Workshop Wednesday: Clothespins

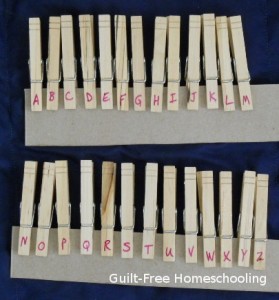
Clothespins? Yes, ordinary spring-type clothespins can be turned into some pretty snazzy manipulatives and still be pressed into laundry duty as needed. I used a Sharpie permanent marker to write on the “business end” of each clothespin. See the entire alphabet? (click on photos to enlarge)

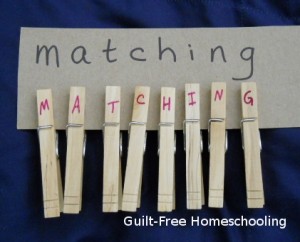
I made my clothespins with upper case letters. Your students can practice matching them up with their lower case “little brothers” on flashcards, even homemade ones like this piece of cereal box cardboard.

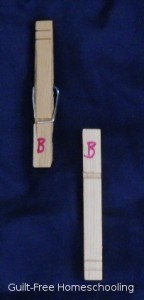
Did you notice that the first pic had the clothespins facing one way and the next pic had the clothespins facing the other way? Good for you—you’re very observant! I wrote the letters on both sides of the clothespins, carefully facing them in opposite directions, so that the pins could be used either up or down. Here’s one pin I took apart, so you can see both sides at once.

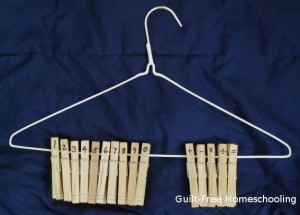
I repeated this trick with numbers and arithmetic operation symbols. These are clipped onto a wire hanger to spark your imagination with more ideas for use!

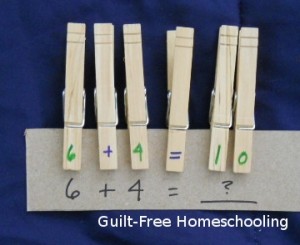
And here’s a quick math problem with clothespins:

You can make multiple sets of letters and numbers with these low-cost, multi-purpose manipulatives. Let your early learners sort the letters in alphabetical order or clip the clothespin letters onto matching flashcards, letter tiles, or the title words on their favorite storybooks. Use the pins for phonics practice, challenge your students to form their spelling words, or leave silly messages on the clothesline. Bring a different tactile dimension to math lessons by letting the littles sort the numbers in order, combine pins for multiple-digit numbers, or include the operation symbols for writing out math problems. Best of all, these manipulatives can do double duty on laundry day, and your students will get plenty of stealth learning practice when they sort the pins out again for lessons!

For more fun, combine these with:
ABC Flashcards
What Is the Missing Element?
Letter & Number Recognition
 

Workshop Wednesday: Hopscotch – A Powerful Learning Game

Who knew that a patch of concrete, some chalk, and a couple of rocks could produce a fun way to learn just about anything? When I was a little girl, I played hopscotch in the traditional way, tossing my stone and jumping from square to square, just as a game for practicing my tossing and balancing skills. Hopscotch can also be used as a kinesthetic learning method, involving the big muscles of arms and legs, pumping information through the blood vessels to the brain. I can see many other uses for the basic method of hopscotch, providing a great method for teaching preschoolers, kinesthetic learners, active children, or anyone else who just needs a break from sitting at a table for one more worksheet.

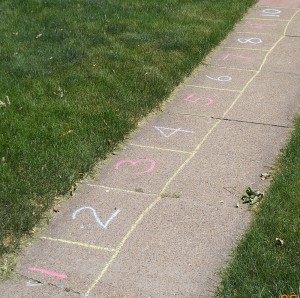
Let’s start by changing the standard hopscotch pattern to a row of 10 squares, numbered from left to right, and let your little ones practice counting as they hop from box to box and back again—tossing a marker stone or beanbag can be used later as their counting skills increase. Do the same thing with a row of ABC’s, first for letter recognition and later for reciting the sounds made by each letter or for a word beginning with that letter. Mom can say a word, and the child can hop to the letter that begins the word. For more advanced students, change the ABC’s to a grid pattern, and try “Twister Spelling” by putting hands and feet in the correct squares to spell the word. Use multiple beanbags, poker chips, or plastic yogurt lids for markers, and challenge your kiddies to spell out words by placing their markers on the correct letter squares.

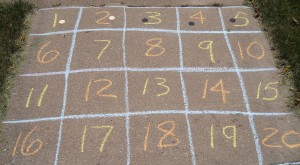
You can also practice addition and subtraction facts with a hopscotch grid. Draw a 1-10 grid by making two rows of five squares each: 1-5, 6-10. Make these boxes large enough for your student to stand in, sort of like a hopscotch game. Start with simple addition problems by asking: If you put down [this many] markers, starting with Box #1 and putting one marker in each box, and then you add [this many] more markers, how many boxes will have markers in them? What is the largest number box that contains a marker? Repeat this activity with as many different number combinations as possible, until your student knows addition facts from 1-10 so well that he cannot be stumped. Then draw two more rows of boxes, extending the grid to 20 (11-15, 16-20), and continue the addition practice with problems up to 20. You can also work on learning doubles in the teens: 5+5=10, 6+6=12, 7+7=14, 8+8=16, 9+9=18, 10+10=20. These facts will help him with problems where the answer is between 10 and 20.

Does one of your students have trouble with subtraction? Using the 1-20 grid, pick a problem that may have stumped your child, like 13-9=? In this example, cover all numbers larger than 13. Ask: If you put down 9 poker chips, with one on each box, starting with 13 and counting down, what is the largest number box that will still be showing? If he’s already experienced at using the 1-20 grid of numbered boxes, he will be able to recognize the row of 6-10 as being 5 boxes. Then he can see that there are 3 boxes for 11-13, so those two rows will use 8 of his 9 poker chips; now he can put the last chip in the largest numbered box in the top row (the 5), and he’s left with 4 as the largest number box still showing: 13-9=4

Another helpful trick is to show your student how to work up or down from 10 when the answer to a problem doesn’t come to him immediately. For example, 13-9=? Let’s see, I know that 10-9=1, and 13 is 3 more than 10, and 3+1=4, so 13-9=4! How about 17-9=? 10-9=1; 17=10+7, and 1+7=8, so 18-9=8! Did you follow that? Children can get discouraged when they don’t know or can’t remember an answer immediately. Showing them several different methods for figuring out the answer helps them to see that they are smart enough to find the answer anyway. Working toward the answer from 10 or from the nearest double is a legitimate method of solving the problem and is actually a better way to learn than just rote memorization, since it uses more creative solving methods.

Are you ready to take this up one more notch? Help your students draw a 1-100 grid (10 rows of 10 squares each, numbered 1-100) and challenge your young mathematicians to toss two beanbags onto the grid and add the resulting numbers. Add more beanbags as their skills increase, or switch to subtraction or multiplication. Use beanbags in different colors (or marked with mathematical operation symbols) for students with appropriate abilities: Color #1 means add this number, Color #2 means subtract this number, Color #3 means multiply by this number, and Color #4 means divide by this number. Use several beanbags for each mathematical operation, drawing them at random from a bucket to create an amazing running math problem. Number squares can be chosen by random tossing or through careful aim. Challenging siblings to toss the beanbags and create problems for each other to solve may result in some serious stretching of math skills! Other possibilities are to toss two beanbags to create a fraction, then simplify it as needed—and more beanbags mean more fractions, which can then be added, subtracted, multiplied, or divided, always reducing the answer to its simplest form. The hopping part of hopscotch doesn’t come into play with this method (unless your kids figure out their own creative way to use it), but the tossing and retrieving of beanbags will still give your wiggly kids plenty of action.

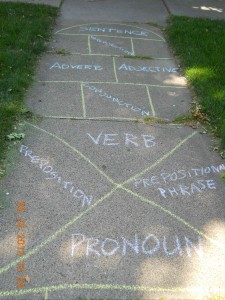
Now you think you’ve heard all of the possible ways to use hopscotch in learning, right? Not at all! Let’s go back to the original hopscotch pattern, but instead of numbering the squares, write in parts of speech: noun, pronoun, verb, adjective, adverb, conjunction, preposition,  prepositional phrase, and interjection.  Hopping through the boxes gives the student a chance to think of a correct example word to give when he stops to pick up his marker. Use more specific terms as your students’ grammar skills increase: irregular verb forms, verb tenses, plurals, reflexive pronouns, dependent clauses, and so on. I included a “sentence” space at the end, and students should make their example sentences match the level of grammar being studied.

If you have a student who is really interested in science, specifically chemistry, and if you have access to a large patch of concrete, consider helping him draw out the periodic table of elements and numbering the squares accordingly. Let him make simple flashcards for each element to fit the boxes on his diagram (cereal boxes are a great source for inexpensive flashcards; write on the back with permanent marker) and practice putting them in their proper places. Flashcards might include the atomic number, the element name and symbol, and the atomic weight. More advanced students may want to include more detailed information and use the jumbo flashcards for memory practice. Other hopscotch applications: a diagram of the solar system would provide practice at naming the planets, a simplified skeleton could be drawn for practice at naming the bones, or a map of the United States (or any geographic area) would provide practice at naming states, capital cities, or other geographic features. Coordinate planes with x- and y-axes provide a large grid for plotting specific points with poker chips. Students of advanced math can solve complex equations, plot the points from multiple solutions, and draw the curves with yarn or string.

Any of these hopscotch learning games may also be drawn with permanent markers on an old, discarded sheet or tablecloth (check local thrift stores), resulting in a reusable “game board” that can be folded up and stored between uses. Use the cloth on grass, carpeting, or other surfaces where it is less likely to slip underfoot. Beanbags aren’t required, but the “marking stone” needs to be something that won’t roll away when tossed—or blow away if used outdoors.

If the weather isn’t cooperating for outdoor activities, or if you don’t have a suitable surface for chalk, or even if your students are just not excited about going outside and jumping around where anyone in the neighborhood might see them, these activities can also be done indoors by using masking tape or sticky-notes on the floor. You can even draw the grids on a large sheet of paper and use coins or game pawns as markers.

See also:
What Is the Missing Element?
Building Blocks for Success in Math
Beanbags (No-Sew DIY)

Workshop Wednesday: Sugar Cube Math, Part 2

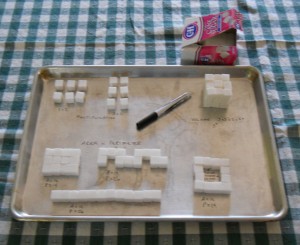
This topic has been explained in a previous post, but now we can supplement that with a photo. See the complete post HERE for detailed activities to make math understandable in such a fun way that it will prompt you and your kids to call it “SWEET!”

Notice that several activities are demonstrated in the picture: multiplication (upper left), showing that 2 rows of 3 cubes each is equal to 3 rows of 2 cubes each; volume (upper right), showing 3 layers of 3 rows with 3 cubes each, or 3x3x3; and the differences between area and perimeter (bottom). The four groups of sugar cubes at the bottom each contain 12 sugar cubes, so they all have an area of 12 units. However, the varying configurations show how the perimeter changes drastically. With the far right configuration, the sides in the middle hole could be counted as part of the perimeter, too, depending on the real-life application (e.g. if you were installing a fence along the sides of a trail, and the cubes represented the trail).

BONUS TIPS:
1) I wrote right on the cookie sheet with a dry erase marker and wiped it off with a tissue (but I did wash the pan well before putting it away).
2) The sugar cube activities can also be drawn on graph paper to save as a reference or worksheet.

See also:
Sugar Cube Math
What Is the Missing Element?
Building Blocks for Success in Math
Looking for the “Hard Part”
Why Does Math Class Take SO LONG?

Workshop Wednesday: Pipe Cleaners

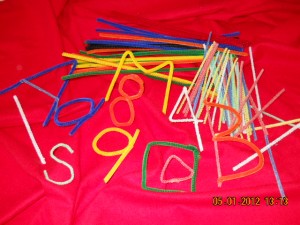
A supply of pipe cleaners, also called chenille sticks, in various sizes and colors provides a great quiet-time activity that will keep almost any child busy for a good, long time. For teaching purposes, pipe cleaners can be formed into a variety of shapes as versatile manipulatives for your tactile students who need to get their hands on something to be able to learn it. The activities listed below can be used interchangeably for letters, numbers, or geometric shapes. Some students may need to try just a few of these activities, while others may want to try all of them… repeatedly.

Bonus tip: It helps to store the pipe cleaners in a shoebox or other container that is large enough to hold several of your students’ artistic creations! You can also take pictures of the more complex creations, enabling the student to dismantle the project and straighten out the pipe cleaners for their next use, while still saving proof of his hard work and imaginative designs.

• Challenge an early learner to duplicate the letters made by Mom or an older sibling.

• Use multiple pipe cleaners to make bigger letters. Using several colors can help younger students recognize the various components of each letter as the separate pencil strokes required to write it.

• Make multiples of each letter in various colors and sizes, and then play a matching game by grouping all the matching letters together. Students can also match pipe cleaner letters to other sets of letters: magnetic letters, letter tiles from games, flashcards, ABC books, etc.

• Match upper & lower case letters together as big brother/little brother pairs.

• Make letters to match those shown on letter tiles from games or on letter flashcards (even home-made). Shuffle cards and place stack face down, turning up the top card for the challenge letter, or put letter tiles in a clean sock or paper bag, then draw one tile at random for the challenge letter.

• Another version of the letter challenge game is to make the opposite case letter of the challenge card or tile. If a flashcard shows a lower case letter, challenge the student to make the upper case version of that letter; if a letter tile shows an upper case letter, make its lower case counterpart.

• Show how flipping a lower case “b” can transform it into a “d,” “p,” or “q” to help children learn to differentiate between the letters. The same principal works for turning a lower case “n” over to become a “u,” or turning an upper case “M” over to look like a “W.” Demonstrating that certain letters do have similar shapes can help children understand which is which and be certain they are using the correct one.

• Twist the ends of several pipe cleaners together to make a long line of pipe cleaners and bend it into the shape of cursive letters or entire words in cursive script.

• FEEL the letters blind-folded or with eyes closed (no peeking!) and try to identify them correctly. This can be tricky if the letter is held upside down or backwards, but turning it over and all around will help students learn to identify and distinguish between similarly-shaped letters. Some students may enjoy the challenge of trying to identify letters that are purposely positioned upside-down or backwards.

• Challenge students to “reproduce this pattern” of geometric shapes, numbers, or letters, even repeating the same colors used. This same activity works well for teaching pattern recognition when stringing beads, but mistakes can be corrected more simply in this version by moving a few pieces around, instead of un-stringing the entire project, and can therefore be less stressful for a sensitive student.

• Numbers made from pipe cleaners can be used to illustrate early math problems in a fuzzy, tactile way, providing a helpful transition between the “counting beans” stage and doing written problems.

• Lay a sheet of paper over any flat pipe cleaner creation and rub across the paper with the side of a crayon to create a “rubbing” image of the letter, number, or shape.

See also:
ABC Flashcards
Letter and Number Recognition

Workshop Wednesday: Play Money

Time to head for the game closet and dig out some play money! This stuff is a fabulous tactile learning tool that can be used for much more than just collecting $200 for passing “GO.” Use play money to practice counting by 1’s or skip-counting (by 5’s, 10’s, 100’s, etc.)with the littles,  demonstrate place value and the substitution needed for arithmetic with the middles (borrowing, carrying, trading, regrouping, swapping, bundling, or whatever you choose to call it in your lessons), practice making change, or discuss money management with the olders. You can get more creative and challenge your students to grab a handful of play money and calculate the amount, then write out the amount in both digits and words. Some of you may take up the challenge to grab several random amounts and use those for addition, subtraction, multiplication, or division problems. Here’s another challenge: let your students make up their own story problems for random amounts of play money—they’ll be getting math practice and writing practice at the same time.

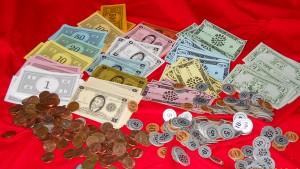
If you have several games that contain play money, pull it all out and pool it together: sorting by denomination is good math practice. As seen in the picture, not all games use the same denominations, so your students can learn to adapt their math practice to the supplies that are available. I even threw in a large handful of real pennies from the coin can that serves as a doorstop here—if you have a coin can or jar, you might want to borrow some of its contents for a little more math practice. (My kids paid much closer attention to math discussions if the problems involved money or food instead of just meaningless numbers!) When the math lesson is over, let the kiddies continue sorting and counting the play money: setting up a pretend “store” is great “stealth” learning! Maybe they’d like to invent a new game that uses all this play money, plus several other random pieces from a few games. Setting up the game instructions offers writing practice, determining the rules is problem-solving practice, and playing the game will give even more practice in counting, adding, subtracting, making change, and whatever other math skills their new game includes. When the time comes, sorting all those game bits and play money back into their respective games is excellent experience for the sorting required in algebra and other higher math studies, and it gets the kids involved in putting things away, instead of leaving all the clean-up to Mom.

For more tips, see also:
Building Blocks for Success in Math
Sorting Toys Is Algebra
Gee Whiz! Quiz

Workshop Wednesday: Building Blocks for Success in Math

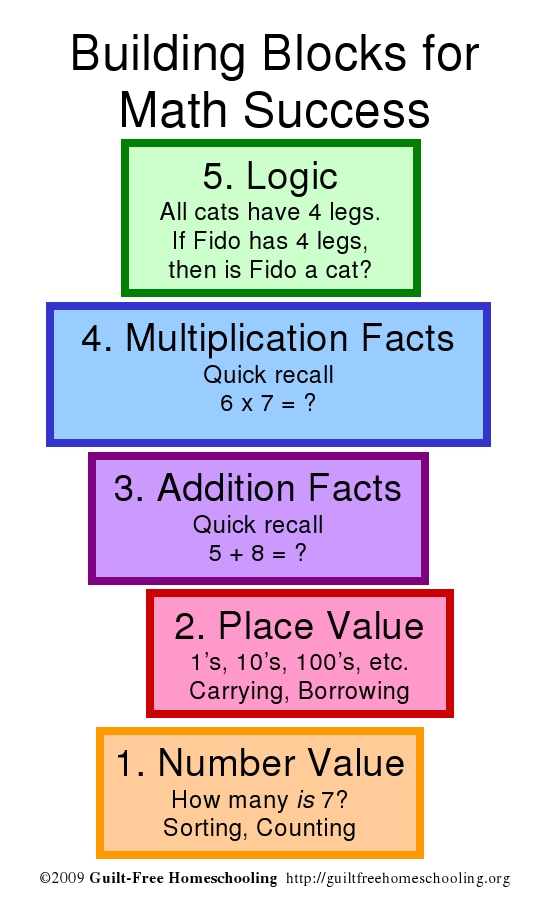
Math is called a foundational subject for good reason: if you don’t have a solid foundation, anything you try to build on top of it is in danger of falling apart. Math is also called a sequential subject, meaning that math skills must be mastered in sequence, each skill building on the skills before it. This picture represents my view of math skills and the order in which they should be mastered, starting at the bottom and building up, one skill upon another.

No one starts teaching math by instructing their preschoolers in differential calculus. The first math skill we teach is Sorting: Which ones match? Is this one like that one? We may start the sorting process with colors or shapes, but Sorting is still the basic skill being learned. Sorting is the #1 most important math skill, used from recognizing number value to solving the most complex equations. Counting is an extension of sorting, assigning a number name to each different quantity. We “know our numbers” when we can group the correct quantity of pieces to represent any given number. We have mastered counting when we can recite the quantities in ascending order. The ability to count backwards is preparation for further skills yet to come.

Place Value might be considered to be an extension of Sorting by placing 1-digit numbers together in one group, 2-digit numbers as another group, yet another with 3-digit numbers, 4-digits, and so on. Children who are learning to count past 10 are learning place value, even though they are not yet adding or subtracting large enough quantities to require carrying or borrowing. Those skills work hand-in-hand with addition and subtraction, but an understanding of place value has to come first. Using a large quantity of identical small manipulatives, such as toothpicks, you can demonstrate the quantities represented by numbers in the ones column and numbers in the tens column to show how and why we write numbers the way we do. As your student gains skill with addition, you can revisit Place Value to demonstrate carrying into the tens, hundreds, thousands, and as many columns as your child wishes to add.

The next natural step after Place Value is Addition. Your child may already be using his counting skills to inform you that since he already has 1 cookie, if you would just give him 2 more cookies, then he would have 3 cookies! He may not recognize 1+2=3 on paper, but he certainly understands cookie quantities! Addition facts are best learned through using real-life objects, manipulatives, or even diagrams, rather than just expecting a young mathematician to transfer immediately to written problems. Hands-on practice makes subtraction easily evident as the un-doing process for addition, thereby taking away the stigma that subtraction is yet another new skill to learn. If a student knows addition facts to the point of quick recall, that same student will be able to perform subtraction. Therefore, a student who struggles with subtraction is a student who has not mastered addition facts.

Multiplication is often presented as one more new skill to master, but when presented as a “short-cut” to repeated addition, the student will see multiplication facts as a convenient tool, not as an obstacle to further learning. Multiplication facts can be demonstrated with a large quantity of small manipulatives that can be grouped into repeated rows (½” squares of heavy paper or cardboard work very well). Some quantities of manipulatives can be rearranged to show various factors which result in the same amount, such as 1×12, 2×6, 3×4, 4×3, 6×2, and 12×1. Grouping and regrouping the manipulatives will give your student a deeper understanding of multiplication facts as he sees the groups (visual), arranges them with his own fingers (tactile), and repeats the facts aloud (auditory). A kinesthetic learner will prefer standing or kneeling to do this activity, providing yet another sensory element.

Why isn’t Division listed in these Building Blocks? Simply because Division is un-doing Multiplication, just as Subtraction is the un-doing of Addition. The only tricky part to Division is that sometimes things don’t come out completely even, and we get “left-overs”—but every child who has tried to share 5 cookies with 3 friends understands that concept already. Division uses the quick recall skills for multiplication facts to regroup as evenly as possible, and the “left-overs” will be dealt with in more detail later on as these skills progress even further into the concepts called fractions and decimals. By the way, fractions, decimals, and percents are all “nicknames” for the same amounts—they are just different ways of looking at the same quantities, such as ½, .5, and 50%, and those all mean that you and I are sharing equal amounts of the same cookie!

The final Math Building Block to be mastered is Logic. Logic means making sense of things, so they come out right. Logic may come in the form of “If/Then” statements, such as the block in the picture shows: If all cats have 4 legs, and Fido has 4 legs, does that then mean that Fido must be a cat? Fido might be a cat, but we also know that other animals besides cats have 4 legs, so we cannot assume that Fido is a cat until we have more information. That is logic: using information to prove a point, but sometimes you realize that you don’t have enough information yet, and the point you prove could be wrong. Another use of logic is in balancing equations. A very simplified example is 7-2=5; if we add 2 to each side, we’ll see 7-2+2=5+2 or 7=7, a true statement. What we do to one side of an equation must also be done to the other side to keep it balanced, as if the equals sign was the pivot point on a balancing scale.

If your student is struggling with any of these building block skills, back up and practice the previous block’s skills until they are mastered. Recall of these facts should come as easily as a reflex action before the student is ready to move on successfully to the next building block. Don’t worry that other students may be moving ahead already—they may not be ready either, and their “progress” will soon result in more struggles. Remember that a student who cannot do division does not know multiplication facts well enough. A student who struggles with multiplication does not know addition facts well enough, and neither does the student who struggles with subtraction. A student who has trouble with addition does not understand place value or number values well enough. Success in math is achieved by mastering skills in sequence and building a solid foundation with each skill before attempting more challenging skills.

For more tips, see also:
Looking for the “Hard Part”
Why Does Math Class Take SO LONG?

Workshop Wednesday: Dot-to-Dot Skip-Counting

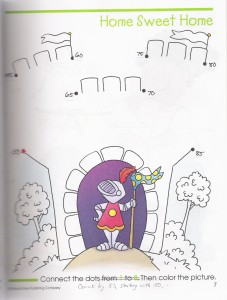
I bought a dot-to-dot coloring book, which was much harder to find than I had anticipated (this one is from School Zone Publishing). Their pictures only used numbers from 1-25, so I dug out some small white stickers, grabbed my scissors and a black fine-point Sharpie, and went to work. I cut the stickers into pieces small enough to cover the numbers on the picture and re-numbered the drawing using skip-counting. Sometimes the pictures are complicated enough that it’s important to only do one number at a time (cover previous number with a sticker, write new number on the sticker, then move on to next number), just so you don’t lose your place and mess up the whole thing. With more complex drawings, my stickers sometimes overlapped the lines of the picture, so I just re-connected those lines, drawing right across the sticker.

Click on photo for larger image.

I changed the directions at the bottom of the page to correspond to the new, improved numbering system: Count by 2’s; Count by 3’s; Count by 10’s; Count by 12’s; and so on. I made the skip-counting harder as the difficulty of the pictures progressed. To make things even more challenging, I changed some of the directions to say “Start at 3. Guess the rule?” so that the pictures didn’t always begin at 1 and the student would have to analyze the numbers to determine which one came next. I made some pictures start at 2, 3, 4, 5, 50, 55, 101, etc. and vary in increments. Some pages counted by 2’s on even numbers; some counted by 2’s on odd numbers. Some counted by 5’s, 10’s, or 100’s—a wide variety of skip-counting experiences.

Skip-counting is good practice for multiplication, and following the numbers of a dot-to-dot puzzle helps your students learn what interval comes next by connecting them in numerical order. The complexity of the numbering system quickly overtakes the simplicity of the picture, providing a worthy challenge to math students who might feel silly doing the simple dot-to-dot coloring page in its original version. Following the random order of the numbers on the page provides more interest and more challenge than if the student had just written out a skip-counting series, and the student can easily self-check his work by judging whether or not the picture has been completed correctly.

BONUS TIP: After you’ve gone to all the trouble of changing the numbers, wouldn’t it be nice to have this last longer than once-through-and-done by your little smarty-pants student? Cut the pages out of the book, slip a page into a plastic page protector, and let your child use a dry-erase marker on the plastic. Wet-erase markers (also called “transparency markers”) will work great, too, and they don’t rub off instantly whenever a stray sleeve crosses the page. A quick wipe with a wet tissue will clean up wet-erase markers and prepare the page for the next use. You could even use enough plastic page sleeves to hold all the pages from the entire coloring book and put them all into a 3-ring binder. Give your child the binder, some markers in assorted colors, and a couple of tissues, and you won’t hear from him for a very long time!

Verified by MonsterInsights