Workshop Wednesday: Math Measuring Tape

Do you have a child who needs to see things for himself in order to understand lesson concepts? Have you used math manipulative blocks but he’s still just not quite getting it? Here’s a unique idea for a powerful math tool that you can make yourself from simple graph paper. By making a special measuring tape that exactly corresponds to the size of whatever math manipulatives you use, your students will have a customized tactile and visual learning aid.

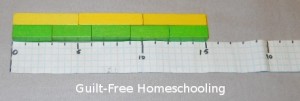
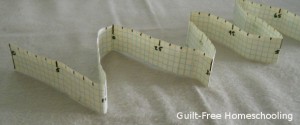
Cut 1 or 2 sheets of graph paper into 1-inch wide strips and tape them together for the length you desire (make sure that no strips end in a partial square). Graph paper marked with five squares per inch (available in office supply stores) is compatible with the centimeter-scale Cuisenaire Rods that we used: 2 graph-squares = 1 centimeter, so marking numbers on every other line produces a centimeter measuring tape. (Yes, centimeter graph paper would have been easier to use, but I couldn’t find any in my area — so I improvised!)

To illustrate skip-counting by 2′s, accordion-fold the tape on every other number, and then say (auditory) the number for each fold-increment. Adapt and repeat for other skip-counting intervals. (The measuring tape in the photo only has numbers at intervals of 5, but feel free to write on as many numbers as your children need.)

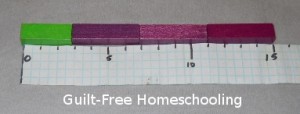
Your students can lay Cuisenaire Rods on the tape to demonstrate addition & subtraction facts. Arranging different length rods to equal the same total (1+5, 2+4, 3+3, etc.) helps them see by yet another method that different numbers can add up to the same total. The measuring tape becomes a learning aid for memorizing facts as your kids line up blocks or rods on it and see the resulting numbers.

Repeat the same process for multiplication & division facts: 3×5, 5×3 — both measure to 15.

This method can also help students understand uneven division problems. For 15 divided by 4, start placing 4-rods at the 15 and filling in backwards toward 0, but fill in the gap with a “remainder” rod, in this case a 3-rod fits as the remainder.

We used this measuring tape by itself to illustrate multiplication and division facts by accordion-folding the paper tape into 6 sections of 8 centimeters to show 6 x 8 = 48 and other facts. My origami-loving son really enjoyed this foldable number line, and he would take a few seconds during a math problem to fold it back and forth, just to be certain of his answers.

The measuring tape can also be used as your kids run around the house, measuring everything in sight (kinesthetic) for practice at measuring and estimating how large certain objects will be, according to the scale used by your math manipulatives. For instance, my sofa may be 86″ long, but measuring it with a centimeter scale makes it 215 centimeters. My kids liked the challenge of guessing how many centimeters first, then measuring an object to confirm the answer. This is also a great way to compare inches and centimeters, and they can use a ruler, yardstick, or measuring tape in inches to confirm their answers.

If you use another form of math manipulatives other than Cuisenaire Rods, you can adapt the size of the measuring intervals on this homemade tape to coordinate with your own manipulatives.  Graph paper with 4 squares per inch (1/4″ squares) can be marked for 1/2″, 3/4″, or 1-inch manipulatives. Remember the sofa we talked about above? It would be almost 115 connecting cubes long, when measured according to a scale for these 3/4″ cubes.

P.S. — We stored our measuring tape neatly by folding it up and using a large paper clip to hold it in place. ;-)
Workshop Wednesday: Patterns

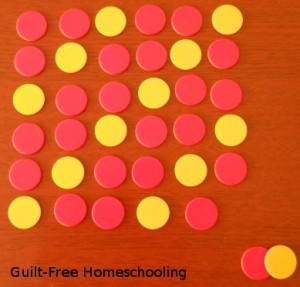
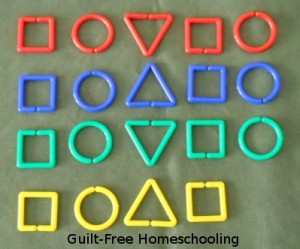
Patterns are everywhere! Patterns can be small, large, or in-between. Patterns can be simple or complex. Recognizing patterns is a fundamental math skill that we use everyday, from sunrise and sunset to left and right shoes. Patterns are not just what keeps the peanut butter on the inside of our sandwiches, they are also what makes life fun and interesting. Let’s explore some designs, just to see if we can spot the patterns (hold your cursor over each picture for a hint). Looking for patterns sharpens your visual skills!


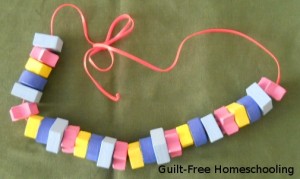
Create a simple pattern of colors or shapes using game pieces, beads, coins, buttons, or anything suitable you have on hand, and challenge your students to repeat it. Beginners may need a little help with recognizing what makes the pattern, analyzing when and how it repeats, and the logic of what comes next, but they will catch on quickly. Some students may repeat a pattern accurately the first time, but may not catch a mistake if they are repeating it multiple times. Help them learn to check their own work for errors.

Anne Sullivan taught Helen Keller using this method and stringing beads.

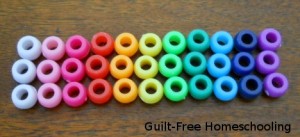
Beads can be strung in patterns on yarn, ribbon, shoestrings, leather boot laces, fishing line, pipe cleaners, toothpicks, etc. Use large wooden beads, plastic pony beads, Hama beads, tiny glass beads, etc. Slice pool noodles into jumbo beads to string onto heavy wire, garden hose, or a yardstick. Start a pattern, and let your kids finish it — or let them challenge themselves or each other in making patterns.
We make patterns when we set the table with plates and silverware. We make patterns when we match up socks in the laundry. We make patterns with our footprints when we walk through sand or snow.  Pattern recognition can be applied to all phases of life, from lining up toy trucks to analyzing when a machine can be expected to break down from wear. Yes, that’s another application of patterns! And now, just for fun, watch this crazy video from Weird Al, all about PATTERNS!  Want to grab some graph paper and colored pencils and make more patterns?

See also:
What Is the Missing Element?
100-Grids and flashcard Bingo

Workshop Wednesday: Letter or Number Manipulatives (DIY)

Have you ever found yourself wishing you had a whole big bunch of fancy-schmancy letter or number manipulatives to help your struggling learner? Well, don’t move, because you’re about to learn how to make them inexpensively for yourself!

A child who has difficulty learning letters or phonics patterns, identifying syllables, spelling words, or reading will usually benefit from using letter manipulatives, something he can move around and re-position himself. The struggling student might be any age, so using letter tiles is helpful for older students who already know the letters but struggle in spelling or syllable divisions.

Number manipulatives are helpful for the student who struggles with math, as are extra tiles with math operation symbols, to use them in building and solving equations. It’s one thing to use math cubes to illustrate 3 + 2 = 5, but it’s another thing entirely to use number tiles to solve 3 + 2 = 4 + y.

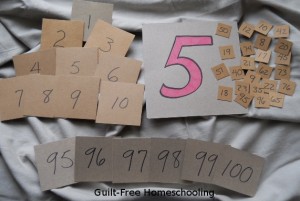
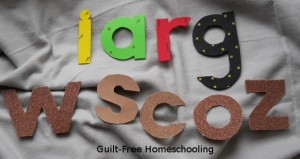
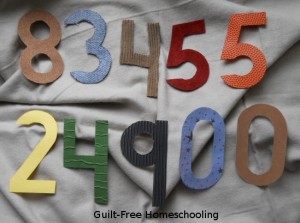
It’s fairly easy to cut out letter or number shapes by enlarging a simple font to super-size status, about 3″ tall (or around 350 points) on your computer’s word processor. Experiment to find a font you like, enlarge the letters or numbers, then print them on cardstock and cut out. These shapes can also be used as templates for making cut-out letters or numbers from materials that can’t be put through a computer printer, or to get more letters or numbers from a single sheet of paper.

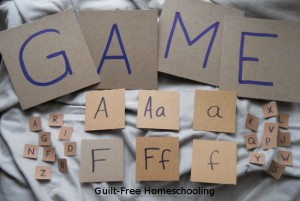
Squares or rectangles can be turned into cards or tiles by writing the letters or numbers on them with a Sharpie marker. I have used cardstock, sandpaper, and cereal box cardboard for these with great success. The sandpaper adds a nice tactile element for kids whose learning styles appreciate more texture. I have varied the sizes, depending on the age of the kids using them and the application they will fulfill — 6″ squares are great for matching games on the floor, but 1″ squares work great as tabletop tiles for spelling practice. We had a few hundred small letter tiles made from cardstock, which were great for building a list of spelling words.

For students who are just learning their letters, I highly recommend starting with upper case letters first, then once the student knows them without mistakes, introducing the lower case letters as the “little brothers” of the upper case. This results in less confusion and fewer possibilities for reversals.

These cut-out letter shapes are wonderful tools for teaching and learning recognition, matching, phonics, spelling, syllables, and so on, whether by themselves or in combination with cards, tiles, and a variety of sizes and font styles (especially helpful for learning to recognize all the different appearances letters can have). You could even make some in the exact same size and shape as the letter tiles from a Scrabble or Bananagrams game and combine them all for even more learning fun!

I have made letter and number shapes and cards from these materials:

  • Sandpaper (fine to medium texture works best)
  • Craft foam
  • Textured fabrics (corduroy, vinyl, fleece, denim, etc.)
  • Cardboard (including cereal boxes), poster board, etc.
  • Cardstock
  • Textured scrapbooking paper

Bonus Tips:

  • Sometimes I needed to glue an identical shape of cardstock or cardboard to the backs of some flimsy materials for stability and durability, especially with cloth or thin paper.
  • Wood or foam cut-outs can sometimes be found with craft supplies for a quicker start.
  • It can also be helpful to decorate the front side and/or bottom edge of letters and numbers to help kids learn to orient them correctly (even a line drawn with a marker can be enough to discern top from bottom or front from back).

Letter Activities:

  • Matching — sort lots of different letter shapes, tiles, and cards into separate piles for each letter. Alphabetizing — mix up one set of letters (A-Z) and put them into alphabetical order.
  • Phonics Practice — use letters to make short words (2-3 letters) and practice reading their sounds in order to read the words. Change one consonant and read again; repeat. Ditto for changing the vowel. Repeat for longer words as skills increase.
  • Spelling practice — use your supply of letter manipulatives to build spelling or vocabulary words. Add as many words as possible that use the same phonics patterns.
  • Syllables — build a vocabulary word, then scoot the letters apart to divide the word into its proper syllables. Compare to the dictionary entry to self-check.

Number Activities:

  • Matching — sort lots of different number shapes, tiles, and cards into separate piles for each number.
  • Numerical order — mix up a set of numbers (0-9 or 1-10) and put them into numerical order.
  • Number value — match the appropriate number shapes, tiles, and cards with the dots on dice or dominoes.
  • Double-digit numbers — combine digits to make teens, twenties, etc. and practice reading them. Ditto for three-digit numbers and beyond.
  • Arithmetic practice — build arithmetic problems using the number shapes, tiles, cards, and operation symbols, and put the correct numbers in place for the answers.
  • More operations — be sure to make some commas, decimal points, fraction bars, dollar & cent signs, percent signs, and anything else your student will encounter in his math lessons.


For more activity ideas, see also (in any order):

ABC Flashcards

Building Blocks for Success in Spelling

Building Blocks for Success in Math

“Stealth Learning” Through Free Play

What Is the Missing Element?

Letter & Number Recognition

Tactile Learners

Workshop Wednesday: Tactile Card Holders, Version 2

Based on last week’s Tactile Card Holders, Version 1, this week’s version uses a few different supplies to create a similar product.

Equipment:
Cereal box cardboard
Photo corners for index cards
Glue (optional)

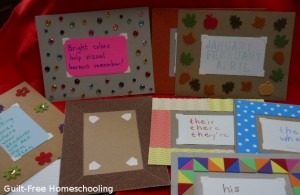
Yes, we are breaking out our old friends, the cereal boxes, to make yet another great learning tool. I cut the cardboard into pieces larger than my index cards and attached self-stick photo-corners in the middle for the index cards. You can use 3×5″ or 4×6″ index cards, depending on what you have available and how much information will be put onto the cards. Then I decorated the surrounding “border” with whatever was available (1 “theme” per card), using glue to attach the things that weren’t already self-stick.

Edges decorated with:
Ribbon
Sequins
Craft foam/felt stickers & shapes
Sandpaper
Acrylic rhinestones/gems
Textured papers

The examples in the picture show photo corners without an index card inserted, along with a few examples of spelling rules. As in last week’s article, these card holders can be especially helpful for older students who are trying to memorize more complicated information and formulas. Once learned, the note cards can be easily switched with new cards for studying new facts. The border textures work by appealing to tactile fingers and giving them something to focus on while the eyes are busy reading the facts on the cards. Later on, when the mind tries to remember the facts, the textures, patterns, and colors from the borders of each card holder will serve as markers on a virtual road map to help the brain find those facts and pull them up into view. Students who have had trouble memorizing dull, dry facts in the past will find these note card holders add some pizazz to the process and actually help stimulate their memories.

The borders of these card holders will offer even more tactile interest than the ones from last week that simply had their edges trimmed with special scissors. My favorites among these have to be the cards with sandpaper borders — I made several of those, each with a different level of coarseness. Satin ribbons offer a smoother texture, but grosgrain ribbon is different yet. I also found some wonderful textured papers at a scrapbooking supplies store to expand the variety of textures and visual appeal. Other cards had their borders adorned with thick felt stickers, craft foam shapes, acrylic “gems,” and other crafty materials to add texture and color. Let these examples spark your imagination and see what you can come up with!

Workshop Wednesday: Tactile Card Holders, Version 1

Sometimes certain facts work well for studying from homemade flashcards. However, some students just don’t do well with trying to learn from ordinary index cards. Today, we’re going to make those cards extraordinary! These card holders will work especially well for teens who are trying to learn complicated facts and formulas, but who need some extra learning methods thrown in.

Equipment:
Index cards to hold the facts or information
Bright colored card stock
Razor knife for cutting slits
Scrapbooking scissors for trimming edges

How To:
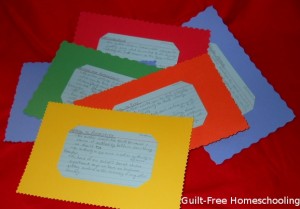
I started with 8 1/2″ x 11″ sheets of brightly colored card stock and cut them in half to make two pieces 5″ x 8 1/2″. Lay an index card in the middle of each of these sheets and mark about 1/2″ from each corner. Use the razor knife to cut angled slits (connecting the marks you just made) for the corners of the index cards. You don’t need to get the cards exactly centered or the slits angled perfectly; if you have a student who is fanatical about precision, give this job to him. Either 3×5″ or 4×6″ index cards will work, depending on what size you have on hand or how much info will be put on each card. The bright colors add visual interest to the boring facts (did I just say boring? oops), and colored index cards can do the same thing (the ones in the photo are light blue, but white cards work just fine). Just be careful that the colors don’t clash or create such a visual disturbance that no one can stand to look at them!

I had a variety of scrapbooking scissors available, so I trimmed the edges of the card holders, using a different pattern on each card. If you only have one or two fancy scissors (or even just a pair of pinking shears), that will still work. You could even use regular scissors and just cut some wavy or zig-zaggy edges. The idea here is to create a little bit of tactile interest for the fingers that will be holding the cards.

As your student studies the facts on each card, the bright color of the card holder will become a visual cue to those facts, and the tactile edge will do the same for his fingers. Reading the card information aloud lets the student say and hear the info, important methods for auditory learning — and when he stops reading aloud, he’ll catch himself wandering off-topic. The large size of these card holders makes them more of a kinesthetic learning tool than just small index cards are. The colors, edge textures, size, and reading aloud will all provide memory keys that his brain can rely on when trying to remember the facts on each card. Hmm… that card was in a red holder… I was holding it with both hands… the edges were pointy… I remember hearing myself say these points over and over… I know — it said THIS!

By inserting the index card’s corners into slits, the holder becomes reusable. When this set of facts has been learned and the student is ready to move on to learning different information, the index card can easily be slipped out and another inserted in its place. Make as many card holders as needed, but if possible, trim the edges of like colors with different patterns to make them different (notice that the 2 blue card holders in the photo have different edge patterns).

The cards shown here are for fallacies of reasoning, but you can use this method for learning vocabulary words, their spelling, and meanings; math or science formulas; historical events or people; or anything else that needs to be memorized.

Also see Tactile Card Holders, Version 2 for more ideas!

Workshop Wednesday: The Moving Answer Worksheet

Addition facts are not tricky; they are merely a short-cut to counting from one number to a higher number. Subtraction is not a difficult procedure; subtraction is just un-doing addition. When taught together, addition and subtraction become different ways of looking at the same problem. Children often get the impression that addition is one skill, and subtraction is a completely different skill. They are not different skills, they are just different methods of looking at the same facts. It’s the same principle as if you and I were holding several pencils, but I give you a pencil, and then you give me a pencil. We can trade pencils back and forth for as long as we want, but we are still holding the same total number of pencils.

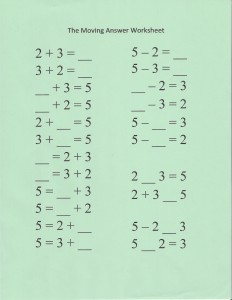
When my kids got stumped on variations of the same math fact (is 2+3 different from 3+2?), I created a simple worksheet to show them how to see those variations as always being the same statement, no matter what form it took. I rearranged the numbers in every way possible, and I moved the answer blank around to different locations, too. By completing this short worksheet, my kids learned to see the statement as a whole, instead of seeing each variation of it as a completely different problem. By combining the addition and subtraction variations of the same math fact, my kids caught on quickly to the idea that those particular numbers always went together, whether adding or subtracting.

Some math teachers and some math programs only place the answer blank at the extreme right end of each problem at this stage. Some students who experience this consistency can become incredibly confused when they are eventually presented with a problem that has the answer blank in a different location. Learning to relate to each set of facts as a completed puzzle helps students identify which piece of the puzzle is missing, and the many variations possible in this worksheet will prepare students for later math (such as algebra) when the answer blanks shift around to different positions within the problems.

Notice how this method was extended in a few examples to include the arithmetic symbols, as well as the numbers, such as in 2 ___ 3 = 5. Obviously, a plus sign belongs in that space, since 2 and 3 must be added to equal 5. It’s obvious to you and me, because we’ve been doing this for so many years, but to a youngster just learning arithmetic, it’s not quite as apparent, and a little discovery is good for the brain cells.

This principle can also be applied to multiplication and division facts, as division is simply the un-doing of multiplication. The stage of learning the facts is a good time to combine these skills, since there are no remainders yet.

The worksheets don’t have to be fancy at all — a handwritten version is just as valid as a computer printed one, but handwriting will probably be much faster and easier to produce. Stick to one set of numbers for each worksheet, but include all the possible variations. Your students will catch on quickly!

Use other learning style methods along with this visual worksheet. Auditory learners will benefit from discussing the patterns in the problems and will appreciate a chance to answer orally. It helps to connect learning styles if you encourage them to write their answers in the blanks after giving the correct oral answer. Do any of the following activities with your auditory learner, but talk about what you’re doing and read the problems aloud, or let him talk aloud to himself. Background music is also helpful for auditory students who need it as “white noise” to drown out other noises and help them concentrate, so keep the iPod and headphones handy! If you have any other students nearby who are not auditory learners, they may appreciate being allowed to do their work in another part of the house — my visual/tactile daughter did a lot of lessons quietly in her bedroom while her auditory brother and I discussed his work in the kitchen.

Tactile learners can use manipulatives to help solve these problems, such as small blocks or dry beans. The same group of objects can be used for the entire worksheet by rearranging them to fit each of the various problems. Other helpful items may be individual cereal-box cardboard “flashcards” for each number and arithmetic symbol–students can arrange and rearrange them to see which piece of the puzzle is missing. Tactile learners need to keep their fingers and hands involved during the lesson, so use whatever materials you have available to make that happen, even if that means making the worksheets large enough to hold numbers formed from Play-Doh on each answer blank!

Kinesthetic learners work well with large-scale manipulatives, such as sports balls arranged in groups in the back yard to fit the problems. You can adapt tactile manipulative, table-top methods for kinesthetic learners by making things large enough that they will be using the big muscles of arms and legs instead of just fingers to move items around. Another good kinesthetic learning method is to write large problems on a whiteboard or chalkboard, or use a slick-finish white shower curtain liner as a giant piece of paper on the floor and write on it with wet-erase markers (or use Post-It notes for the answers). Chalk on the sidewalk or driveway is another good stand-by for over-sized writing projects, but don’t forget that your kinesthetic student will also respond well to doing standard worksheets if he can lie on his tummy on the floor to do them! Any method that keeps those big muscles active is a kinesthetic method, so if you want your student sitting quietly in a chair, it’s not a kinesthetic lesson.

Whatever your students’ learning styles may be, it should be their goal to learn how to learn through every style. Therefore, using a few of the above ideas for each student in whatever lessons you do will increase their ability to learn through other styles and increase their overall understanding. Besides that, variety just makes the learning that much more fun!

Workshop Wednesday: 100-Grids and Flashcard Bingo

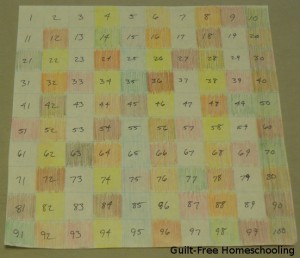
A 100-grid is another marvelous teaching and learning tool that can be made in numerous fun ways. A standard 100-grid contains the numbers from 1 to 100 (too obvious?) in ten rows of ten squares each, 1-10 in the top row, then 11-20 in the second row, and so on.

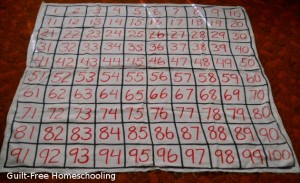
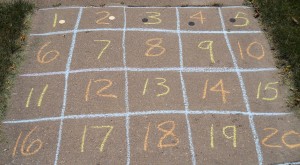
Draw the grid on the driveway with chalk; your kids may also get Dad’s permission to draw it on the garage floor if they promise to sweep it clean again when they’re done. I drew a 100-grid on an old tablecloth (you can also use an old bedsheet) with permanent markers for a reusable, storable, portable, floor-cloth version. These grids are big enough for your kinesthetic learners to hop around on for hopscotch-style, action learning!

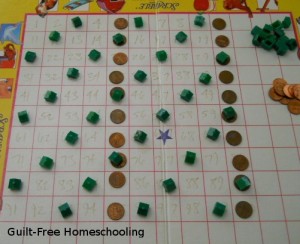
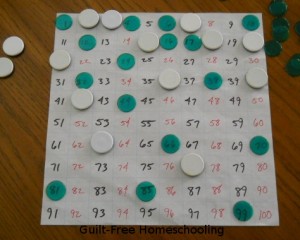
Draw a smaller 100-grid on paper or cover the blank-grid side of a Scrabble Junior game board with clear Con-Tact paper (to make it washable & more durable) and fill in the numbers with either wet-erase or dry-erase markers. These versions are more tactile, since your students can use game pawns, pennies, or dry beans for marking number squares in learning activities.

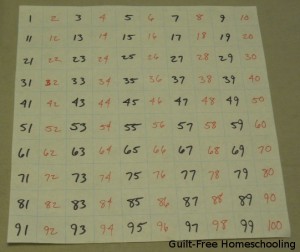
Add a visual learning element to your 100-grid activities by alternating colors of the numbers. To skip-count by 2’s, write the odd numbers in one color and the even numbers in another color. To skip-count by 3’s, use one color for the multiples of 3 and another color for all the other numbers. If you want to do this activity many times for many multiples, write all the numbers out in one color, then place a colored marker on the appropriate skip-counting intervals.

Do you have an auditory learner? Challenge him to say the numbers aloud while hopping or jumping from number to number, or while placing markers on the correct squares.

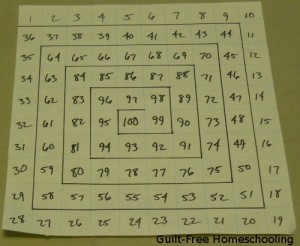
Try varying the arrangement of the numbers in your grid for some interesting game play. If you have a Chutes and Ladders game, you can see one simple variation of our grid — it starts in the lower left corner and zig-zags back and forth to the top. For another game board variation, start with 1 at an outer corner and spiral the numbers in toward the central 100 square–but you might want to outline the path to make it easier to follow.

For a very simple game to practice math skills using these novelty grids, remove the face cards from a normal deck of playing cards and use the remaining “math deck” for an addition game. Let each player select a pawn and set it just off the grid near the 1 square; on his turn, each player will turn up a card from the deck and move his pawn that many spaces. The first player to reach 100 wins that round. For more advanced play, let the black cards represent positive numbers (adding, or moving forward) and let the red cards represent negative numbers (subtracting, or moving backward).

Another amazing math activity is the “Sieve of Eratosthenes.” This scholar from long, long ago created a fairly simple mathematical process for isolating prime numbers. On a standard 100-grid, have your students cover each multiple of 2, starting after 2 itself, to cover each number that has 2 as one of its factors. Since 2 has only itself and 1 as factors, leave it uncovered; it is a prime number. Now repeat with 3, covering each number after 3 that is a multiple of 3. Continue for 4, 5, 6, 7, 8, and 9. The numbers that are left uncovered are all prime numbers that have no other factors besides themselves and 1. This is fun to do on paper, using colored pencils to color in the squares and using a different color for each round. Starting with a light color and getting a bit darker on each round will show very plainly which numbers have the most factors — they will be very dark when you have finished.

Now for a bonus — here are the instructions for a game I call “Flashcard Bingo,” that is played on a 100-grid.

FLASHCARD BINGO

Equipment:

  • 1-100 chart
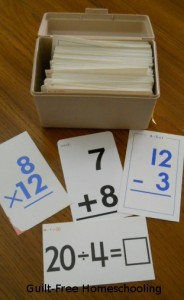
  • Math flashcards–combine addition, subtraction, multiplication, and division flashcards (The combination of cards used should be appropriate to the players’ skills.)
  • Several dozen markers for each player (colored paper squares, pennies, dry beans, etc.). If playing outdoors, larger objects, such as poker chips, can be used as markers.

Shuffle all the flashcards together and place them in an index card file box or other box that will hold all the cards and allow extra room for fingers to draw them out.

Use the honor system for not peeking at the answers if they are printed on the cards, or have players draw & hold cards for each other, covering answers as needed.

The first player draws a card at random and gives the answer to the problem. If he gives the correct answer, the player puts his marker on the answer number’s square on the 100-grid. If the card has two different problems on front & back, he may look at both problems and choose either side of the card for strategy: if the player already has possession of the square for that card’s answer, he may choose to answer the problem on the opposite side.

If the player gives an incorrect answer, the next player gets a chance to answer correctly and “steal” the square. If the second player cannot answer correctly, each player in turn is given a chance to answer and steal the square with the correct answer. The player giving the correct answer may not be holding the flashcard or may not have seen the answer on the flashcard.

At the end of a player’s turn, his card is returned to a random location in the box. Play proceeds to the left of the player who drew that card, even if he answered incorrectly, and even if the player who gave the correct answer is the next player in the circle.

If a player’s answer number is already covered by another player’s marker, the new player may “bump” the occupying player’s marker off the grid and place his own marker on the square, or the player may opt to take another card instead of bumping the occupying player’s marker.

If the player already has possession of the squares for both sides of the card, he may announce that he will combine both answers as desired (adding, subtracting, multiplying, or dividing) to achieve a hard-to-reach number square, such as prime numbers or large numbers. Paper & pencil may be permitted, but not calculators. If a player draws a flashcard with a correct answer of 0 or an answer larger than 100, and he is not able to combine the answers from both sides of the card, he may opt to draw again. There is no limit to how many cards a player can draw, as long as he already owns the squares representing the answers to the cards drawn, but he must use the first available square.

Winner is the first player to get 5 markers in a straight row, vertically, horizontally, or diagonally.

Advanced Option: Add a game die for another challenge. Players roll the die on each turn and add, subtract, multiply, or divide that number into the answer on the flashcard to determine which square to occupy on the grid.

Discussion Question: As your students play this game, ask them if they notice which part of the grid accumulates the most markers and if they can explain why that happens.

Younger Players Option—

Use only addition & subtraction facts from 1-20. Play on a 20-grid with 4 rows of 5 squares each (1-5, 6-10, 11-15, 16-20). Winner is the first player to get 4 markers in a straight row in any direction, vertically, horizontally, or diagonally.

For more ideas, see also:
Applying Learning Styles with Skip-Counting
Hopscotch–A Powerful Learning Game

Verified by MonsterInsights