Addition facts are not tricky; they are merely a short-cut to counting from one number to a higher number. Subtraction is not a difficult procedure; subtraction is just un-doing addition. When taught together, addition and subtraction become different ways of looking at the same problem. Children often get the impression that addition is one skill, and subtraction is a completely different skill. They are not different skills, they are just different methods of looking at the same facts. It’s the same principle as if you and I were holding several pencils, but I give you a pencil, and then you give me a pencil. We can trade pencils back and forth for as long as we want, but we are still holding the same total number of pencils.
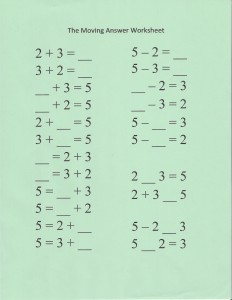
When my kids got stumped on variations of the same math fact (is 2+3 different from 3+2?), I created a simple worksheet to show them how to see those variations as always being the same statement, no matter what form it took. I rearranged the numbers in every way possible, and I moved the answer blank around to different locations, too. By completing this short worksheet, my kids learned to see the statement as a whole, instead of seeing each variation of it as a completely different problem. By combining the addition and subtraction variations of the same math fact, my kids caught on quickly to the idea that those particular numbers always went together, whether adding or subtracting.
Some math teachers and some math programs only place the answer blank at the extreme right end of each problem at this stage. Some students who experience this consistency can become incredibly confused when they are eventually presented with a problem that has the answer blank in a different location. Learning to relate to each set of facts as a completed puzzle helps students identify which piece of the puzzle is missing, and the many variations possible in this worksheet will prepare students for later math (such as algebra) when the answer blanks shift around to different positions within the problems.
Notice how this method was extended in a few examples to include the arithmetic symbols, as well as the numbers, such as in 2 ___ 3 = 5. Obviously, a plus sign belongs in that space, since 2 and 3 must be added to equal 5. It’s obvious to you and me, because we’ve been doing this for so many years, but to a youngster just learning arithmetic, it’s not quite as apparent, and a little discovery is good for the brain cells.
This principle can also be applied to multiplication and division facts, as division is simply the un-doing of multiplication. The stage of learning the facts is a good time to combine these skills, since there are no remainders yet.
The worksheets don’t have to be fancy at all — a handwritten version is just as valid as a computer printed one, but handwriting will probably be much faster and easier to produce. Stick to one set of numbers for each worksheet, but include all the possible variations. Your students will catch on quickly!
Use other learning style methods along with this visual worksheet. Auditory learners will benefit from discussing the patterns in the problems and will appreciate a chance to answer orally. It helps to connect learning styles if you encourage them to write their answers in the blanks after giving the correct oral answer. Do any of the following activities with your auditory learner, but talk about what you’re doing and read the problems aloud, or let him talk aloud to himself. Background music is also helpful for auditory students who need it as “white noise” to drown out other noises and help them concentrate, so keep the iPod and headphones handy! If you have any other students nearby who are not auditory learners, they may appreciate being allowed to do their work in another part of the house — my visual/tactile daughter did a lot of lessons quietly in her bedroom while her auditory brother and I discussed his work in the kitchen.
Tactile learners can use manipulatives to help solve these problems, such as small blocks or dry beans. The same group of objects can be used for the entire worksheet by rearranging them to fit each of the various problems. Other helpful items may be individual cereal-box cardboard “flashcards” for each number and arithmetic symbol–students can arrange and rearrange them to see which piece of the puzzle is missing. Tactile learners need to keep their fingers and hands involved during the lesson, so use whatever materials you have available to make that happen, even if that means making the worksheets large enough to hold numbers formed from Play-Doh on each answer blank!
Kinesthetic learners work well with large-scale manipulatives, such as sports balls arranged in groups in the back yard to fit the problems. You can adapt tactile manipulative, table-top methods for kinesthetic learners by making things large enough that they will be using the big muscles of arms and legs instead of just fingers to move items around. Another good kinesthetic learning method is to write large problems on a whiteboard or chalkboard, or use a slick-finish white shower curtain liner as a giant piece of paper on the floor and write on it with wet-erase markers (or use Post-It notes for the answers). Chalk on the sidewalk or driveway is another good stand-by for over-sized writing projects, but don’t forget that your kinesthetic student will also respond well to doing standard worksheets if he can lie on his tummy on the floor to do them! Any method that keeps those big muscles active is a kinesthetic method, so if you want your student sitting quietly in a chair, it’s not a kinesthetic lesson.
Whatever your students’ learning styles may be, it should be their goal to learn how to learn through every style. Therefore, using a few of the above ideas for each student in whatever lessons you do will increase their ability to learn through other styles and increase their overall understanding. Besides that, variety just makes the learning that much more fun!


 Guilt-Free Homeschooling is the creation of Carolyn Morrison and her daughter, Jennifer Leonhard. After serious disappointments with public school, Carolyn spent the next 11 years homeschooling her two children, from elementary to high school graduation and college admission. Refusing to force new homeschooling families to re-invent the wheel, Carolyn and Jennifer now share their encouragement, support, tips, and tricks, filling their blog with "all the answers we were looking for as a new-to-homeschooling family" and making this website a valuable resource for parents, not just a daily journal. Guilt-Free Homeschooling -- Equipping Parents for Homeschooling Success!

Speak Your Mind