My daughter had an interesting exercise in her college chemistry lab which we modified for use at home and again later for a group science class. It is a lesson in using experimentation to make a hypothesis (first guess) and then prove whether or not that theory is correct. These directions tell how we adapted it for a co-op class with two dozen 7-12th graders. If you want to do it at home for only 1 or 2 students, you will obviously only need one set of Mystery Boxes.
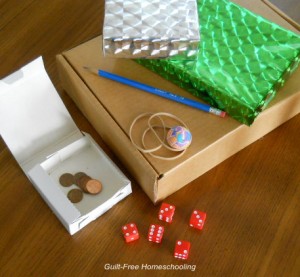
Matching Mystery Boxes were prepared in advance for each team of students: an item or group of matching items were placed into a cardboard box that was large enough to allow the items to roll around freely. (Sizes and shapes of boxes may differ, and the contents may vary in quantity to increase difficulty for advanced students.) The box edges were taped shut, and each box was marked with an identifying number. Teams of 4-6 students were each given a set of six boxes to test, and the students were instructed to use the Scientific Method to determine what was inside each box.
When a student picked up a box, he wrote down the number of the box and his hypothesis of what he thought might be inside, then proceeded to tip, shake, rattle, and listen to prove or disprove his theory and make a conclusion. Each box was passed around to teammates to see if they all came to the same conclusion. When each team had completed its series of several boxes, the boxes were opened to reveal their true contents. Teams were to be as certain as possible of their determinations and not show the contents to other teams. Sample items used in the Mystery Boxes were paper clips, a pencil, marbles, coins, or a large eraser (only one type of item per box). You may choose to use items that are more difficult for older students: several cotton swabs, large rubber bands, pencils in one box and pens in another, a spoon, etc.
The items should be common to everyone, but they are in uncommon circumstances, making them surprisingly tricky to identify. Do we really notice the differences in sounds made by coins and paper clips? How can I determine if the object in this box is a pencil or a pen? Why does the object in this box roll easily this way but seems to slide that way? A delicate touch is needed to tip the box slightly and make a pencil roll slowly enough to hear its six sides or discern its eraser end from the pointed lead end; extreme concentration is required for hearing a few large rubber bands slide softly across their box.
Tips for the Mystery Boxes lesson:
— All Mystery Boxes should be prepared in advance by the teacher so that students have no clue what is inside.
— Objects should be ordinary, common objects, familiar to students.
— Use only one type of item in each box (i.e. do not mix pencils and pens in the same box).
— Objects should roll, slide, or move easily if shaken. Do not use a single tissue, cotton ball, or similar (relatively weightless) object which cannot be sensed in the box.
— Boxes should be large enough to allow objects to roll or slide freely: front to back, side to side, up and down.
— Boxes should be securely sealed to prevent objects from falling out or students from peeking in.
— Multiple items should be used if a single item alone will not have enough identifiable characteristics (a single coin will not be as effective as multiple coins).
— When preparing boxes for a large group class, separate the group into teams and have duplicate sets of boxes so that each team works on the same items. Number the boxes and keep a (hidden) list of their contents to prevent confusion. (All boxes marked #1 contain pencils, all #2 boxes contain rubber bands, etc.)
— Various sizes and shapes of boxes will keep team members focused on their own boxes: “Our #1 box is large and flat, while their #1 box is smaller and taller; they probably don’t contain the same things.” The order of testing the boxes is up to each team: they do not have to proceed in numerical order.
— A set of six boxes (per team) kept each team of five to six students busy for an hour testing, comparing, and discussing. When a team declared that they knew what was in a specific box, I did not lie about the contents, but slyly asked, “Are you sure?” to keep them reasoning and retesting for a longer time.
— I did not tell students what types of items to expect; they were told only “common, everyday objects.” Students had to use their own knowledge to decide what was inside.
— Students must depend on hearing alone (cannot see or feel box contents). Tipping and shaking each box is acceptable, but squeezing or crushing the box to feel its contents is not permitted.
— Thinking skills become better developed as this exercise progresses. Students should test all boxes, and then go through them again, using the knowledge gained throughout the testing process in retesting each box.
— Students may compare the characteristics of boxes with each other (i.e. this box sounds more like coins than that box does).
— Provide paper and pencils for students to write down their hypotheses, reasoning, and conclusions. This is the essential portion of the lesson: learning how to write down their process of experimentation. Students may use their own notebooks, or you may choose to make form-style “lab sheets,” but writing down the process changes this from an entertaining party game into a profitable science lesson.
[For more information on cooperative classes and group activities, visit Topical Index: Co-op Groups.]


 Guilt-Free Homeschooling is the creation of Carolyn Morrison and her daughter, Jennifer Leonhard. After serious disappointments with public school, Carolyn spent the next 11 years homeschooling her two children, from elementary to high school graduation and college admission. Refusing to force new homeschooling families to re-invent the wheel, Carolyn and Jennifer now share their encouragement, support, tips, and tricks, filling their blog with "all the answers we were looking for as a new-to-homeschooling family" and making this website a valuable resource for parents, not just a daily journal. Guilt-Free Homeschooling -- Equipping Parents for Homeschooling Success!

Recent Comments