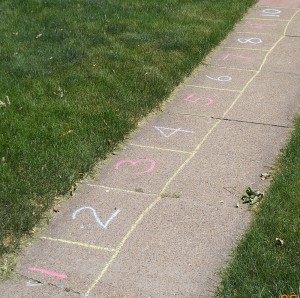
Who knew that a patch of concrete, some chalk, and a couple of rocks could produce a fun way to learn just about anything? When I was a little girl, I played hopscotch in the traditional way, tossing my stone and jumping from square to square, just as a game for practicing my tossing and balancing skills. Hopscotch can also be used as a kinesthetic learning method, involving the big muscles of arms and legs, pumping information through the blood vessels to the brain. I can see many other uses for the basic method of hopscotch, providing a great method for teaching preschoolers, kinesthetic learners, active children, or anyone else who just needs a break from sitting at a table for one more worksheet.
Let’s start by changing the standard hopscotch pattern to a row of 10 squares, numbered from left to right, and let your little ones practice counting as they hop from box to box and back again—tossing a marker stone or beanbag can be used later as their counting skills increase. Do the same thing with a row of ABC’s, first for letter recognition and later for reciting the sounds made by each letter or for a word beginning with that letter. Mom can say a word, and the child can hop to the letter that begins the word. For more advanced students, change the ABC’s to a grid pattern, and try “Twister Spelling” by putting hands and feet in the correct squares to spell the word. Use multiple beanbags, poker chips, or plastic yogurt lids for markers, and challenge your kiddies to spell out words by placing their markers on the correct letter squares.
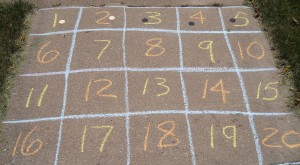
You can also practice addition and subtraction facts with a hopscotch grid. Draw a 1-10 grid by making two rows of five squares each: 1-5, 6-10. Make these boxes large enough for your student to stand in, sort of like a hopscotch game. Start with simple addition problems by asking: If you put down [this many] markers, starting with Box #1 and putting one marker in each box, and then you add [this many] more markers, how many boxes will have markers in them? What is the largest number box that contains a marker? Repeat this activity with as many different number combinations as possible, until your student knows addition facts from 1-10 so well that he cannot be stumped. Then draw two more rows of boxes, extending the grid to 20 (11-15, 16-20), and continue the addition practice with problems up to 20. You can also work on learning doubles in the teens: 5+5=10, 6+6=12, 7+7=14, 8+8=16, 9+9=18, 10+10=20. These facts will help him with problems where the answer is between 10 and 20.
Does one of your students have trouble with subtraction? Using the 1-20 grid, pick a problem that may have stumped your child, like 13-9=? In this example, cover all numbers larger than 13. Ask: If you put down 9 poker chips, with one on each box, starting with 13 and counting down, what is the largest number box that will still be showing? If he’s already experienced at using the 1-20 grid of numbered boxes, he will be able to recognize the row of 6-10 as being 5 boxes. Then he can see that there are 3 boxes for 11-13, so those two rows will use 8 of his 9 poker chips; now he can put the last chip in the largest numbered box in the top row (the 5), and he’s left with 4 as the largest number box still showing: 13-9=4
Another helpful trick is to show your student how to work up or down from 10 when the answer to a problem doesn’t come to him immediately. For example, 13-9=? Let’s see, I know that 10-9=1, and 13 is 3 more than 10, and 3+1=4, so 13-9=4! How about 17-9=? 10-9=1; 17=10+7, and 1+7=8, so 18-9=8! Did you follow that? Children can get discouraged when they don’t know or can’t remember an answer immediately. Showing them several different methods for figuring out the answer helps them to see that they are smart enough to find the answer anyway. Working toward the answer from 10 or from the nearest double is a legitimate method of solving the problem and is actually a better way to learn than just rote memorization, since it uses more creative solving methods.
Are you ready to take this up one more notch? Help your students draw a 1-100 grid (10 rows of 10 squares each, numbered 1-100) and challenge your young mathematicians to toss two beanbags onto the grid and add the resulting numbers. Add more beanbags as their skills increase, or switch to subtraction or multiplication. Use beanbags in different colors (or marked with mathematical operation symbols) for students with appropriate abilities: Color #1 means add this number, Color #2 means subtract this number, Color #3 means multiply by this number, and Color #4 means divide by this number. Use several beanbags for each mathematical operation, drawing them at random from a bucket to create an amazing running math problem. Number squares can be chosen by random tossing or through careful aim. Challenging siblings to toss the beanbags and create problems for each other to solve may result in some serious stretching of math skills! Other possibilities are to toss two beanbags to create a fraction, then simplify it as needed—and more beanbags mean more fractions, which can then be added, subtracted, multiplied, or divided, always reducing the answer to its simplest form. The hopping part of hopscotch doesn’t come into play with this method (unless your kids figure out their own creative way to use it), but the tossing and retrieving of beanbags will still give your wiggly kids plenty of action.
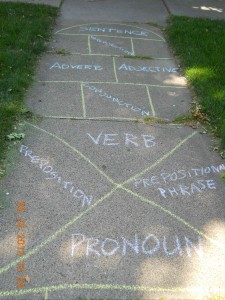
Now you think you’ve heard all of the possible ways to use hopscotch in learning, right? Not at all! Let’s go back to the original hopscotch pattern, but instead of numbering the squares, write in parts of speech: noun, pronoun, verb, adjective, adverb, conjunction, preposition, prepositional phrase, and interjection. Hopping through the boxes gives the student a chance to think of a correct example word to give when he stops to pick up his marker. Use more specific terms as your students’ grammar skills increase: irregular verb forms, verb tenses, plurals, reflexive pronouns, dependent clauses, and so on. I included a “sentence” space at the end, and students should make their example sentences match the level of grammar being studied.
If you have a student who is really interested in science, specifically chemistry, and if you have access to a large patch of concrete, consider helping him draw out the periodic table of elements and numbering the squares accordingly. Let him make simple flashcards for each element to fit the boxes on his diagram (cereal boxes are a great source for inexpensive flashcards; write on the back with permanent marker) and practice putting them in their proper places. Flashcards might include the atomic number, the element name and symbol, and the atomic weight. More advanced students may want to include more detailed information and use the jumbo flashcards for memory practice. Other hopscotch applications: a diagram of the solar system would provide practice at naming the planets, a simplified skeleton could be drawn for practice at naming the bones, or a map of the United States (or any geographic area) would provide practice at naming states, capital cities, or other geographic features. Coordinate planes with x- and y-axes provide a large grid for plotting specific points with poker chips. Students of advanced math can solve complex equations, plot the points from multiple solutions, and draw the curves with yarn or string.
Any of these hopscotch learning games may also be drawn with permanent markers on an old, discarded sheet or tablecloth (check local thrift stores), resulting in a reusable “game board” that can be folded up and stored between uses. Use the cloth on grass, carpeting, or other surfaces where it is less likely to slip underfoot. Beanbags aren’t required, but the “marking stone” needs to be something that won’t roll away when tossed—or blow away if used outdoors.
If the weather isn’t cooperating for outdoor activities, or if you don’t have a suitable surface for chalk, or even if your students are just not excited about going outside and jumping around where anyone in the neighborhood might see them, these activities can also be done indoors by using masking tape or sticky-notes on the floor. You can even draw the grids on a large sheet of paper and use coins or game pawns as markers.
See also:
What Is the Missing Element?
Building Blocks for Success in Math
Beanbags (No-Sew DIY)

 Guilt-Free Homeschooling is the creation of Carolyn Morrison and her daughter, Jennifer Leonhard. After serious disappointments with public school, Carolyn spent the next 11 years homeschooling her two children, from elementary to high school graduation and college admission. Refusing to force new homeschooling families to re-invent the wheel, Carolyn and Jennifer now share their encouragement, support, tips, and tricks, filling their blog with "all the answers we were looking for as a new-to-homeschooling family" and making this website a valuable resource for parents, not just a daily journal. Guilt-Free Homeschooling -- Equipping Parents for Homeschooling Success!

Awesomesauce!!! Stealing this and taking it outside right now!
For me, a new way to see the hopscotch!! Thanks for your ideas. I’ll apply them with my kids in our homeschool. :)