Workshop Wednesday: What Is the Missing Element?

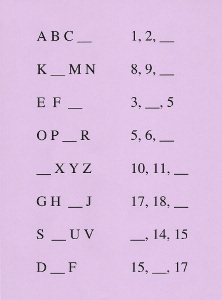
Use this worksheet as an example to make simple Missing Element worksheets for your children. No one should have to stop and sing the Alphabet Song from beginning to end, just to figure out what letter comes after P. The same concept applies to numbers and counting, just without the song. My young kids viewed little worksheets like this as a fun challenge. After a little practice, they could do these orally, asking “What letter comes after V?” any time we had a few seconds to fill: while standing in line at the store, waiting for a red light, any waiting, anywhere. It kept them mentally active, which made the waiting much more bearable for them. I used the same process for numbers, asking “What number comes after 19?” and similar questions. The worksheet itself is a visual method; the oral question and answer exercise is an auditory method.

These are good mental exercises for those students who already know letters and numbers, but who don’t automatically recognize a short segment of the longer series. This is also a good skill to build into those youngsters who are just mastering the ABC’s and counting—notice that I said mastering, not initially learning.

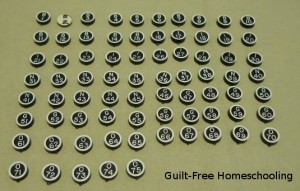
For those students who need a more tactile application, let them match alphabet blocks or letter tiles to the challenges on the worksheet, filling in the gap with the appropriate letter on a block or tile. Number tiles can be used to create the number challenges, using multiple tiles to produce multiple-digit numbers. Borrow letter or number tiles from games, or make your own by cutting 1-inch squares from cereal box cardboard and marking with a Sharpie on the plain side.

Be sure to allow your students plenty of free-play time with the Missing Element exercise, as they will be sure to want to challenge each other (or you) with more examples. When a child continually quizzes you for the answer, give the correct answer each time, knowing that he is learning from your consistent responses. When you are confident that he really does know the correct answer, you can give the wrong answer with a questioning tone of voice or say “Is it K?” to see if he will correct you!

For a young kinesthetic learner, spread out the letter or number series on the floor using Post-It notes or flashcards and let the child hop on each one as he reads them off and shouts out the missing element as he hops into the gap. Another method for energetic children is to have flashcards for the series in one room and extra flashcards for the missing element in another room. Challenge your little Tigger to run, hop, or somersault into the other room to search for the correct card(s) to bring back and fill in the gap in the series.

Combining all of these learning style methods will give your students practice at using more than just their preferred style of learning, which helps them gain a better understanding while also broadening their experiences. As your students get older and expand their knowledge base, you can adapt this Missing Element concept for other academic pursuits as well.
Workshop Wednesday: Dominoes Make Great Tactile “Flashcards”

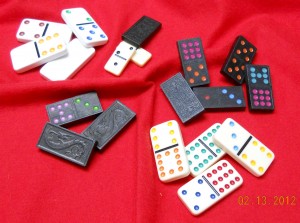
Wouldn’t it be wonderful to have a single set of simple math learning aids that could help your students learn everything from basic number values to fractions, decimals, and percentages? It already exists, and you may even own a set: dominoes. Ordinary flashcards appeal to the student who learns best through visual means: seeing and reading. Saying the flashcard facts aloud will work best with the student who learns well through auditory means: hearing and saying. For the student whose fingers must connect with the lesson in a tangible way for him to truly lock the facts away in the deep recesses of his mind, dominoes make ideal flashcards!

Dominoes make great tactile “flashcards”!

Dominoes are wonderfully tactile, whether they are the smooth, heavy plastic ones that look like imitation ivory or the pressed wood versions with a decorative design embossed on the back side. The dots are usually carved out, and the depressions are filled with bright colors of paint. There is also usually some physical attribute serving as a divider between the two halves of the domino, either a carved or embossed line. All of these features work together to provide textural interest to the fingers that get to hold them – much more interesting than flat, boring, cardstock flashcards. Flipping through a stack of thin cards is one thing; stacking up dominoes, as one masters the facts they represent, is quite another thing. Dominoes appeal to many senses and learning styles with their bright colors, heavy thickness, and the wonderful sound they make as they clink together.

Let’s look at the wide variety of math exercises, from beginner level to more advanced skills, that can be performed with a set of dominoes.

Number Value

Count the spots. Say the number, or write the number. Repeat as needed for practice until the student knows how many seven is and can identify a group of dots with the appropriate number. Substitute a matching number of candies, blocks, or toy cars for the dots and repeat the counting exercise until the student understands that numbers can apply to more than just small colored dots in orderly patterns. Once the student has mastered the number relating to each distinct pattern of dots, arrange the same number of objects in different patterns to show that each number can occur in various types of groupings (e.g. four objects in a straight line is still four, even though they do not form a square, as on the domino).

Smaller v. Larger

When the student understands the principle of assigning values to digits, that same student can begin to differentiate smaller groups from larger groups. Since each domino conveniently displays two number groupings, use them to practice smaller v. larger numbers: help the student decide which group of dots represents the smaller number and turn that side to be on the left, leaving the larger number group on the right side. Repeat as needed for practice until the student can tell at a glance which number is smaller and which number is larger. Practice saying the numbers and deciding which is smaller and which is larger, and then count the dots, if necessary, for confirmation.

Two-Digit Numbers

Once again, each domino represents two digits. Help the student learn to read and write the two-digit numbers shown on each domino’s face. For example, if a domino shows a two and a six, that domino may be read as 26 or as 62. Dominoes that have no dots on one side can be read as a one-digit number and a two-digit number (e.g. 3 and 30). The smaller v. larger exercise can then be repeated with these two-digit numbers.

Addition

Students can begin simple addition problems by adding the two numbers represented on a domino and then counting the total of all dots for confirmation.

Subtraction

By holding a domino vertically with the larger number on top and the smaller number on the bottom, the student can begin learning to write and perform subtraction problems. More advanced students, who have learned the concepts of positive and negative numbers, can reverse the domino, placing the smaller number on top, and proceed with the subtraction exercise.

Multiplication

Dominoes can be used as multiplication flashcards by attempting to multiply the two numbers represented. If the student is unsure of an answer, it is advisable to consult a reference chart for the correct answer, rather than merely guess. Seeing the correct answer time after time will help the student memorize it by sight, and the student will eventually trust his memory instead of taking the time to look at the chart for the answer. (A calculator may also be used to check answers, but pressing a wrong button can deceive the student into believing a wrong answer.)

Division

Holding the dominoes horizontally can represent the numbers in a division problem. The student can write those numbers down on paper to practice dividing. The beginning student should only divide small numbers into larger numbers, until his knowledge of decimals allows him to practice dividing larger numbers into smaller numbers.

Manipulatives

Turn the dominoes face-down, so the dots are not visible. Practice counting, adding, and subtracting. Subtraction is merely undoing the addition process, and this can be easily illustrated by grouping and re-grouping the dominoes. Arrange groups of dominoes into rows to illustrate multiplication facts, and discuss how dividing is just undoing multiplication, but sometimes with leftovers called “the remainder.”

Fractions: Proper & Improper, Simplifying

Holding a domino vertically, the two numbers can represent the numerator (top) and denominator (bottom) of a fraction. Proper fractions always have the larger number in the denominator, while improper fractions always have the larger number in the numerator and can be simplified into a mixed number fraction. When reading the domino as a fraction, the student can decide if the fraction can be simplified and what that new fraction should be. Advanced students may select two dominoes and attempt to add them together as fractions, converting them to common denominators as needed. Subtraction, multiplying, and dividing fractions may also be practiced by selecting random dominoes to use as the fractions in each problem. Students should always be encouraged to write math problems in a notebook — when needed for reference, the student can easily look back at his previous work to see how he solved similar problems.

Fraction, Decimal, & Percentage Equivalents

Students with a working knowledge of fractions may move on to the decimal equivalents of fractions. Percentages are another form of fractions. Fraction, decimal, percentage, and ratio can all be thought of as “nicknames” for equivalent amounts. Arranging face-down dominoes to illustrate the problem, writing out the problems, and drawing diagrams will all help the students understand how the amounts are equivalent. Then the student may wish to use face-up dominoes as flashcards again, using the two numbers shown as a fraction and determining the decimal and percentage equivalents.

Perimeter, Area, & Volume

Using the dominoes face-up, a student can build “fences” to illustrate perimeter, or the distance around the outside of a specific shape. Count only the edges of each domino, and count each half of the long sides as a separate unit: a domino at a corner would count as 3 units: one for the short end on one side of the corner, and two along the long side of the domino on the other side of the corner. Filling in that shape solidly with “floor tiles” relates to the concept of area. Again, count each half of a domino (each separate section of dots) as one “floor tile.” Stacking multiple layers of dominoes can illustrate the 3-dimensional concept of volume. For example, an area represented by two rows of three dominoes each will contain six dominoes. Stack up several identical layers to show that each layer contains six dominoes. Multiply the area of six times the number of layers to determine the total number of dominoes used.

Play Domino Games

What better way to show that math is valuable in everyday life than to play a game of dominoes? Advanced players might enjoy the competitive element of keeping score, but those playing just for the fun of the game can proceed more quickly by simply playing their dominoes on the matching numbers and moving on to the next turn. There are a variety of domino games, so expand your knowledge base and learn several.

Line Dominoes Up on Edge for Physical Science Domino Effect

No one should go through life without lining up dominoes in curvy lines or intricate patterns and then gently pushing over the first one in line to watch all the others tumble in turn. Setting up the dominoes on end is good for honing the fine motor skills of small hand muscles — great care must be used to ensure that the dominoes don’t fall too early! Repeat as often as possible and search You-Tube for massive domino displays to enjoy!

How to Adapt Lessons to Fit Your Student’s Interests and Make Learning Come Alive

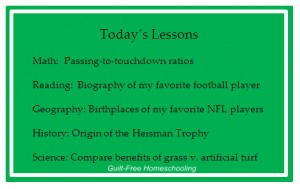
A GFHS reader wrote to me, concerned about her student’s lack of interest in doing homeschool lessons, although he showed a wide capacity for learning and retaining facts about sports. The mom was frustrated as to how to get any actual lessons accomplished, since their days were an endless series of disagreements and strife. This is when out-of-the-box thinking can really pay off. Taking the lessons out of the box and away from the textbooks can make a huge difference and ignite the spark of learning in a “reluctant” learner such as this student. The examples given here will relate to football (this particular child’s passion), but you can easily adapt these ideas to wherever your students’ interests lie.

When a child is keenly interested in football or other sports, that can be used as an “in” for other subjects. For instance, put a map of the USA on a bulletin board and have him stick a pin in the approximate places where his favorite NFL players were born. Then have him place another pin in the city where each player went to college and connect the two pins for each player with a piece of yarn. Suddenly he’ll be up to his elbows in a fascinating research project and geography lesson that doesn’t feel like schoolwork to him at all!

Take this in a slightly different direction by challenging him to do some research on the NFL teams, making a chart showing when each team was founded, where it began, and if or where it has moved. Have some of the teams’ names or colors or mascots changed throughout the years? Now he’s found a history lesson that he can really enjoy! Give him more pins for the map (and a different color of yarn) to show the movements of the teams. A little more research can reveal what important world events coincided with significant team events or crucial games for more history, this time linking football to other events. Find inventions or products that were introduced during the years that match up to his favorite events regarding games, teams, or players, and that can bring in some science lessons. Look at how football uniforms, pads, helmets, and other equipment have changed over the years and why for some more science and history.

Challenge him to research the backgrounds of a few favorite players and write “color commentary” that could be used by a sportscaster, and you’ll have a writing assignment he’ll be eager to do! Challenge him to write his own sports “column” or read and critique the sports columns or blogs by professional sports writers, and he’ll have reading material, comprehension studies, and analytical writing assignments that hold his interest. To round out the language arts lessons, focus on his content first, then work on helping him correct spelling, punctuation, and grammar — always examining the rules for each change, not just criticizing his writing without reasons. He may even learn to spot spelling and grammar errors in the professionals’ columns for an important lesson in why accuracy matters!

Players’ statistics can be analyzed for some practical, real-life applications in math. Calculate the total yards of passing or rushing, the percentage of completed passes, or how a player’s averages have improved or declined over his career. Math practice is math practice, regardless of whether it uses random problems on a worksheet or real-life statistics. When the real-life applications mean something to the student, he will have motivation to complete the work. Learning one fact will spur curiosity to learn more facts, and before long, the student will be knee-deep in new information and hungry for more.

The homeschooling mom mentioned earlier took this advice and began adapting lessons to her son’s interest in football. When his curriculum focused on poetry, they searched the internet for poems about football—and were delighted with their results. One poem prompted a discussion, which led to further studies and more topics. This simple substitution transformed a struggle over a single, uninteresting lesson into a day filled with curiosity, researching, exploring, and learning.

Lessons that are based on real-life interests will combine several academic subjects all at once, rather than following the institutional school model of working on each individual subject for forty minutes before switching to the next unrelated subject for the next forty-minute period. Your student can research a given topic, study and analyze the reading material, pursue more research as to the geography, science, or history related to the topic, perform some math calculations to gain better understanding of the data, create a timeline of events, and express his conclusions and personal opinions in a variety of formats. The analysis of the information is conveyed, whether it takes on the form of a formal essay, a news story, editorial column, a poem, song, or rap, or even a personal journal entry. My own student who was reluctant to read assigned stories outside his field of interest became a voracious reader when the subject matter fed his curiosity. (How many adults would waste valuable time reading things in which they have no interest?) Adapting lessons to your students’ interests teaches those students how to learn from every facet of life and sets them firmly on the path to life-long learning.

See also:
The Value of Supplemental Activities
10 Ways to Improve a Lesson
How Can I Teach Out-of-the-Box Thinking?
Is Learning Limited to Books?
Every Day Is a Learning Day, and Life Is Our Classroom

Why Does Math Class Take SO LONG?

Homeschooling families often have this lament: My child takes f-o-r-e-v-e-r to do math each day! Can anything be done??? Let’s consider for a moment exactly what the student is being asked to do, to see if we can understand why it takes so much time. (Please note: I will use he/him/his as generic pronouns; all of this applies equally to girls and boys.)

Beginning students are learning the fine art of manipulating numbers to learn the processes of adding, subtracting, multiplying, dividing, and learning new number-languages called fractions, decimals, percentages, measurements, and on and on. You, the parent/teacher, are probably performing calculations with a minimum of fifteen to twenty years’ experience, quite likely much more. What seems incredibly plain and simple to you may in reality be incredibly confusing to your student.

Nearly every math lesson will present the student with a new concept, or at least an expansion of a previously learned concept. This means that the student must 1) study the new idea to grasp its meaning, 2) compare this new information to his previous knowledge to see how they relate to each other, 3) experiment with a few sample problems to test out the new concept and prove his understanding of it, 4) proceed to complete the remainder of the lesson’s required problem set, which may include both problems from today’s new concept and problems from previously learned lessons as review material. Steps 1-3 can be prolonged and repeated through discussions with the teacher (you) to insure that the student understands the new material fully. Examples may be drawn on paper, chalkboard, or whiteboard. Manipulatives may be used for grouping and regrouping. Graphs, charts, geometric figures, angles, and other mathematical illustrations may be incorporated. Teaching a math lesson in a way that your student will understand it completely can take time. Once the lesson has been understood, the student must mentally review the concepts again with each problem to make sure he understands the process as he is working his way through all of the day’s assigned problems.

In contrast, a grammar lesson may ask the student to write a sentence using an action verb, and the student looking for shortcuts may respond with “Jim sat.” It has a subject and a verb, it shows action, and it meets all the requirements. However, math requires exactness. There are few, if any, shortcuts to be taken in math. Mathematical calculations have concrete solutions: one and only one answer. Every operation must be exact, every digit must be accurate, and every calculation must be done completely, in order for the outcome to be correct.
4321
+765
___6Wrong. Shortcuts do not work in math.

Some may argue that calculators provide shortcuts, but I will counter that calculators should not be used until higher math, and then only as a time-saving device by the student who is fully capable of doing the work accurately without the aid of a calculator. In the words of my favorite college math teacher, “[Calculators] are stupid. They are machines that can only do exactly what you tell them to do.” The student who accidentally pushes the wrong button will get the wrong answer. I know. I did it. On a final exam. My paper showed that I had executed the problem correctly, but in my haste to complete the problem quickly, I hit the wrong button on a very, very, very simple calculation and achieved the wrong final answer. My gracious teacher gave me partial credit for using the correct process, but his point was made forever that using a calculator does not automatically provide success. Every keystroke must be verified by an alert mind. My haste ruined what would have been a perfect score on my final — disappointing, to say the least.

Back when I was plugging my way through elementary math, I had a teacher who required perfection, not merely correctness. She was a bitter old shrew of a woman who had been encouraged to stay in a classroom long past her prime and had lost all compassion for the children placed under her authoritative control; but I digress. A math problem can be solved correctly without perfectly formed digits or immaculately aligned numbers, and the existence of erasure marks on the paper has little to do with the accuracy (or inaccuracy) of the answers. When my children began doing math problems that included multiple columns of numbers, I bought them spiral notebooks of graph paper to use for their daily assignments. They could write one digit in each quarter-inch box, and the boxes kept the digits perfectly aligned. My students could focus on the place values as they copied the numbers for the problems, and then successfully solve the equation without being sidetracked by wondering if a wayward digit rightfully belonged in the tens’ column or the hundreds’ column.

Math is a sequential subject: each lesson builds upon each lesson before it. If foundational skills have been rushed and are not fully understood, each subsequent lesson will become harder and harder to grasp. Do not push your youngsters to make progress in math simply for the sake of turning pages. Be certain that each student knows what he is doing before allowing him to move on to the next concept. However, many enjoyable games and activities can be used to reinforce math concepts and provide practice with fun — and using math means learning math, even if you are playing a game and having fun.

Let’s focus for a moment on your particular student. Does his learning style allow him to absorb new information easily when he reads it the first time? Or does your student benefit from an oral discussion with you and some Q & A about the subject matter? Perhaps your student is more hands-on and doesn’t really get the concept until he can play with some math manipulatives, moving them around, grouping and regrouping, sorting and re-sorting, counting and recounting? (That’s why they’re called “manipulatives,” by the way, because you can manipulate them.) And let’s not forget that kinesthetic student whose brain goes numb when his seat makes contact with the chair’s seat — he may need to be on his feet, stretching his muscles through every minute of his math lesson, but that physical action guarantees that his brain is revved up and tuned in — not at all what classroom models need you to believe. A student whose learning style is not being utilized will be a student who is easily distracted from the subject at hand. Touch his learning style and you will gain his attention.

One last consideration is the amount of work set forth in your student’s textbook. All textbooks are not created equal, and especially not math texts. The number of problems required with each day’s lesson may change from day to day in certain books, and it will surely change from year to year, but it especially changes from publisher to publisher. When my high school student was using a math textbook that assigned 30 problems per day, her friends’ math textbook from a different publisher assigned 100 problems per day for the same grade level. I repeat: All textbooks are not created equal, and especially not math texts. Our book’s daily 30-problem set offered a variety of problems, using a method of continual review over past concepts. The 100-problems-per-day book offered no such variety: all 100 problems were of the exact same type. Is it any wonder that students can become bored and tired of doing math?

Math does take time. Math will probably be the subject that eats up the largest segment of your homeschool day. However, if your student is sitting idly, hour after hour, staring at a math lesson but not completing it, there are most likely several causes at work.

1) A lack of foundational arithmetic skills. A child who cannot recognize specific digits for their representative amounts cannot perform addition. A child who does not know addition facts cannot perform subtraction or progress on to multiplication. A child who does not know multiplication facts cannot perform division. A child who does not know multiplication facts will not fully understand fractions and, therefore, will also not understand decimals, percentages, or measurements.

2) The student has not understood the lesson concepts or is confused by them. This is often due to the student’s learning style. This is not a disability, just a difference in how each of us takes in and processes information. Some people take in information through their eyes, some through their ears, others through their fingers, and still others through their larger muscles of arms and legs. Seriously. Touch his learning style and you will grab his attention.

3) The textbook may be too aggressive (moving too quickly for the student’s pace) or just plain too boring in how it presents the material. While much of math is often taught through drill, drill, drill, I do not know anyone who would choose to learn anything through repetitive and boring drills if there was a more interesting alternative available.

Allow enough teaching time and a variety of teaching methods to be sure your student understands each lesson concept completely. Allow your student to talk things out, work with manipulatives, or run a lap after every problem to keep his muscles-to-brains connection engaged. Allow your restless student to take breaks while working his math problems, knowing that you, too, would break up a long and tedious task into shorter segments, if it did not hold your rapt attention. Math does take time, but the flexibility of Guilt-Free Homeschooling allows you to conquer it with the methods that work best for your family.

For more tips, see also —

Looking for the “Hard Part”

10 Fun Math Exercises from a BINGO Game

Sugar Cube Math

Alternate Methods for Teaching Math

Topical Index: Math

Topical Index: Learning Styles

10 Ways to Improve a Lesson

Sometimes we all need help teaching a lesson. The lesson may be too confusing, too short, or just plain boring. Your student may need a more complete explanation or just want to delve more deeply into the subject. You may need to expand the lesson to include an activity to fit your student’s learning style. No matter what the reason, here are a few suggestions for how to improve a lesson.

  1. Make it bigger. — Suppose your child is learning fractions, and the book’s diagrams are rather small. Draw similar diagrams using an entire sheet of paper for each one — sometimes bigger IS better! Simple drawings and diagrams do not demand precision: children are good at pretending, and they can pretend along with you that your drawing is accurate.
  2. Take it outside. — Fresh air and elbow room can improve anyone’s ability to think. Even reading a favorite storybook outdoors can give it new perspective.
  3. Add color. — Say good-bye to black-and-white; say hello to understanding. Use colored pencils or markers, highlighters, construction paper, or colored index cards. For example, write each step of a complicated math problem in a different color to help clarify the progression.
  4. Add texture. — Go beyond flat and give your fingertips a chance to enjoy themselves. Form ABC’s with Play-Doh, cut letters out of sandpaper, or draw with chalk on the sidewalk.
  5. Let your student play with it. — Exploration is the birthplace of genius. Go beyond the lesson plan and indulge your student with his own session of free experimentation, whether with math manipulatives, Scrabble letter tiles, vinegar and baking soda, etc. Playing is learning.
  6. Add more details. — Why strain to understand a single example, when ten examples will make it crystal clear? Suppose your child is trying to learn the letter A; show the child many examples of what A looks like, from several ABC books, from newspaper headlines, on packages in your pantry; draw A with crayons and markers, in shaving cream smeared on a window, in dry cornmeal poured in a baking pan; arrange small items into an A shape: pennies, pipe cleaners, pencils, building blocks, toy cars, fingers, etc. — after all of these examples, your child will better understand how to recognize an A!
  7. Discuss it. — Skip the one-sided lecture and the interrogation-style Q & A session; try an open and honest give-and-take, valuing your student’s opinions, reactions, and ideas. How would you react if those opinions were coming from your friend, instead of from your child?
  8. Build it. — Cardboard, scissors, and tape are the stuff that feeds imagination. Projects don’t have to be constructed well enough to last forever, just long enough to illustrate the concept.
  9. Research it (together). — Expand two great minds at the same time. The teacher doesn’t always have to know the answers before the student does — your student will develop new respect for you as he sees you willing to learn with him.
  10. Make it personal. — Use a personal application to your student’s own life, activities, or possessions, and he’ll never forget it. Instead of math manipulatives, use the student’s building blocks, toy cars, baseball cards, Barbie doll shoes, etc.

The specific examples given above might be either too simple or too advanced for your current needs, but you can adapt them to your student’s situation. Even if you think some of these ideas may not help with your particular struggles, dare to give them a try anyway. You may be pleasantly surprised at the results!

Sugar Cube Math

Are you looking for some fun activities to keep your students’ math skills sharp over the summer break? Do your students need help to achieve mastery of math concepts? Sugar cubes can provide just what you need! One of these activities each week may be enough to boost their math thinking skills, but your students just might want to keep playing and experimenting on their own!

A friend once asked me how I used sugar cubes in math. She had visualized the children just eating the sugar and becoming too hyper for any actual learning! Math manipulatives are nothing more than little things used to illustrate a math lesson, and sugar cubes are fairly inexpensive things that just happen to come in perfect little cube shapes, making them ideal for stacking. However, sugar cubes must be handled with some special care to get them past more than one lesson: do not expose them to moisture (not even wet fingers) and keep them on a jelly-roll pan (large cookie sheet with sides) to collect the crumbs of sugar that will inevitably fall off. Handle the cubes gently to prevent crushing them, but do not be too alarmed when a few of the cubes crumble no matter how gently you touch them. (Life is like that: some of us just can’t take as much pressure as others can.) When lesson time is over, your students can carefully place the sugar cubes back into their box to use them again another day. You will probably want to reserve these sugar cubes for math lessons only — they can become a little too soiled with repeated handling for plunking into your morning coffee! The following suggestions will work with any cube-shaped objects (Cuisenaire Rod 1-units, ABC blocks, dice, etc.), as long as all of the cubes are the same size. A box or two of sugar cubes provides a large number of identical cubes for a small investment, and their plain white sides allow the student to focus on the cubes as units, rather than on any decorative details.

Stack them up, pile them up, square up the piles and see how much fun you can have building walls and tiny forts with sugar cubes. Make checkerboard designs or pyramids. Lessons can be much more than boring drill, and you can learn from play! Below are some more structured lessons to try after a free play session. Some parents may need to do these experiments with their children; other parents may need to get out of the way and just let their child experiment to his heart’s content!

Addition is very simply illustrated through counting the total number of cubes that results from combining this group of cubes with that group of cubes. Take this operation to its next logical level and un-do the addition of cubes for a simplified lesson in subtraction. A student who can see that subtraction is nothing more than backwards addition will not be confused into thinking that subtraction is a new and confusing mathematical concept. Illustrate how addition and subtraction are linked together by discussing both concepts with one set of math facts: 2 cubes in this group plus 3 cubes in that group equals 5 cubes all together: 2 + 3 = 5. Therefore, taking 3 cubes away from 5 cubes leaves us with 2 cubes again: 5 – 3 = 2. Switch the numbers around to show that 3 + 2 also equals 5, and 5 – 2 = 3. Experimenting with just those 5 cubes, the student will quickly see that 1 + 4 = 2 + 3, and so on. Repeat these experiments with other groupings of cubes, always focusing on undoing the addition to prove that the subtraction facts are just another way to state the matching addition facts.

An important part of math is learning about prime numbers. Start with just 1 cube and by adding 1 more cube at a time, we will experiment with making different arrangements of the cubes. Any number of cubes that can make only 1 row is called a prime number — it has multiplication factors of only itself and 1. (One by itself does not count as a prime, because it has no factors at all — it’s just one.)

If you have arranged cubes into two equal rows, that means you have at least 4 cubes. Those can be arranged into 1 row of 4 cubes (or 4 rows of 1 cube each), or 2 rows of 2 cubes each. These are also the multiplication factors of 4: 1 x 4, 4 x 1, and 2 x 2.

Add 2 more cubes, 1 to each row, for a total of 6 cubes. Those can also be arranged into 1 row of 6 cubes (or 6 rows of 1 cube each) or 2 rows of 3 cubes each. Now rearrange the cubes into 3 rows of 2 cubes each to prove that 2 x 3 makes the same size and shape of rectangle as 3 x 2, but just turned the other direction.

Add 2 more cubes, for a total of 8 cubes. Arrange these into 1 row of 8 cubes, then 2 rows of 4 cubes each, and also 4 rows of 2 cubes each. Factors of 8 are: 1 x 8, 2 x 4, 4 x 2, 8 x 1.

So far, an odd number of cubes has not been able to make any even arrangement of rows except for 1 row of cubes. Add 1 more cube to your grouping, for a total of 9 cubes. This is the first odd number that has other factors besides itself and 1: 1 x 9, 9 x 1, and 3 x 3. Arrange the 9 cubes into 3 rows of 3 cubes each.

Show your student that his experiments have now proved that an odd number times an even number equals an even number (3 x 2 = 6). An even number times an even number equals an even number (2 x 4 = 8), and an odd number times an odd number equals an odd number (3 x 3 = 9). Those principles will remain true no matter which odd or even numbers are used — encourage your student to experiment with his sugar cubes to prove this fact.

As the child continues adding more cubes and rearranging them into factor groups, have him make a list of the factors for each number, seeing how many different ways each number can be factored. Which number (of the ones he has tried so far) has the most factors? Multiplication is nothing more than a short-cut to addition, and multiplying can save a lot of time that would be spent adding. Multiplying with bigger numbers will be much faster than adding those numbers over and over and over.

This process can also be done in reverse to illustrate division. Take a random number of sugar cubes and arrange them into rows. Can you make several rows with an equal number of cubes in each row, or do you end up with a few leftover cubes? Try several different arrangements of rows and numbers of cubes in each row. Keep trying until 1) you can come out with a square or rectangular arrangement with no leftovers, or 2) you prove that you have a prime number of sugar cubes, with no other factors than this number and 1. Whether you are multiplying or dividing, the factors remain the same — proving that division is just un-doing multiplication. The only difference is that when dividing, sometimes you can end up with a few leftovers, called the remainder.

Area is basically the same as a set of factors. It can also be thought of as floor tiles by looking straight down on top of the cubes so that only their tops can be seen. By moving the cubes around, the student can demonstrate how 1 x 12, 2 x 6, 3 x 4, 4 x 3, 6 x 2, and 12 x 1 all have the same area (they all use exactly 12 cubes). Area of a square or rectangle is determined by multiplying two connecting sides together, just like the two factors.

Perimeter can be related to how many sections of “fence” it would take to go around the outside of a certain area. The cubes’ edges can be counted as individual fence sections for an easy way to prove how many fence sections are required. Notice that each corner-cube has two exposed edges for fences. Perimeter is usually determined by adding the totals of the sides together, but multiplication can be used as a shortcut for perfect rectangles: 2 times the shorter side, plus 2 times the longer side. (Note that in a single row of cubes, the cube at each end will have 3 exposed sides to be counted.)

Experiment with various arrangements of the same group of cubes and compare the area to the perimeter. Can you change the perimeter without changing the area? What is the largest or the smallest perimeter you can make while keeping the same area?

Volume can be thought of as area in several levels. First, think of area as being a flat concept, like floor tiles, and volume being a 3-dimensional concept, like the solid sugar cubes. Arrange 2 rows of 3 cubes each, making an area of 6. Now arrange 6 more cubes in exactly the same pattern. If you stack one group on top of the other group, you can easily see 2 layers of 6 cubes each. Two rows times 3 cubes times 2 layers equals a volume of 12 cubes: 2 x 3 x 2 = 12. Try this with other groups. Multiply to find the volume: the number of rows times the number of cubes in each row equals the area of that layer. Now multiply the area times the number of layers to find the volume. How many more cubes does it take to increase the total volume of the stack of cubes?

Once your student has mastered calculating volume, combine it with measurements. Have him measure the side of one sugar cube, and then substitute that measurement in his calculations of perimeter, area, and volume. Now have him measure the sides of the large stack of sugar cubes to see if his calculations were correct. Substitute 1 inch for the measurement: if the sugar cubes measured 1 inch on each side, how large would the stack be now? How large would a stack be with 10 layers of 10 rows of 10 sugar cubes in each row? How about a stack that had 100 cubes each direction? How about 1,000? Or a million? Or a billion? (This leads directly into the study of exponents, because a square of x-number of sugar cubes is x2 and a cube of x-number of sugar cubes is x3.) How many sugar cubes would it take to make a large cube (all 3 sides equal) the approximate size of a card table? Or as tall as your house? Or as wide as a football field? Your students may need to use a calculator to check their math on these problems, but getting to use the calculator is their reward for having fun with math!

By the time your student has completed all of the activities listed above, he has probably also thought of some other activities to try with the sugar cubes. Try them–experimenting is how we learn!

10 Fun Math Exercises from a BINGO Game

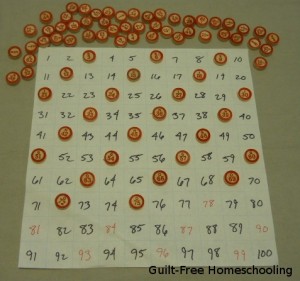
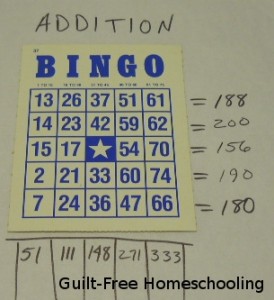
A standard Bingo game contains several printed cards with numbers arranged into a grid of rows and columns and tokens marked B-1 through O-75, used for calling the numbers when playing the game. These components can be used in other ways for some creative (and fun) variations on math practice.

  1. Play Bingo for number recognition practice and good, clean fun.
  2. Sort the number-tokens into odds and evens. Or sort out just the tokens needed to skip-count by 2’s, or 3’s, or 4’s, etc.
  3. Arrange the tokens into numerical order from 1-75.
  4. Sort the tokens into 1-10, 11-20, etc.
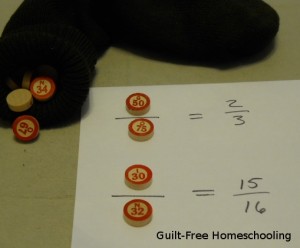
  5. Pick 2 (or more) tokens at random and add their values together. Now try subtracting them, multiplying them, or dividing them. [Hint: Place all of the tokens into a paper sack or a clean sock for ease of random drawing.]
  6. Pick 2 tokens at random and make fractions from their numbers — make both a proper fraction (numerator is smaller than denominator) and an improper fraction (numerator is larger than denominator). Simplify each fraction, if possible, or make a list of equivalent fractions.
  7. Add the columns of numbers on the Bingo cards.
  8. Add the rows of numbers on the Bingo cards.
  9. Write the factors for each number on a Bingo card or for number tokens drawn at random.
  10. Practice rounding with the numbers on the Bingo cards or with randomly drawn tokens.
Verified by MonsterInsights