Workshop Wednesday: What Is the Missing Element?

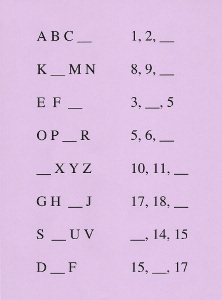
Use this worksheet as an example to make simple Missing Element worksheets for your children. No one should have to stop and sing the Alphabet Song from beginning to end, just to figure out what letter comes after P. The same concept applies to numbers and counting, just without the song. My young kids viewed little worksheets like this as a fun challenge. After a little practice, they could do these orally, asking “What letter comes after V?” any time we had a few seconds to fill: while standing in line at the store, waiting for a red light, any waiting, anywhere. It kept them mentally active, which made the waiting much more bearable for them. I used the same process for numbers, asking “What number comes after 19?” and similar questions. The worksheet itself is a visual method; the oral question and answer exercise is an auditory method.

These are good mental exercises for those students who already know letters and numbers, but who don’t automatically recognize a short segment of the longer series. This is also a good skill to build into those youngsters who are just mastering the ABC’s and counting—notice that I said mastering, not initially learning.

For those students who need a more tactile application, let them match alphabet blocks or letter tiles to the challenges on the worksheet, filling in the gap with the appropriate letter on a block or tile. Number tiles can be used to create the number challenges, using multiple tiles to produce multiple-digit numbers. Borrow letter or number tiles from games, or make your own by cutting 1-inch squares from cereal box cardboard and marking with a Sharpie on the plain side.

Be sure to allow your students plenty of free-play time with the Missing Element exercise, as they will be sure to want to challenge each other (or you) with more examples. When a child continually quizzes you for the answer, give the correct answer each time, knowing that he is learning from your consistent responses. When you are confident that he really does know the correct answer, you can give the wrong answer with a questioning tone of voice or say “Is it K?” to see if he will correct you!

For a young kinesthetic learner, spread out the letter or number series on the floor using Post-It notes or flashcards and let the child hop on each one as he reads them off and shouts out the missing element as he hops into the gap. Another method for energetic children is to have flashcards for the series in one room and extra flashcards for the missing element in another room. Challenge your little Tigger to run, hop, or somersault into the other room to search for the correct card(s) to bring back and fill in the gap in the series.

Combining all of these learning style methods will give your students practice at using more than just their preferred style of learning, which helps them gain a better understanding while also broadening their experiences. As your students get older and expand their knowledge base, you can adapt this Missing Element concept for other academic pursuits as well.
Workshop Wednesday: Dominoes Make Great Tactile “Flashcards”

Wouldn’t it be wonderful to have a single set of simple math learning aids that could help your students learn everything from basic number values to fractions, decimals, and percentages? It already exists, and you may even own a set: dominoes. Ordinary flashcards appeal to the student who learns best through visual means: seeing and reading. Saying the flashcard facts aloud will work best with the student who learns well through auditory means: hearing and saying. For the student whose fingers must connect with the lesson in a tangible way for him to truly lock the facts away in the deep recesses of his mind, dominoes make ideal flashcards!

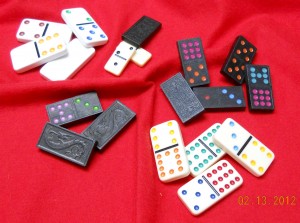
Dominoes make great tactile “flashcards”!

Dominoes are wonderfully tactile, whether they are the smooth, heavy plastic ones that look like imitation ivory or the pressed wood versions with a decorative design embossed on the back side. The dots are usually carved out, and the depressions are filled with bright colors of paint. There is also usually some physical attribute serving as a divider between the two halves of the domino, either a carved or embossed line. All of these features work together to provide textural interest to the fingers that get to hold them – much more interesting than flat, boring, cardstock flashcards. Flipping through a stack of thin cards is one thing; stacking up dominoes, as one masters the facts they represent, is quite another thing. Dominoes appeal to many senses and learning styles with their bright colors, heavy thickness, and the wonderful sound they make as they clink together.

Let’s look at the wide variety of math exercises, from beginner level to more advanced skills, that can be performed with a set of dominoes.

Number Value

Count the spots. Say the number, or write the number. Repeat as needed for practice until the student knows how many seven is and can identify a group of dots with the appropriate number. Substitute a matching number of candies, blocks, or toy cars for the dots and repeat the counting exercise until the student understands that numbers can apply to more than just small colored dots in orderly patterns. Once the student has mastered the number relating to each distinct pattern of dots, arrange the same number of objects in different patterns to show that each number can occur in various types of groupings (e.g. four objects in a straight line is still four, even though they do not form a square, as on the domino).

Smaller v. Larger

When the student understands the principle of assigning values to digits, that same student can begin to differentiate smaller groups from larger groups. Since each domino conveniently displays two number groupings, use them to practice smaller v. larger numbers: help the student decide which group of dots represents the smaller number and turn that side to be on the left, leaving the larger number group on the right side. Repeat as needed for practice until the student can tell at a glance which number is smaller and which number is larger. Practice saying the numbers and deciding which is smaller and which is larger, and then count the dots, if necessary, for confirmation.

Two-Digit Numbers

Once again, each domino represents two digits. Help the student learn to read and write the two-digit numbers shown on each domino’s face. For example, if a domino shows a two and a six, that domino may be read as 26 or as 62. Dominoes that have no dots on one side can be read as a one-digit number and a two-digit number (e.g. 3 and 30). The smaller v. larger exercise can then be repeated with these two-digit numbers.

Addition

Students can begin simple addition problems by adding the two numbers represented on a domino and then counting the total of all dots for confirmation.

Subtraction

By holding a domino vertically with the larger number on top and the smaller number on the bottom, the student can begin learning to write and perform subtraction problems. More advanced students, who have learned the concepts of positive and negative numbers, can reverse the domino, placing the smaller number on top, and proceed with the subtraction exercise.

Multiplication

Dominoes can be used as multiplication flashcards by attempting to multiply the two numbers represented. If the student is unsure of an answer, it is advisable to consult a reference chart for the correct answer, rather than merely guess. Seeing the correct answer time after time will help the student memorize it by sight, and the student will eventually trust his memory instead of taking the time to look at the chart for the answer. (A calculator may also be used to check answers, but pressing a wrong button can deceive the student into believing a wrong answer.)

Division

Holding the dominoes horizontally can represent the numbers in a division problem. The student can write those numbers down on paper to practice dividing. The beginning student should only divide small numbers into larger numbers, until his knowledge of decimals allows him to practice dividing larger numbers into smaller numbers.

Manipulatives

Turn the dominoes face-down, so the dots are not visible. Practice counting, adding, and subtracting. Subtraction is merely undoing the addition process, and this can be easily illustrated by grouping and re-grouping the dominoes. Arrange groups of dominoes into rows to illustrate multiplication facts, and discuss how dividing is just undoing multiplication, but sometimes with leftovers called “the remainder.”

Fractions: Proper & Improper, Simplifying

Holding a domino vertically, the two numbers can represent the numerator (top) and denominator (bottom) of a fraction. Proper fractions always have the larger number in the denominator, while improper fractions always have the larger number in the numerator and can be simplified into a mixed number fraction. When reading the domino as a fraction, the student can decide if the fraction can be simplified and what that new fraction should be. Advanced students may select two dominoes and attempt to add them together as fractions, converting them to common denominators as needed. Subtraction, multiplying, and dividing fractions may also be practiced by selecting random dominoes to use as the fractions in each problem. Students should always be encouraged to write math problems in a notebook — when needed for reference, the student can easily look back at his previous work to see how he solved similar problems.

Fraction, Decimal, & Percentage Equivalents

Students with a working knowledge of fractions may move on to the decimal equivalents of fractions. Percentages are another form of fractions. Fraction, decimal, percentage, and ratio can all be thought of as “nicknames” for equivalent amounts. Arranging face-down dominoes to illustrate the problem, writing out the problems, and drawing diagrams will all help the students understand how the amounts are equivalent. Then the student may wish to use face-up dominoes as flashcards again, using the two numbers shown as a fraction and determining the decimal and percentage equivalents.

Perimeter, Area, & Volume

Using the dominoes face-up, a student can build “fences” to illustrate perimeter, or the distance around the outside of a specific shape. Count only the edges of each domino, and count each half of the long sides as a separate unit: a domino at a corner would count as 3 units: one for the short end on one side of the corner, and two along the long side of the domino on the other side of the corner. Filling in that shape solidly with “floor tiles” relates to the concept of area. Again, count each half of a domino (each separate section of dots) as one “floor tile.” Stacking multiple layers of dominoes can illustrate the 3-dimensional concept of volume. For example, an area represented by two rows of three dominoes each will contain six dominoes. Stack up several identical layers to show that each layer contains six dominoes. Multiply the area of six times the number of layers to determine the total number of dominoes used.

Play Domino Games

What better way to show that math is valuable in everyday life than to play a game of dominoes? Advanced players might enjoy the competitive element of keeping score, but those playing just for the fun of the game can proceed more quickly by simply playing their dominoes on the matching numbers and moving on to the next turn. There are a variety of domino games, so expand your knowledge base and learn several.

Line Dominoes Up on Edge for Physical Science Domino Effect

No one should go through life without lining up dominoes in curvy lines or intricate patterns and then gently pushing over the first one in line to watch all the others tumble in turn. Setting up the dominoes on end is good for honing the fine motor skills of small hand muscles — great care must be used to ensure that the dominoes don’t fall too early! Repeat as often as possible and search You-Tube for massive domino displays to enjoy!

Family Planning (No, Not That Kind)

Planning is vital — but I don’t mean planning every moment of every day, deciding what lessons you will do when or to which organized activities you will deliver your children every day. The most important thing to schedule is your time together as a family. Set aside an evening for a light supper, then watch a family movie together, with plenty of popcorn and apple slices. Plan a family game night and try your hands at Jabberwocky Scrabble (anything goes, but players must pronounce and define each “word” — be prepared for side-splitting laughs) or a similarly fun twist on any other game that’s been gathering too much dust on the shelf. Reserve an entire day for a family outing: take sandwiches, fruit, and a large jug of ice water and head for a park with a lake or nature trails or playground equipment and spend the day disconnecting from everything and everyone else. Block out a weekend on the calendar for a family get-away and then get away from your normal schedule and routine.

Do only what your budget will allow, and trust me when I say that fun doesn’t have to cost anything. We tramped through the woods, stopped to look at the wildflowers, marveled at the tiny fish or tadpoles at the lake’s edge, or dipped our fingers and toes in the chilly water. We watched the clouds for drago-saurs and ele-raffes, skipped rocks on the lakes, and let the ripples on the water mesmerize us until we had forgotten everything else. Take turns playing follow-the-leader around, over, and through all of the swings and slides, take giant steps or silly, head-bobbing, arm-flapping walks round and round the trees, and let yourselves laugh freely and enjoy the company of the people who matter most in this world. Wander through a free museum or turn a lingering trip through an antique store into a spontaneous walk through history.

Why do these things need to be scheduled? Because if you don’t schedule time for your family first, your time will be scheduled for you by other people, other groups, or by other activities, and your family’s time together will be vaporized into the mist of a busy life. Family must come first, and it doesn’t count if you are all attending a group activity but participating as individuals instead of as a family unit. If this is a foreign concept to you, dare to try a brand new activity where you and your spouse and your children interact together for the entire time. It may take a while for this new bond to develop to fullness, but there is a unique and lasting experience ahead of you, and family is well worth cultivating.

10 Ways to Improve a Lesson

Sometimes we all need help teaching a lesson. The lesson may be too confusing, too short, or just plain boring. Your student may need a more complete explanation or just want to delve more deeply into the subject. You may need to expand the lesson to include an activity to fit your student’s learning style. No matter what the reason, here are a few suggestions for how to improve a lesson.

  1. Make it bigger. — Suppose your child is learning fractions, and the book’s diagrams are rather small. Draw similar diagrams using an entire sheet of paper for each one — sometimes bigger IS better! Simple drawings and diagrams do not demand precision: children are good at pretending, and they can pretend along with you that your drawing is accurate.
  2. Take it outside. — Fresh air and elbow room can improve anyone’s ability to think. Even reading a favorite storybook outdoors can give it new perspective.
  3. Add color. — Say good-bye to black-and-white; say hello to understanding. Use colored pencils or markers, highlighters, construction paper, or colored index cards. For example, write each step of a complicated math problem in a different color to help clarify the progression.
  4. Add texture. — Go beyond flat and give your fingertips a chance to enjoy themselves. Form ABC’s with Play-Doh, cut letters out of sandpaper, or draw with chalk on the sidewalk.
  5. Let your student play with it. — Exploration is the birthplace of genius. Go beyond the lesson plan and indulge your student with his own session of free experimentation, whether with math manipulatives, Scrabble letter tiles, vinegar and baking soda, etc. Playing is learning.
  6. Add more details. — Why strain to understand a single example, when ten examples will make it crystal clear? Suppose your child is trying to learn the letter A; show the child many examples of what A looks like, from several ABC books, from newspaper headlines, on packages in your pantry; draw A with crayons and markers, in shaving cream smeared on a window, in dry cornmeal poured in a baking pan; arrange small items into an A shape: pennies, pipe cleaners, pencils, building blocks, toy cars, fingers, etc. — after all of these examples, your child will better understand how to recognize an A!
  7. Discuss it. — Skip the one-sided lecture and the interrogation-style Q & A session; try an open and honest give-and-take, valuing your student’s opinions, reactions, and ideas. How would you react if those opinions were coming from your friend, instead of from your child?
  8. Build it. — Cardboard, scissors, and tape are the stuff that feeds imagination. Projects don’t have to be constructed well enough to last forever, just long enough to illustrate the concept.
  9. Research it (together). — Expand two great minds at the same time. The teacher doesn’t always have to know the answers before the student does — your student will develop new respect for you as he sees you willing to learn with him.
  10. Make it personal. — Use a personal application to your student’s own life, activities, or possessions, and he’ll never forget it. Instead of math manipulatives, use the student’s building blocks, toy cars, baseball cards, Barbie doll shoes, etc.

The specific examples given above might be either too simple or too advanced for your current needs, but you can adapt them to your student’s situation. Even if you think some of these ideas may not help with your particular struggles, dare to give them a try anyway. You may be pleasantly surprised at the results!

Sugar Cube Math

Are you looking for some fun activities to keep your students’ math skills sharp over the summer break? Do your students need help to achieve mastery of math concepts? Sugar cubes can provide just what you need! One of these activities each week may be enough to boost their math thinking skills, but your students just might want to keep playing and experimenting on their own!

A friend once asked me how I used sugar cubes in math. She had visualized the children just eating the sugar and becoming too hyper for any actual learning! Math manipulatives are nothing more than little things used to illustrate a math lesson, and sugar cubes are fairly inexpensive things that just happen to come in perfect little cube shapes, making them ideal for stacking. However, sugar cubes must be handled with some special care to get them past more than one lesson: do not expose them to moisture (not even wet fingers) and keep them on a jelly-roll pan (large cookie sheet with sides) to collect the crumbs of sugar that will inevitably fall off. Handle the cubes gently to prevent crushing them, but do not be too alarmed when a few of the cubes crumble no matter how gently you touch them. (Life is like that: some of us just can’t take as much pressure as others can.) When lesson time is over, your students can carefully place the sugar cubes back into their box to use them again another day. You will probably want to reserve these sugar cubes for math lessons only — they can become a little too soiled with repeated handling for plunking into your morning coffee! The following suggestions will work with any cube-shaped objects (Cuisenaire Rod 1-units, ABC blocks, dice, etc.), as long as all of the cubes are the same size. A box or two of sugar cubes provides a large number of identical cubes for a small investment, and their plain white sides allow the student to focus on the cubes as units, rather than on any decorative details.

Stack them up, pile them up, square up the piles and see how much fun you can have building walls and tiny forts with sugar cubes. Make checkerboard designs or pyramids. Lessons can be much more than boring drill, and you can learn from play! Below are some more structured lessons to try after a free play session. Some parents may need to do these experiments with their children; other parents may need to get out of the way and just let their child experiment to his heart’s content!

Addition is very simply illustrated through counting the total number of cubes that results from combining this group of cubes with that group of cubes. Take this operation to its next logical level and un-do the addition of cubes for a simplified lesson in subtraction. A student who can see that subtraction is nothing more than backwards addition will not be confused into thinking that subtraction is a new and confusing mathematical concept. Illustrate how addition and subtraction are linked together by discussing both concepts with one set of math facts: 2 cubes in this group plus 3 cubes in that group equals 5 cubes all together: 2 + 3 = 5. Therefore, taking 3 cubes away from 5 cubes leaves us with 2 cubes again: 5 – 3 = 2. Switch the numbers around to show that 3 + 2 also equals 5, and 5 – 2 = 3. Experimenting with just those 5 cubes, the student will quickly see that 1 + 4 = 2 + 3, and so on. Repeat these experiments with other groupings of cubes, always focusing on undoing the addition to prove that the subtraction facts are just another way to state the matching addition facts.

An important part of math is learning about prime numbers. Start with just 1 cube and by adding 1 more cube at a time, we will experiment with making different arrangements of the cubes. Any number of cubes that can make only 1 row is called a prime number — it has multiplication factors of only itself and 1. (One by itself does not count as a prime, because it has no factors at all — it’s just one.)

If you have arranged cubes into two equal rows, that means you have at least 4 cubes. Those can be arranged into 1 row of 4 cubes (or 4 rows of 1 cube each), or 2 rows of 2 cubes each. These are also the multiplication factors of 4: 1 x 4, 4 x 1, and 2 x 2.

Add 2 more cubes, 1 to each row, for a total of 6 cubes. Those can also be arranged into 1 row of 6 cubes (or 6 rows of 1 cube each) or 2 rows of 3 cubes each. Now rearrange the cubes into 3 rows of 2 cubes each to prove that 2 x 3 makes the same size and shape of rectangle as 3 x 2, but just turned the other direction.

Add 2 more cubes, for a total of 8 cubes. Arrange these into 1 row of 8 cubes, then 2 rows of 4 cubes each, and also 4 rows of 2 cubes each. Factors of 8 are: 1 x 8, 2 x 4, 4 x 2, 8 x 1.

So far, an odd number of cubes has not been able to make any even arrangement of rows except for 1 row of cubes. Add 1 more cube to your grouping, for a total of 9 cubes. This is the first odd number that has other factors besides itself and 1: 1 x 9, 9 x 1, and 3 x 3. Arrange the 9 cubes into 3 rows of 3 cubes each.

Show your student that his experiments have now proved that an odd number times an even number equals an even number (3 x 2 = 6). An even number times an even number equals an even number (2 x 4 = 8), and an odd number times an odd number equals an odd number (3 x 3 = 9). Those principles will remain true no matter which odd or even numbers are used — encourage your student to experiment with his sugar cubes to prove this fact.

As the child continues adding more cubes and rearranging them into factor groups, have him make a list of the factors for each number, seeing how many different ways each number can be factored. Which number (of the ones he has tried so far) has the most factors? Multiplication is nothing more than a short-cut to addition, and multiplying can save a lot of time that would be spent adding. Multiplying with bigger numbers will be much faster than adding those numbers over and over and over.

This process can also be done in reverse to illustrate division. Take a random number of sugar cubes and arrange them into rows. Can you make several rows with an equal number of cubes in each row, or do you end up with a few leftover cubes? Try several different arrangements of rows and numbers of cubes in each row. Keep trying until 1) you can come out with a square or rectangular arrangement with no leftovers, or 2) you prove that you have a prime number of sugar cubes, with no other factors than this number and 1. Whether you are multiplying or dividing, the factors remain the same — proving that division is just un-doing multiplication. The only difference is that when dividing, sometimes you can end up with a few leftovers, called the remainder.

Area is basically the same as a set of factors. It can also be thought of as floor tiles by looking straight down on top of the cubes so that only their tops can be seen. By moving the cubes around, the student can demonstrate how 1 x 12, 2 x 6, 3 x 4, 4 x 3, 6 x 2, and 12 x 1 all have the same area (they all use exactly 12 cubes). Area of a square or rectangle is determined by multiplying two connecting sides together, just like the two factors.

Perimeter can be related to how many sections of “fence” it would take to go around the outside of a certain area. The cubes’ edges can be counted as individual fence sections for an easy way to prove how many fence sections are required. Notice that each corner-cube has two exposed edges for fences. Perimeter is usually determined by adding the totals of the sides together, but multiplication can be used as a shortcut for perfect rectangles: 2 times the shorter side, plus 2 times the longer side. (Note that in a single row of cubes, the cube at each end will have 3 exposed sides to be counted.)

Experiment with various arrangements of the same group of cubes and compare the area to the perimeter. Can you change the perimeter without changing the area? What is the largest or the smallest perimeter you can make while keeping the same area?

Volume can be thought of as area in several levels. First, think of area as being a flat concept, like floor tiles, and volume being a 3-dimensional concept, like the solid sugar cubes. Arrange 2 rows of 3 cubes each, making an area of 6. Now arrange 6 more cubes in exactly the same pattern. If you stack one group on top of the other group, you can easily see 2 layers of 6 cubes each. Two rows times 3 cubes times 2 layers equals a volume of 12 cubes: 2 x 3 x 2 = 12. Try this with other groups. Multiply to find the volume: the number of rows times the number of cubes in each row equals the area of that layer. Now multiply the area times the number of layers to find the volume. How many more cubes does it take to increase the total volume of the stack of cubes?

Once your student has mastered calculating volume, combine it with measurements. Have him measure the side of one sugar cube, and then substitute that measurement in his calculations of perimeter, area, and volume. Now have him measure the sides of the large stack of sugar cubes to see if his calculations were correct. Substitute 1 inch for the measurement: if the sugar cubes measured 1 inch on each side, how large would the stack be now? How large would a stack be with 10 layers of 10 rows of 10 sugar cubes in each row? How about a stack that had 100 cubes each direction? How about 1,000? Or a million? Or a billion? (This leads directly into the study of exponents, because a square of x-number of sugar cubes is x2 and a cube of x-number of sugar cubes is x3.) How many sugar cubes would it take to make a large cube (all 3 sides equal) the approximate size of a card table? Or as tall as your house? Or as wide as a football field? Your students may need to use a calculator to check their math on these problems, but getting to use the calculator is their reward for having fun with math!

By the time your student has completed all of the activities listed above, he has probably also thought of some other activities to try with the sugar cubes. Try them–experimenting is how we learn!

Preschool Is Not Brain Surgery

I have tackled the topic of homeschooling older students while you have preschoolers around several times before, but I’ve never yet directly addressed homeschooling for preschool itself, especially when preschool marks the official beginning of schooling for your oldest child. This changes now: I am here to encourage you that you can teach your own child for preschool. You do not need an advanced degree in education to be able to effectively teach your child at home for preschool.

I have prepared a list of things that my children and I did during their preschool years that cover all of the types of activities and subjects your child will need to prepare them for their future academics. These activities may be done in any order, corresponding to your child’s interests and abilities. Progress according to your child’s abilities: if your child has difficulty understanding any given concept, set it aside for two weeks or two months while you do other activities and see what a difference that makes. Pick it up again later, or set it aside a second time, if necessary. All children learn at different rates, just like they begin to walk or talk or get teeth at different times. Faster or slower is not better, it’s just different.

Multiple activities can be done each day, if it works with your schedule and with your child’s interests. Fifteen minutes at a time may be adequate for the average preschooler, but the child may enjoy several of these short sessions throughout the day. Focus on only one activity at each session, but if your child is really enjoying the activity, you can let him continue playing with it after the formal “lesson” time is completed.

Read books to your child. Snuggle up together for special Mommy-and-me time. Use funny voices for the characters. Vary your tone to match the scene: fast and loud for the exciting parts, slow whispers for the sneaky parts, sniffling when the character is sad, bouncy and happy when the character is happy. When the book is a familiar favorite, stop periodically to ask your child questions: Where is Papa Bear going next? Why is he doing that? What will he find there? These help build your child’s memory by asking him to recall details he has learned from all of the times you have read this story in the past. Which bear is wearing the red shirt? Point to the smallest bear. Can you find a bowl on the bears’ table? Questions of this type help your child notice details and learn to identify colors, sizes, objects, etc. Why did the bears leave the house? Where did they go? What is this little girl’s name? These questions teach comprehension: read a portion of the story, and then ask the child about key elements that were just read. At first, you may want to ask questions about one page at a time, but soon your child will be able to recall details from several pages back.

Include ABC books, even though they usually have no plot or story. As a child, my personal favorite was The Nonsense ABC by Edward Lear. For my own children, their favorite was The Dr. Seuss ABC. What those books have in common are fun, rhyming poems for each letter. Lear’s “A was once an apple pie” was just as easy to remember as Dr. Seuss and his “Aunt Annie’s alligator.” The delightful poems were much more enjoyable than a simple picture book of ABC’s, although those are useful, too, as you will see in a moment.

Learning letters. Gather all the ABC books you have, and compare the pages for the same letter in each book. Linger over one letter per week or a letter every few days, until you know for sure that your child knows that letter. Use sticky-notes or home-made flashcards to label objects in your home that begin with the letter of the week, and help your child make the letter’s sound every time you see one of those objects and say its name. Banana, B, buh, buh-nana. You get the idea — and so will your preschooler. You may need to get creative on a few letters, such as Q, unless you live with a queen in a home full of quilts and have a pet quail. For X, you may need to use words that have an X in them, such as fox. The picture ABC books will come in very handy now, especially if they use several items for each letter. Don’t overlook your public library — they may have ABC books for unique topics, such as animal ABC’s or around-the-world with ABC’s.

Help your child learn to recognize a letter, no matter what font it is written in. Making a Letter Recognition Notebook is an excellent method for this. Focus on the appearance of the letters themselves, instead of what objects begin with each letter. Do one page for the upper case of a letter and another page for samples of the lower case letter. The goal here is for your child to be able to spot an a, whether it looks like a ball against a wall or like an egg underneath a tiny umbrella.

Learning numbers. Repeat the activities from the Learning Letters section above, but do them for the numbers 1-10. Draw a group of dots on the page to correspond to the number represented. Use counting books for activities similar to the ABC book activities. Once your child knows 1-10, you may add numbers up to 20, if you’d like. Your goal here is for the child to recognize each digit and immediately know how many objects that number stands for.

Learn colors. Ditto. A color-of-the-week activity will show your child all the varieties of each color. Light blue, dark blue, bright blue, dusty blue, navy blue, sky blue. Blue jeans, blue socks, blueberries, blue blanket, blue water bottle, blue crayons, blue cars, blue blocks, blue game pieces. How many blue things can you find in your home? You may be surprised!

Learn shapes. Ditto once again. The variety within each shape can be confusing at first to little ones. Is a big circle the same thing as a small circle? Are a cookie and a ring both circles even though one has stuff inside it and the other one is empty? Rectangles and triangles can be particularly tricky. Use a dollar (kids love learning with real money) as an example of a rectangle, then turn it up on end to show the child how the dollar is the same shape as a door. No more tricky rectangles! Long and skinny or short and fat, rectangles will still look mostly like a door or a dollar. Triangles have 3 sides, no matter how long or short those sides may be, and once your preschooler can count to 3, he can begin to recognize triangles. Browse through the snack cracker aisle at the supermarket for some tasty, edible geometric shapes! Careful nibblers will transform one shape into another, naming the shapes as they admire their creations and then eating their artwork.

Fine motor skills. See Preschoolers’ Educational School-time Activities for a variety of helpful activities that your child will enjoy doing and learn wonderfully useful skills at the same time.

Gross motor skills. Let your child practice on a “balance beam” made by drawing a straight line with chalk on the sidewalk or driveway. Masking tape on the floor is a good substitute indoors. When your child can do it easily without stepping off the line, switch to using a 4″ x 4″ board (any length) lying directly on the ground. When the child can walk that board easily without losing his balance, prop the board up with a brick or concrete block (or other stable item) at each end — just don’t go too high, so that the child will not be hurt if he does fall. Please stay close by your child whenever he is practicing this.

Other useful concepts. Play. Notice the weather each day. Go to the park. Walk around the block. Smell flowers. Watch an anthill. Put a bird feeder or a bird bath near a window and keep it filled so you can watch the birds and learn to identify them. Make cookies. Add a set of measuring cups to the bath toys. Visit a zoo. Watch a construction site (from a safe distance) and talk about what each man or machine is doing. Learn from life every day.

Social Skills. See Social Skills — What Should I Teach My Preschooler? for a very complete explanation.

What about school questions? Preschoolers ask questions; it’s what they do, and it’s who they are. Your homeschooled preschooler will undoubtedly ask questions about going to school: Why does my friend go to school and I don’t? When will I go to school? Can I ride on a school bus? Can I play on the school playground? Why does my storybook show kids doing things at school, but I don’t have any stories about kids who homeschool? Ah, yes, those questions.

You can share as much as you think your preschooler will understand about why you chose to homeschool, but try not to make other families look bad for not homeschooling. One way around this is to point out what vehicles are owned by the families on your block or in your neighborhood. Some have small cars, some have pickup trucks, and some have minivans. They pick the type of vehicles that they want for the things they do. Some families send their children to public school, some go to private schools, and some homeschool. Each family picks the type of school that they want for their children. Each family can also decide if they want to plant flowers around their house or raise tomatoes in their garden. They can decide if they want to have a dog or a cat or tropical fish or no pets at all. Some families choose to eat in fancy restaurants, some families get burgers at the drive-through, and some families make all their meals at home. Every family gets to make choices, and homeschooling is one thing your family has chosen.

Sometimes the trickier part of answering these questions is to show that not following the crowd can be more fun. Because you are homeschooling, you can go to the park when the other children are stuck inside the school building. This is also a good way to bring weather (good or bad) into the conversation: you can play outside on nice days instead of having to sit at a desk all day long, or you can stay inside where it’s warm and dry all day long on the cold and rainy days. Perhaps you can visit the school playground after school is over for the day or on a weekend or during the summer. Perhaps you can ride on a city bus or a church bus. I have known preschoolers who begged and begged their parents to let them go to school, only to find out that school was not the fun experience they had imagined it to be. One little boy asked his mommy if he could be homeschooled again, because all he really had wanted from school was to play on the playground, and when he was in school, the teacher only let him go out to the playground at certain times and for very short periods. Being homeschooled with his brothers was much more enjoyable.

Many children (and parents) ask about the lack of homeschooling in storybooks. I agree that there are very few books that portray education at home, but I have a sneaky way around that, too. Not all storybooks show everything that a child does every day, and not all storybooks show children going to school. Therefore, maybe, just maybe, the children in some books are homeschooling, but the story is telling about some other part of their day. Our school books were not in every room of our house — ok, sometimes, but not always. When the Bear family went for a walk to let their porridge cool down, perhaps they had been doing their lessons all morning, and now it was lunch time, and they would continue their lessons after lunch. Stories are not always about what you can see — sometimes there are also lessons to be learned in what the pictures do not show. And finding those lessons also teaches your child to think about the story and what it does and does not say.

Do I need curriculum to homeschool preschool? No. If you don’t believe me, take this quick test:

  • Do you know the alphabet?
  • Can you count to 20?
  • Can you identify basic colors and shapes?
  • Do you know how to use a pencil?
  • Do you know how to use scissors?
  • Can you read a child’s storybook?

If you answered Yes to 3 or more of these questions, you will probably do just fine. Use the money you would have spent on curriculum for a family zoo pass or a storage cabinet for all of the arts and crafts supplies you will accumulate in the next few years!

Preschool-aged children need foundational skills: pre-reading (recognizing letter names and letter sounds; visual distinction: recognizing differences and similarities between objects), pre-writing (small muscle skills and coordination: using fingers), and body control (large muscle skills and coordination: using arms and legs). Children who are only three, four, or five years old do not need to be able to identify nations of the world, Presidents of the United States, or the life cycle of seahorses. These tiny tots will benefit much more from spending 15 minutes cutting colored paper into confetti than they would from endless coloring pages for geography, history, science, or social studies topics. I have probably just stepped on the toes of multiple eager teachers, but please understand that your little ones will not remember very many of these superfluous lessons until they are able to read fluently for themselves. Then you can turn them loose on the library shelves and get ready to hear them recount the myriads of fascinating facts they have read.

Once when I was selling some of our outgrown books at a used curriculum fair, my customer asked if I had the teacher’s manual for the 2nd grade reading text. “No,” I replied with a smile, “I thought if I couldn’t figure out the answers to the questions in a 2nd grade reading book, I had bigger problems than the teacher’s manual could fix.” She thought about that for a few seconds and began laughing along with me. “You’re absolutely right!” And she bought the book. Teaching preschool is even easier than teaching 2nd grade reading. And you will be able to do it just fine without a teacher’s manual or fancy curriculum.

More articles related to Preschoolers are listed in Topical Index: Preschoolers.

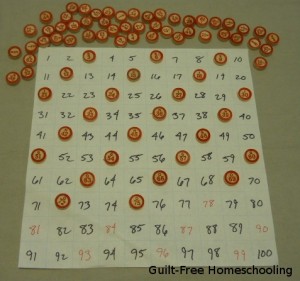
10 Fun Math Exercises from a BINGO Game

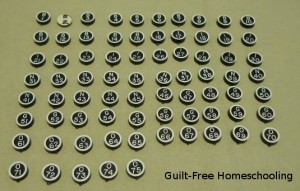
A standard Bingo game contains several printed cards with numbers arranged into a grid of rows and columns and tokens marked B-1 through O-75, used for calling the numbers when playing the game. These components can be used in other ways for some creative (and fun) variations on math practice.

  1. Play Bingo for number recognition practice and good, clean fun.
  2. Sort the number-tokens into odds and evens. Or sort out just the tokens needed to skip-count by 2’s, or 3’s, or 4’s, etc.
  3. Arrange the tokens into numerical order from 1-75.
  4. Sort the tokens into 1-10, 11-20, etc.
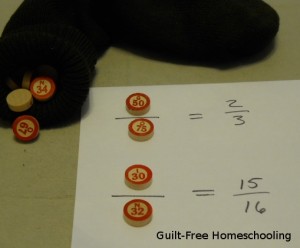
  5. Pick 2 (or more) tokens at random and add their values together. Now try subtracting them, multiplying them, or dividing them. [Hint: Place all of the tokens into a paper sack or a clean sock for ease of random drawing.]
  6. Pick 2 tokens at random and make fractions from their numbers — make both a proper fraction (numerator is smaller than denominator) and an improper fraction (numerator is larger than denominator). Simplify each fraction, if possible, or make a list of equivalent fractions.
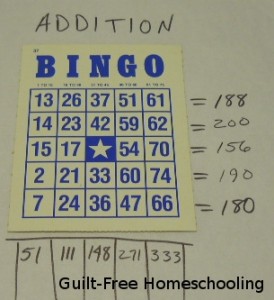
  7. Add the columns of numbers on the Bingo cards.
  8. Add the rows of numbers on the Bingo cards.
  9. Write the factors for each number on a Bingo card or for number tokens drawn at random.
  10. Practice rounding with the numbers on the Bingo cards or with randomly drawn tokens.
Verified by MonsterInsights