Applying Learning Styles with Skip-counting

I have often written about learning styles and how each person can relate to material presented in certain ways better than they can grasp the same material presented in other ways. Today’s lesson is for the parent who is saying, “Okay, I understand that this child is more auditory and that child is more visual, but what do I do with that information?” I will walk you through a basic lesson for early math, skip-counting. While giving you some tips for teaching skip-counting, I will also show you how to adapt any lesson to cover each of the various learning styles. Covering all learning styles in a lesson will enable all of your students to learn the material at the same time and give each student a more complete understanding of the material being presented.

Begin by explaining the principle of skipping to your child: walk across the room with him, then skip across the room with him to illustrate how skipping covers the same distance faster and requires fewer steps than merely walking does. Explain that skip-counting is a short-cut way to count things, by using fewer steps and skipping over certain numbers to cover the distance faster.

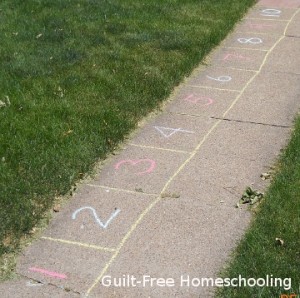
Children love kinesthetic applications, so if the weather allows, let’s take the math outside. Use sidewalk chalk to draw a long line down the sidewalk or driveway. Now mark the line off in reasonable increments (approximately the length of your child’s foot) and number each mark to create a number line so that your child can step from number to number. Drawing this as a long row of numbered boxes (instead of just a thin line) might make the concept easier for your child to understand, as it will resemble a giant game board where he can jump from box to box. Have him stand at the beginning (make a “start” or “zero” place), then have him step or jump to the “2” place, then to 4, and then to 6 to show him the concept of counting by two’s. Can he tell you where he should go next?

Once he is able to skip-count by 2’s, you can repeat the activity by having him skip-count by 4’s. If the increments become too large to step or jump to, he can run quickly across the “skipped” numbers and stop on the desired number, shouting the number loudly as he skip-counts the increments. If numbered boxes on the sidewalk do not work for your situation, try using kitchen floor tiles or stairs, or use masking tape to “mark” a line on your floor or carpeting.

Next, shift the concept from kinesthetic to tactile by drawing a series of smaller numbered boxes on paper and have him do “finger skipping” from one number to another, first by 1’s, then by 2’s. You may eventually want to let him use some game pawns, moving them from square to square while counting off the increments.

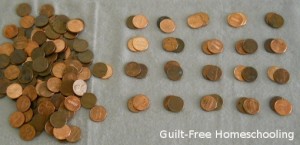
When your child understands the entire concept of skip-counting, you can pour out a large quantity of the substance of your choice onto the table (or a cookie sheet) and allow your student to start counting objects: M&M’s, oyster crackers, dry beans, buttons, Lego’s, or checkers. Count them by 1’s until he has the idea that counting them all individually will be a long process. Now have him move two at a time and try counting by 2’s. Allow him some time to practice this concept — it can be difficult to do any task until you are used to it. After he has the 2’s mastered, then you can move on to skip-counting by 4’s, 3’s, 5’s, 10’s, or any desired increment. (Counting by 4’s is an easy concept to follow counting by 2’s, since it is just a larger extension of counting by 2’s — counting just the even numbers by 2’s. I recommend doing the 4’s before the 3’s for this reason. In the same manner, follow counting by 3’s with 6’s, and follow 5’s with 10’s.)

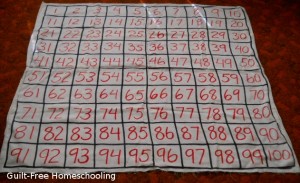
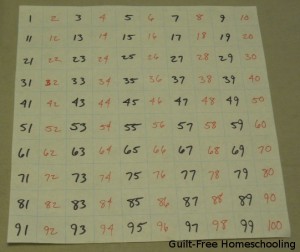
Another activity to help a student understand skip-counting by 2’s is to fill in a 100-chart with colored markers (adding a strong visual element). Draw* a chart of 10 x 10 boxes (10 rows of 10 squares each). Now alternate filling in the numbers: Mom writes an odd number in black, and the student writes an even number in red. Say each number aloud (here is the auditory part of the lesson) as you write them. Read the numbers over again when the chart is all filled in, alternating as Mom says a number she wrote and the student says a number he wrote — and suddenly the student is counting by 2’s! Then Mom can be quiet while he reads only his numbers aloud to reinforce his new skill. (Adapt this activity to other increments as needed for skill in skip-counting.) *Note: 1-inch graph paper is available at office supply stores in a poster-sized display tablet. I LOVE THIS STUFF! It is great for fast number charts — and hundreds of other homeschool uses. I rolled mine up and tied the roll securely with string for easier storage on a closet shelf.

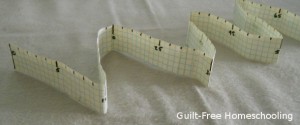
Graph paper marked with five squares per inch (also available in office supply stores) can be used to make a measuring tape for math as a good tactile and visual learning aid. Cut a few sheets into 1-inch wide strips and tape them together for the length you desire. This scale is compatible with the centimeter-scale Cuisenaire Rods: 2 graph-squares = 1 centimeter, so marking numbers on every other line produces a centimeter measuring tape. I used it to illustrate multiplication and division facts by accordion-folding the paper tape into 6 sections of 8 centimeters to show 6 x 8 = 48 and other facts, but a similar principle will work for skip-counting. Fold the tape on every other number, and then read off (auditory) the numbers at each fold for skip-counting by 2’s. Adapt and repeat for other increments.

When your student has advanced to skip-counting by 10’s, draw a large 100-chart on the driveway, and your student can jump or run from box to box (kinesthetic), or have him fill in the numbers with colored chalk (tactile & visual). Do the 100-chart activity on paper with red numbers on the 10’s only (tactile & visual), but black numbers on the other squares. Then write 1-10 in a vertical column on paper, saying them aloud (auditory). Now add a zero to each number, and read aloud again to count by 10’s. Repeat, adding more zeroes, to count by 100’s, 1,000’s, 10,000’s, or as many zeroes as your child can handle.

Kinesthetic teaching tactics will involve large muscle groups: moving arms from the shoulders or moving legs from the hips. Walking, hopping, running, and jumping, and throwing, catching, and reaching are excellent ways to teach a kinesthetic child. You want to have him move his entire body whenever possible. If a child is easily distracted while trying to sit still, he is probably a kinesthetic learner. If the lesson takes place while the student is seated, it is probably not a kinesthetic lesson. If you want a kinesthetic child to learn, do not try to keep his bottom stuck to a chair seat. Let him stand, let him walk around, let him throw a ball to you while reciting, if necessary, but incorporate his need for movement into your lessons. (Notice that this is not wiggling and moving around just for the sake of wiggling and moving and trying to disturb others. This is taking in information through well-coordinated muscles and reinforcing it through repeated muscular actions.)

Tactile teaching tactics will involve small muscle groups: moving hands from the wrist, moving fingers, and touching, feeling, and rubbing with fingertips. Textures, from dramatic and rough to subtle and smooth, and finger and hand movements are excellent ways to teach a tactile child. You want to have him touching something related to the lesson whenever possible. If a child is easily distracted while trying to keep his hands still, he is probably a tactile learner. If the lesson takes place while the student’s hands are empty, it is probably not a tactile lesson. If you want a tactile child to learn, do not try to keep his hands empty and quiet. Let him touch things, let him make something, let him hold a toy while reciting, if necessary, but incorporate his need for touching into your lessons. (Notice that this is not touching and fiddling with things just for the sake of touching and fiddling and trying to disturb others. This is taking in information through an acute sense of touch and reinforcing it through repetitive touches.)

Auditory teaching tactics will involve sound: incoming sounds and outgoing sounds. Speaking, singing, and humming, and listening are all ways to teach an auditory child. You want to involve his ears and vocal chords whenever possible. If a child is easily distracted while the room is quiet, he is probably an auditory learner. If the lesson requires the student to read quietly, it is probably not an auditory lesson. If you want an auditory child to learn, do not try to keep him quiet. Let him hum, let him sing, let him read his assignments aloud, let him discuss the lessons with you, let him listen to music in the background, if necessary, but incorporate his need for vocalization into your lessons. (Notice that this is not making noise just for the sake of making noise and trying to disturb others. This is taking in information through highly sensitive ear-gates and reinforcing it through vocal repetition.)

Visual teaching tactics will involve illustrations and colors: graphs, charts, and diagrams, and lots of bright, stimulating colors. Posters, maps, forms, and worksheets, and color-coding are excellent ways to teach a visual child. You want to involve his eyes whenever possible. If a child is easily distracted while listening, but is not bothered by sitting still, he is probably a visual learner. If the lesson takes place while the student has no examples to look at, it is probably not a visual lesson. If you want a visual child to learn, do not try to keep his eyes focused on you. Let him read, let him draw, let him color while you read aloud, if necessary, but incorporate his need for visual details into your lessons. (Notice that this is not looking around and daydreaming just for the sake of looking and daydreaming and trying to disturb others. This is taking in information through very observant eye-gates and reinforcing it through recalling memory-pictures.)

Any lesson can be adapted to include elements of the various learning styles. Do not be afraid to be creative in trying revolutionary approaches that seem to be unusual applications for the subject at hand. Your “crazy idea” may be the exact key that unlocks the door to learning for your students.
Goal: To Learn Equally Well in All Learning Styles!

Teach Your Children the Art of Amusing Themselves

“I’m bored.” “Mommy, come play with me.” Have you heard these laments lately? By teaching your children to enjoy a variety of “by-myself” activities, you can prevent the incessant whining, cure the boredom, and gain a tiny bit of free time for yourself. You will also be fostering independence in your children by teaching them the basics of teaching themselves.

Your time, Mom, is too valuable to be spent merely entertaining your children. Individual entertainment is a skill very valuable in homeschooling. A student of any age needs to be able to learn on his own, and solitary time is the ideal situation in which to practice independent study. Once they have acquired interest in a few solo activities, your students can entertain themselves while you tend to their siblings, to your housework, or to your own leisure pursuits. They can begin to see the advantages of striving to complete their schoolwork quickly in order to return to their own recreational activities. Children who learn how to entertain themselves will be much more content personally and able to adapt to new circumstances better than will their counterparts who rely on others for entertainment.

Just as some tiny tots need to be spoon-fed the first bite or two of a new food before taking over to feed themselves, some children may need guidance in learning to play by themselves. Start an activity with them, and then slowly wean yourself away from the action: dump out a 100-piece jigsaw puzzle, and get Sammy started on assembling the easy border pieces while you sort out the pieces for a few main elements in the puzzle. (Do not assemble the parts completely, just sort or put a few pieces together to help Sammy along. This is the all-important “teaser” stage: you want to make it irresistible for Sammy to finish the puzzle.) Before long, Sammy will be engrossed in his task with enough confidence to carry him through, and you can excuse yourself to shuffle the laundry, promising to check on his progress later (then be sure that you do come back to praise him). Sometimes, Mom or an older sibling may need to give a few quick lessons in a new activity, but the real learning sets in when the child begins to explore a craft or leisure pursuit on his own. Be sure to praise the child for his time dedicated to working alone, and show him how valuable the skills are that he is developing.

Consider these leisure pursuits that work well as independent activities:

–jigsaw puzzles
–crossword & other word puzzles
–sudoku & other number/logic puzzles
–solitaire card games
–sewing, crocheting, knitting & other needle arts
–painting & drawing
–whittling & woodworking
–Lego’s & other construction toys
–building models
–gardening
–reading
–bicycling, rollerblading, & other individual sports
–(what can you add to this list?)

On one particularly lazy day when my children were small, we had picnicked at a city park and the children were growing bored with the playground equipment. With too much month left at the end of the money, we were seeking no-cost diversions, but boredom was overtaking the usual ideas. As we sat at a picnic table discussing what else we could do for the day, I picked up a handful of the small stones and pea gravel that covered the playground surface. Fingering the tiny rocks led to watching them tumble across each other. Before long, we had stumbled upon a new and challenging game: Rock Stacking. We spent the next hour stacking up the pebbles and seeing who could create the tallest stacks. Height was replaced by quantity as we began counting who could stack the most rocks before their stack toppled over. Soon other children had joined us and we had several families involved with our new game, all cheering each other’s accomplishments. Steady hands were as valuable as a sharp eye for spotting flat surfaces on the rocks, and all participants had to be careful not to jiggle the table and send everyone’s stack back to the starting line. It was a wonderfully enjoyable afternoon that I will not soon forget, especially the amazement on the faces of the children we did not know, who begged to be included in our fun — with not a penny of expenditure to anyone. I am sure that none of those other children would ever previously have considered joining a friend who asked, “Hey, want to go stack rocks?”

As they grow into adults, the inventiveness and creativity that has been developed through individual activities and solo entertainment will show forth in the ability to provide cheap (or free) alternatives to eating out or going to movies. Children who have grown up constantly being entertained by their parents or older siblings have little imagination for how to spend “down time,” so they continue to seek someone to entertain them and need a constant flurry of activity to keep them happy (usually at considerable financial cost). My daughter’s college friends quickly ran out of money and ideas for recreation, prompting the invention of her Shopping Trip Bingo game, an exercise in no-cost entertainment. We have often gone on short nature hikes as a family, and our children have continued their love of that no-cost activity by taking special friends back to our favorite lake for quiet walks and peaceful getaways.

To paraphrase an old saying, “If you give a man a fish, that man knows where to go to get fish.” So if you consistently entertain your children when they are bored, your children will always know whom to go to for entertainment. However, a child who can occupy himself with satisfying leisure activities is learning hobbies that will last a lifetime. The more he explores and learns on his own, the more he hones his skills for teaching himself — skills valuable for homeschooling and for continuing his education throughout life. Any time that you spend in teaching your child a solitary activity (knitting, for example), will be returned to you in multiplied hours that you can dedicate to other pursuits while your child carries on independent activities. Not every child can automatically see how to entertain himself, some need more guidance than others, and a few will continue to need Mom’s approval and encouragement from time to time, but a child who learns to amuse himself will be opening the door to a world full of knowledge and adventure.

Shopping Trip Bingo

Once upon a time, a girl named Jenny went to college in a big city far, far away. It was fun. She made many new friends. They went to classes together and studied together and had all sorts of fun together. Then one day, Jenny and all of her friends realized that they were broke. No one had any more money for movies, or shopping, or any of the things they usually did for fun. Jenny’s friends were very sad. They had all studied very hard and needed a break. They wanted to go have some fun. They wanted to go shopping at the mall, but they had no money to buy things.

Then Jenny had an idea. “Let’s play BINGO!” said Jenny. “Oh, that’s boring,” said her friends. “I know how to make it fun!” said Jenny, and she disappeared into her dorm room. When she came back out a few minutes later, Jenny was holding several small cards. The cards were divided up into squares like Bingo cards, but each square had words written in it, instead of numbers. “Now let’s go to the mall, and I will show you how to play,” said Jenny.

When they got to the mall, Jenny gave each person a card and a pencil. “We will all walk around the mall like we always do, but you have to find the things written in the boxes. The first person to find all of their things and cross them off will win the game!” said Jenny. “Wow! This sounds FUN!” said her friends. Jenny and her friends had so much fun playing her new game that they played it over and over. They loved to go the mall and play Jenny’s Mall Bingo game. Jenny and her friends were happy again, and they did not have to spend any money. That made them extra happy.

* * * * * * * * * *

You do not have to be in college or live near the Mall of America to enjoy Jenny’s game. Your children may enjoy doing this during long car trips or during grocery shopping trips with Mom. Adapt your bingo cards to the area that you will be visiting, and keep your children occupied in boredom-free bliss.

MOA Bingo consisted of a patchwork block of random items to spot during study-break trips to the Mall of America. Suddenly, instead of meandering through the mall, bemoaning their lack of money for shopping, the students had a mission — finding all the items on their bingo cards. Each trip yielded more bizarre items to include on the cards for the next visit.

The Mall of America houses a travel store with posters of far-away places and stuffed toys of exotic animals, in addition to the usual mall-fare of sports shops, clothing stores, and a wide variety of shoppers. The bingo cards contained a balance of hard-to-find and easy-to-find items, along with common, everyday, household objects that can be hard to find in the shopping mall setting. Gift wrapping counters, vending machines, and First Aid Stations are often overlooked while shopping, but become of vital importance in the strategy of Mall Bingo.

Players had to become creative in finding their listed items, especially if their opponents craftily steered them away from the obvious sources. Your card might list “Mickey Mouse,” but your opponent has carefully kept you away from the Disney Store. Now is the time to improvise by heading into a bookstore and looking in the collectibles section. However, the same strategy will work for “Ronald McDonald” if you are trying to steer your opponent away from the Food Court.

Sample items from Mall Bingo cards:
Card A
–obelisk
–snake
–red shoe
–#21
–aspirin
–Ronald McDonald

Card B
–pyramid
–tree frog
–green hat
–#52
–tape
–Mickey Mouse

Notice how the easier-to-find pyramid is balanced by the harder-to-find tree frog. The obelisk is hard to find, but snakes (oddly) were easier to find. Random numbers could be spotted on sports jerseys or price tags. Two or three players stayed together in one group with each individual working to steer the group in favorable directions, but larger groups could split up and work as teams with one card per team. The objects were not purchased, and did not even have to be for sale, but someone besides the player had to witness the object before the college student could check an item off of his card.

My son used the same concept to stay alert during a particularly monotonous college class: Professor Bingo. The squares listed the professor’s many habits, turning them from repetitive mannerisms into delightful antics. Would the prof misplace his chalk, would he hitch up his pants, would he argue against his own notes, or would he emphasize a statement by flicking imaginary water from his fingers?

This game can be adapted to your personal needs. Use more or fewer items, depending on the skill level of your players. On your food-buying trips, teach your little ones to recognize fruits, vegetables, or other items by using pictures from the grocery ads instead of words on the cards, or play it like the Alphabet Game by challenging your kiddies to find a grocery item for each letter of the alphabet.

Having fun does not always have to mean spending money. Our family has invented many enjoyable activities from whatever our circumstances were, and Mall Bingo is a prime example. Now, who wants to go to the mall?

The Value of Supplemental Activities

A friend recently posed an intriguing question to a group of homeschooling moms: “If money were no object, what would you purchase first for your homeschool?” The usual wish-list items came out: specific curriculum choices, books, more books, shelves for all the books, rooms just for school stuff, and books. However, I was the most surprised by reading a spontaneous part of my own answer: “For us, it wasn’t the curriculum itself that ‘made’ homeschooling — it was the extra-curricular activities and supplemental things we did that we remember most and learned the most from.” It was an aspect of homeschooling that I had never truly pondered before, at least not in so many words. I have often suggested various activities to help struggling students bridge the learning styles gap with assorted curricula, but suddenly I was seeing activities as The Most Important Part of any homeschooling experience.

It is not the curriculum itself that matters most; it is what you do with the program and what you do besides the program that will make all the difference in your homeschooling endeavor. Supplemental activities can turn a mediocre program into an educational experience far better than the most renowned program on the market. The activities you choose can be tailored to your child’s individual needs and interests, whereas a boxed program must be universally applicable.

Some programs are better than others, but that still goes only so far. My regular readers already know how much I loved Miquon Math for grades 1-3, but the suggested activities were what really drove the concepts home. Practice away from the workbooks and playing and experimenting with Cuisenaire rods are what solidified the knowledge that was presented in the books. Saxon Math effectively used real-life examples through word problems to teach the students how to set up a formula. (Once they have the formula, any math student can solve the formula.) Our supplemental activities for Saxon math included applying the formulas to more areas of real life: relating fractions to pies and candy bars, doubling recipes for practice using fractions, calculating the areas, perimeters, and angles for home improvement projects, and applying the mathematics of probabilities to everyday situations in my students’ lives. When my daughter had trouble understanding probability from the textbook example of red marbles and blue marbles, I changed the problem to fit her teddy bear collection. Suddenly, her favorite white polar bear stood out in marked contrast to the other bears, and the chances of selecting him at random from a pile of stuffed bears was more easily understood.

We played a great deal with construction toys, but we always built something, even if our projects were not elaborate architectural models. We never stacked the bricks just for the sake of stacking bricks. Instructions for Erector Set models or K’nex figures were a launching pad for our imaginations as we challenged ourselves to combine patterns or build bigger or better designs. Real life usually requires you to have some type of plan, so our activities always had a basic plan as well. We dared to dream, and we learned through the trying, whether we succeeded or not.

We are all familiar with the jokes about students who put a book underneath their pillows, hoping to absorb information by osmosis while they slept. We smile and laugh, knowing that there is no possible way for that to happen, but many times we urge a child to “read the book,” expecting him to absorb all the information in that manner. If the child is adept at visual learning, it may happen, but so much more knowledge and understanding can be gained through the addition of a few supplemental activities. Activities break down the barriers of learning styles, making it possible to teach your child in the way he learns best, no matter what curriculum you are using.

When I took a college chemistry course, I worked industriously at memorizing vast quantities of information. They were only meaningless words to me, but I forced myself to memorize them so that I could reproduce them on test papers. However, through working in the chemistry lab, experimenting with the acids, bases, minerals, and gases, I began to understand the concepts behind those words. I had read the book, and I had learned the facts, but I did not gain understanding until I got into a supplemental activity. Watching bubbles form in a beaker of water as electrodes forced the hydrogen and oxygen molecules to separate made the atomic bonding process straightforward and uncomplicated. It was right there in front of me. I could watch it happen. I collected bubbles of the two gases in separate test tubes and proved their identities with another test. A similar experiment electroplated a nickel coin with the copper from a penny. The diagrams my professor scribbled on the chalkboard became stop-motion animations of the molecular breakdown process. He showed me through symbols and arrows the explanation for what I saw forming in the beaker. It was not sleight-of-hand illusion; it was science taking place at my fingertips. It was not something I could learn sufficiently from merely reading a book. I had read about the process, but actually doing it made the reading portions of my lesson obsolete.

Supplemental activities do not have to be expensive or use fancy materials. Many wonderful, educational activities can be obtained from the simple things you already have around the house.
* Read aloud and discuss plot lines, characters, and what-do-you-think-will-happen-next.
* Play with art and craft materials, even if you have no natural artistic ability whatsoever. If you have difficulty drawing, get off the paper and try “sculpting” with Play-Doh — maybe you are more of a three-dimensional thinker.
* Draw diagrams, even if you have no natural artistic ability whatsoever. The simple chalkboard illustrations that have helped me gain understanding were not artistic or even dimensionally accurate, but I still learned and understood.
* Use manipulatives: hands-on learning aids, whether they are homemade flash cards, things for counting and sorting, or a clock-face made from a paper plate and cardboard “hands.” If it helps your student understand a concept, it is worth your time, trouble, and expense.
* Build models. Who cares if popsicles sticks do not resemble quality building materials? I bought my students a small package of pre-notched “popsicle” sticks (think miniature, flat Lincoln Logs) in the craft department of Wal-Mart. They never looked like much when we built things with them, but the knowledge gained from the process of fitting them together was irreplaceable.
* Do experiments. A vinegar and baking soda reaction is fascinating to someone who has never watched it before. Woodburning with nothing more than a magnifying glass and the sun is another unforgettable experience (especially when you stop paying attention to where you have the light focused and your leg suddenly gets hot).
* Play games. Children sometimes balk at spending more time studying their lessons, but have you ever had a child turn down the chance to play a game? Any game using money is math; many games require forethought and strategy, and all games teach sportsmanship. Get together with other homeschooling families and share your favorite games with each other.
* Invent a new game: take a concept that your students need work on and invent a new game for practicing that concept. Make the pieces yourself or borrow them from other games and write all the necessary rules for some real-life problem-solving experience. I dare you to try it.
* Take on hosting a group project (even if it is nothing more than a Monopoly marathon) and enlist your students to help you plan and execute it. We learned much more from preparing large-scale events than we ever could have learned from merely participating in them. My daughter first ventured into administrative duties when we tackled an event that combined several homeschool support groups. The skills she developed then still serve her today in retail management.
* GO see things and DO stuff: zoos, museums, libraries, etc. A “family pass” will often be usable at more than one location. We purchased a season-long family pass to a small local zoo, only to find that it also entitled us to free admission to a much larger zoo in another city an easy day-trip away. Our pass also included other zoos, history museums, art museums, and science museums for a full year. For a little more than the standard admission for one family visit, we were able to take in multiple wonderful experiences. Another amazing surprise for me was how fascinating unfamiliar libraries were to my children. We dropped by the public library in another city and ended up spending hours exploring it and seeing how its features differed from our local library. Whether you take an extended, educational, family vacation or just walk around your neighborhood noticing the architectural differences, it can be a memorable learning experience.

Anything that takes place outside of the textbooks or outside of the house is always memorable. If I were to ask my children to name their “Top 10 Favorite Things” from our homeschooling days, none of their responses would include the textbooks we used. Their “Top 1,000” list would barely touch on textbooks. Let me say this again: it is not the curriculum itself that matters the most. It is what you do with the program and what you do besides the program that will make all the difference in your homeschooling experience.

The Beauty of Logic (and Sudoku Puzzles)

There are currently two distinct groups reading these words. The first group is those who are nodding their heads in agreement with the “beauty of logic” sentiment in the title and saying, “Yes, logic does have a certain beauty and precision.” The other group are non-math people who are wondering what in the world I could be referring to, while shaking their heads and thinking, “She has really gone off the deep end this time — logic is just painful and confusing!”

By “the beauty of logic,” I mean that there is always a right answer and a wrong answer in logical situations. You know where you stand with logic. Numbers, for example, are logical concepts with finite definitions: two always means exactly two; two never means three; two never means purple. Word meanings can become fuzzy and illogical, especially in the English language, where a word such as love can mean things as diverse as: 1) a deep emotional attachment [love my husband]; 2) nothing, such as a score of zero in a tennis game [two-love]; or 3) an intense desire for or appreciation of something [love this pizza; love that song].

I had tried to share my appreciation of math and logic with my children, but my young son’s distaste of anything math-related kept him from developing a similar emotion. Until now. The summer of his pre-calculus course revealed to him his true abilities in math, but his current semester of university math is opening the door to fun math and logic. And dragging him in. As a computer science major, he is taking a class with the tongue-twisting name of Combinatorics — an exploration of math as arrangements and patterns of numbers. That professor recently assigned some math puzzles of a sort that I have been doing for a long time just for fun. (Yes, I am a sick, sick person, and I do need to get out more often.) It seems that a large portion of the world is discovering these puzzles (now called “Sudoku”), as newspapers are adding them to their daily fare of crosswords and “Jumble” word puzzles.

My son was home for a weekend recently and inquired about these puzzles. He knew they were included in his upcoming assignments and wanted some inside information on how to solve them. Sudoku puzzles consist of a 9 x 9 grid in which the digits 1-9 are entered into each row, column, and 3×3-grid portion so that the digits do not repeat. Enter the Beauty of Logic concept. Logic dictates that the puzzles can be solved through systematic strategies, not merely through trial-and-error guessing. As I explained a few tips to my son for solving the puzzles, his admittedly-non-math-person girlfriend became interested and asked for a sample puzzle to try. When I headed to the computer to print some, my husband called after me, “Print one for me, too.” Our evenings since then have been consumed with clipboards, pencils, erasers, and puzzles as we compare notes on solving strategies and progress to higher difficulty levels.

Finding the one correct digit for any square of the puzzle should be done through a process of elimination: these could work, but those cannot work, so this one must work. I cannot arbitrarily decide that a three would look nice in this spot or that I have not used any fives lately, so I should give a five the opportunity to participate in this corner. The best digit for completing a row is not a matter for discussion: when the other eight digits have already been used, there can be only one possible choice for the final digit. The rules of the game specify that each of the digits must be used only once in each subsection. Therefore, if a digit appears twice, I must assume it is a mistake to be corrected, not something to be tolerated as an alternative solution. If you and I work at solving identical puzzles, our solutions should also be identical — if they do not match, we cannot both be right.

That is what I see as The Beauty of Logic: there are distinct strategies that can be employed to arrive at the correct answer; we do not have to stumble blindly, depending on guesswork and instincts to succeed. There can be many wrong answers, but there is one correct answer. Logic is not a matter of interpretation, nor is it different things to different people. A wrong answer is not open to debate. Incorrect answers must be changed, not tolerated or lauded as “diversity.” If only the rest of life could be so simple.

Homeschooling the Neighborhood

In my state it is not legal for me to officially homeschool children who are not members of my immediate family. However, we did sometimes include neighborhood playmates in our activities, particularly in the summertime when “just another day to play” can tend to be somewhat boring. We did not always do formal lessons through the summer, but we did incorporate fascinating, fun, and educational activities into the relaxed playtime of summer.

Summer was a time when I could devote more of my time to planning or preparing a study or activity for later use. I found that I could also give something a “test run” by trying it out on the kiddies — if they enjoyed a taste of it, chances are they would enjoy a more in-depth look during the school year, and perhaps even the children in our larger co-op group would be interested in it, too. So what do you do when your own children are not quite enough for the activity you would like to try out? Let the neighbors join in. Several times, I prepared a fun, yet interesting and educational activity for my own children to do on a boring summer day, only to find that their neighborhood friends were just as interested in breaking the monotony of swinging and bicycling.

Such was the case when I did extensive research and calculations to examine exactly what size an effective solar-system model should be. I have seen many of the science-fair-type of planetary exhibits made from Styrofoam balls, assorted fruits, or sports balls, but I had always felt that I was not seeing an accurate portrayal from those. While my children were spending their summertime swinging, roller-blading, or just relaxing with a novel, I was delightedly poring over scientific facts and punching furiously at my calculator — a welcome change for me from the usual Mom-fare of laundry and dishes. When I finally trooped outside with my notebook of figures, a large measuring tape, and crude signposts mounted on popsicle sticks, my participants were not merely my own offspring, but their eager friends as well, who jumped at the chance to be included in measuring our lawn and placing the markers for each planet’s orbit. Never was one of my summer projects met with an “I already learned that at school” or a “This is vacation — I don’t want to learn anything” response from the children who were not my regular students. Whenever we needed some extra “classmates” for our learning games, there were always ready and eager volunteers.

One day I prepared the “geeWhiz Quiz” for my children, intending it to double as both a math activity and a scavenger hunt. I also secretly hoped that their time spent searching through the game closet would spur some interest in long-forgotten table games and interest them in playing a few of those again. I explained the process of the activity to them while a friend from the neighborhood was present. She seemed deeply disappointed that I expected my children to do this activity later, after she would have returned home. I quickly copied another worksheet for her, and all three children happily spent the entire afternoon in arithmetical computations. My anticipated bonus also paid off: the trio did find several games that piqued their interest, and they kept themselves occupied for many days afterwards.

We often filled our front sidewalk with an extensive Dr. Seuss universe in colored chalk drawings or an ever-expanding circus train overflowing with acrobatic clowns and exotic animals (each new helper got to add his own train car). Our favorite cartoon book illustrations were faithfully copied over and over and over in sidewalk chalk creations. A cleansing overnight rain never brought disappointment, but instead it meant a clean slate for tomorrow. Time after time, the neighborhood children would see us sitting in the middle of the sidewalk and rapidly migrate to our front yard, picking up bits of chalk and asking what parts they could add to the growing mural. My children were not lacking in social contacts with age-mates, and they learned valuable lessons in teamwork and the sharing of ideas as well as supplies.

Being the only homeschool family in your area does not necessarily mean you will not have contacts with other students. We had many opportunities to share educational experiences with public and private school students who were eager to join us in doing things our way. The neighborhood parents knew they could expect our fun activities to have an educational benefit, and their children never seemed to mind it either.

“Mystery Boxes” and the Scientific Method

My daughter had an interesting exercise in her college chemistry lab which we modified for use at home and again later for a group science class. It is a lesson in using experimentation to make a hypothesis (first guess) and then prove whether or not that theory is correct. These directions tell how we adapted it for a co-op class with two dozen 7-12th graders. If you want to do it at home for only 1 or 2 students, you will obviously only need one set of Mystery Boxes.

Matching Mystery Boxes were prepared in advance for each team of students: an item or group of matching items were placed into a cardboard box that was large enough to allow the items to roll around freely. (Sizes and shapes of boxes may differ, and the contents may vary in quantity to increase difficulty for advanced students.) The box edges were taped shut, and each box was marked with an identifying number. Teams of 4-6 students were each given a set of six boxes to test, and the students were instructed to use the Scientific Method to determine what was inside each box.

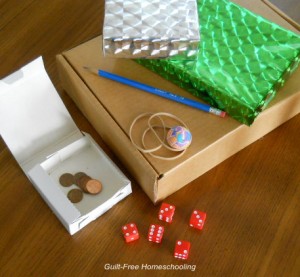
When a student picked up a box, he wrote down the number of the box and his hypothesis of what he thought might be inside, then proceeded to tip, shake, rattle, and listen to prove or disprove his theory and make a conclusion. Each box was passed around to teammates to see if they all came to the same conclusion. When each team had completed its series of several boxes, the boxes were opened to reveal their true contents. Teams were to be as certain as possible of their determinations and not show the contents to other teams. Sample items used in the Mystery Boxes were paper clips, a pencil, marbles, coins, or a large eraser (only one type of item per box). You may choose to use items that are more difficult for older students: several cotton swabs, large rubber bands, pencils in one box and pens in another, a spoon, etc.

The items should be common to everyone, but they are in uncommon circumstances, making them surprisingly tricky to identify. Do we really notice the differences in sounds made by coins and paper clips? How can I determine if the object in this box is a pencil or a pen? Why does the object in this box roll easily this way but seems to slide that way? A delicate touch is needed to tip the box slightly and make a pencil roll slowly enough to hear its six sides or discern its eraser end from the pointed lead end; extreme concentration is required for hearing a few large rubber bands slide softly across their box.

Tips for the Mystery Boxes lesson:
— All Mystery Boxes should be prepared in advance by the teacher so that students have no clue what is inside.
— Objects should be ordinary, common objects, familiar to students.
— Use only one type of item in each box (i.e. do not mix pencils and pens in the same box).
— Objects should roll, slide, or move easily if shaken. Do not use a single tissue, cotton ball, or similar (relatively weightless) object which cannot be sensed in the box.
— Boxes should be large enough to allow objects to roll or slide freely: front to back, side to side, up and down.
— Boxes should be securely sealed to prevent objects from falling out or students from peeking in.
— Multiple items should be used if a single item alone will not have enough identifiable characteristics (a single coin will not be as effective as multiple coins).
— When preparing boxes for a large group class, separate the group into teams and have duplicate sets of boxes so that each team works on the same items. Number the boxes and keep a (hidden) list of their contents to prevent confusion. (All boxes marked #1 contain pencils, all #2 boxes contain rubber bands, etc.)
— Various sizes and shapes of boxes will keep team members focused on their own boxes: “Our #1 box is large and flat, while their #1 box is smaller and taller; they probably don’t contain the same things.” The order of testing the boxes is up to each team: they do not have to proceed in numerical order.
— A set of six boxes (per team) kept each team of five to six students busy for an hour testing, comparing, and discussing. When a team declared that they knew what was in a specific box, I did not lie about the contents, but slyly asked, “Are you sure?” to keep them reasoning and retesting for a longer time.
— I did not tell students what types of items to expect; they were told only “common, everyday objects.” Students had to use their own knowledge to decide what was inside.
— Students must depend on hearing alone (cannot see or feel box contents). Tipping and shaking each box is acceptable, but squeezing or crushing the box to feel its contents is not permitted.
— Thinking skills become better developed as this exercise progresses. Students should test all boxes, and then go through them again, using the knowledge gained throughout the testing process in retesting each box.
— Students may compare the characteristics of boxes with each other (i.e. this box sounds more like coins than that box does).
— Provide paper and pencils for students to write down their hypotheses, reasoning, and conclusions. This is the essential portion of the lesson: learning how to write down their process of experimentation. Students may use their own notebooks, or you may choose to make form-style “lab sheets,” but writing down the process changes this from an entertaining party game into a profitable science lesson.

[For more information on cooperative classes and group activities, visit Topical Index: Co-op Groups.]

Verified by MonsterInsights