What Made This a “Bad” Homeschool Day?

This day started with such promise. You planned the lessons, and everyone took their places, but then something, somewhere went wrong. Very wrong. And you may have no idea why. Go fix yourself a refreshing beverage, and let’s see if we can analyze what happened.

In my personal vocabulary, a “bad homeschool day” has one basic meaning: We didn’t accomplish all of the lessons that I had planned for us to do. There can be multiple causes for this “failure,” which is probably not as much of an actual failure as it is just not hitting the bull’s-eye of your intended target of Lessons Mastered. To take this analogy just a bit further, think of your day’s homeschooling plans as a standard target of concentric rings. Landing an arrow anywhere on the target is a degree of success (a partially learned lesson), and even coming close to the target is still a degree of success (learning anything at all about any topic, but not necessarily the planned lesson). A complete and utter failure would mean that your arrow never even left the bow (although that in itself teaches a lesson, but we’ll get to that later*). Also notice that the bull’s-eye of that target is not a pinpoint. It is actually roomy enough to hold several arrows, meaning that two or three arrows can be separated by some distance while still occupying the official center of the target. Consider this for a moment: you can hit the bull’s-eye several times, with the arrows landing fairly far apart from each other. Different arrows in different parts of the bull’s-eye equate to different homeschooling days that reach the goal in different ways. You can achieve success while still not reaching pinpoint perfection. (Perfection and success are two entirely different things — and success is much easier to achieve than perfection!)

Now let’s look at some possible causes of today’s Bad Homeschooling Day.

1) A Family Emergency — File this under “Life Happens.” These often cannot be avoided. Emergency Room visits are often considered by active little boys to be sure indicators of bravery and manhood, veritable rites of passage. Other emergencies can come in the guise of a chronic illness, a death in the family, or an unexpected change in career or place of residence. Marriage, divorce, pregnancy, miscarriage, and many other events can have a resounding effect on homeschooling progress and for much longer than a single day. There is usually no way to schedule an emergency: it just happens. Please do not despair when some unexpected event disrupts your calendar. Do keep in mind that extremely valuable *life lessons will still be learned during family emergencies — lessons that do not come from textbooks and cannot be experienced in classroom situations.

2) Your Students Just Didn’t Get It — File this under “Not Unusual.” Students vary in how they learn: God made them that way. What bizarre sort of Stepford Wives-world would this be if everyone reacted exactly like everyone else? The lessons for today were probably not presented in ways that corresponded to your students’ learning styles. See the Titles Index and look for Alternate Methods of Teaching [for various subjects]. Even if the exact subject you need is not listed, the articles contain many suggestions for presenting material to the various learning styles, and you will find ideas that will help.

3) Your Students Would Not Stay On Task — File this under “Learning Styles.” Over there is a daydreamer, here is a wiggler, this one is a goof-off, and that one never stops talking. Sound familiar? This category can also be applied to your students’ styles of learning, but this, too, can be accommodated. It’s not that your students are trying purposely to ignore you; it’s just that they find other facets of life much more intriguing than the way this particular lesson is being presented.

A daydreamer may be thinking up a truly valuable invention, or mulling over a tidbit from a recent conversation or book or movie or song, or puzzling over why something works the way it does, and if that does then shouldn’t this be possible, too? Your daydreamer is very likely not dreaming at all, but thinking very deep and elaborate thoughts and ideas. Allow that child to keep an “idea notebook” handy for quickly jotting down thoughts to be explored more fully later, after the lessons are done. The journal will help the child remember those thoughts, and it just might help him get refocused on the lesson at hand. Plus, you get the bonus of voluntary writing: SHH — don’t let the child know that you are secretly counting this as a writing assignment! This is just a special, personal notebook that can be kept handy during any lesson and pulled out for scribbling a quick note without receiving a scolding for momentarily not paying attention. Assure him this journal will not to be corrected, graded, or even read by anyone else until he chooses to share his ideas. My son kept a notebook that we called his Invention Journal, which he filled with complicated drawings and detailed explanations for items he felt would be valuable, time-saving, or just plain fun.

A wiggler has a serious need to move, so use it to your advantage. Send him off to run an errand to the other end of the house or to run laps around the back yard before you begin presenting the lesson. Once his muscles are awake, he will be a much more attentive listener. Include stretch breaks between lessons or between sections of a long lesson. Hindering this child’s need for movement is equivalent to letting his brain run out of gas.

Talkers have just as great a need to express themselves as the wiggler has a need to move. These are the students who can easily be engaged in discussions, debates, and question-and-answer sessions about lesson concepts. They are not likely to read directions themselves: they are much more likely to ask you to tell them what to do. [See Teach Your Students to Teach Themselves for help with this.] A budding comedian needs to get the funny story out of his system before he will be able to concentrate on any academic input, so invite him to tell it, and enjoy a hearty laugh together. He will be much more attentive to your lessons when he knows you appreciate his humor. You can trust me on this one — by the time my son turned six, I had developed a great empathy for what Jerry Seinfeld’s mother must have endured.

A student who cannot keep his hands still is often accused of goofing off and delaying his work by fiddling with anything within reach. This one will drive you straight to the room with the thickly padded rubber wallpaper unless you realize that those busy fingers are the keys to his ears. Just like the wiggler who must move his legs to activate his brain, The Busy Fingers Kid must have something in his hands to stimulate his brain. Once again, you can use this to your advantage: let him hold a favorite toy or keep his special blanket folded underneath him on his chair or give him modeling clay to work with while you read aloud or explain a lesson concept. Do not insist on eye contact with this child to prove he is paying attention — his ears will only be able to listen to you if his hands are busy, and his eyes may or may not focus on you. This child will respond especially well to manipulatives, learning aids, and educational gadgets. It’s not that he wants something to play with, he just needs to feel something with his fingers to be able to learn.

4) A Defiant Student — File this under “Needs a Little More Time.” This most often occurs when a family is involved in a major change, such as the transition from public or private school to homeschooling, especially if the student is not completely thrilled with the idea. Students who have previously been in a classroom situation need time to decompress and shift gears into the more relaxed atmosphere of homeschooling. A good rule of thumb for the length of the transition is one month for every year the child spent in school, double that if the child went to preschool. That period will be a time of adjustment: expect to find and repair potholes, expect to share tears and triumphs, and be as patient, loving, and forgiving as you possibly can muster. Know that every rough patch you can bring your student through will lead to smoother sailing later on. Remember that this child’s entire academic world is undergoing dramatic changes, and your student has no idea what to expect next. Treat your defiant student with respect, and he will respect you in return. [See Troublesome Students for more specific suggestions.]

5) Using a Homeschooling Style That Is Counter to Your Family’s Lifestyle — File this under “Common Mistakes.” Many families who are new to homeschooling, especially families who are leaving public or private school, make the all-too-common-but-well-intended mistake of trying to duplicate a formal school routine at home. Reasoning that the children have been used to precisely timed periods, clocks and bells to signal those periods, structured lessons, and periodic tests, innocent first-time homeschoolers may think it is wrong to finish a subject in less than 30 minutes (or to extend it longer than 60 minutes), wrong to start the day’s lessons after 10 AM (or before 8 AM), or wrong to finish all of the day’s lessons in only 2 hours (or wrong not to have everything finished up by 3:15 PM). Let me assure you that you may use as much or as little time as seems fitting to your students’ abilities, and daily variances are not at all uncommon. Furthermore, it is absolutely permissible to take stretch breaks and play breaks and snack breaks as often as they may be necessary. You are allowed to teach students of close but differing ages as though they were in the same grade at the same time, if that fits well into your situation and their needs. You are allowed to skip a lesson now and then, spread a single lesson over several days, take a day off when you really need it, and choose educational materials that match your family’s values and interests.

If your students need structure and precise scheduling, then by all means use it. But if your family feels stifled and pressured by demanding schedules and tedious lessons, explore learning in a more relaxed, more motivating environment. Perhaps your plans have been too aggressive. Perhaps you do need more personal discipline. Whatever your family’s needs may be, find the combination of lesson materials and supplemental activities that works for your family and begin to thrive.

I cannot promise that you will never again have a Bad Homeschooling Day. I cannot promise that every Bad Homeschooling Day can be magically transformed into an Exceptional Learning Day. What I can guarantee is that you will get out of homeschooling exactly what you will put into it: if you work toward teaching your students in the ways they learn best, you will reap attentive, eager learners who may often be several steps ahead of you. When a student’s interest veers away from the planned lesson, do not be afraid to pursue his suggestion — you may both end up learning much more than the textbook’s authors intended.

The poet Robert Burns is often paraphrased, The best laid plans of mice and men often go awry. Proverbs 16:9 provides a more optimistic conclusion: The mind of man plans his way, but the Lord directs his steps. No matter what your plans may be, remember that they are only plans: ideas and intentions of what you hope to accomplish with your students during a set period of time. Some days are slow learning days — you know yourself that on some days you can think faster or more clearly than you can on other days, depending on the weather, a mild illness, or the unpredictable distractions of life. Your children are exactly the same: some days their progress will be slow, and on other days they will make up for lost time and amaze your socks off! Give yourselves time to adapt to learning at home, and experiment with schedule changes until you find the ideal solution for your family’s needs. Use Life’s interruptions to teach the lessons not found in books, and recognize the lessons your students are learning, whether or not the worksheets get completed today.

For further encouragement, please see these additional articles:
Redeeming a Disaster Day
Homeschooling Is a Choice
What Is Your “Best”?
Reschedule, Refocus, Regroup

Top 10 Dress-up Items

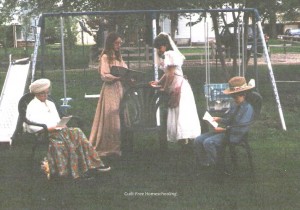
Kids love costumes. Dressing up in fanciful attire does something to spark a child’s imagination. Turn your children loose with a boxful of dress-up items, and they will be busy for hours, dressing up, imagining, changing, playing, wondering, and becoming many different characters.

When I was a little girl, my family had a large box of dress-up clothes. I remember playing with them for hours and hours. My favorite Halloween costumes either came out of this box or were added to it after the treats were gone. Specialty items were gathered and quickly tucked into the box. Fanciful costumes created for school plays also went into the box once the performances were over.

Many years later, I created a dress-up box for my own children. They spent many afternoons trying on everything in the box, sharing the costumes with friends during play days, making up skits to fit their costumes, and doing it all over and over again. Some days they dressed up as elegant ladies and gentlemen and held fancy “tea” parties; other days they strived for the goofiest costumes possible and convulsed with laughter and delight.

As dress-up quickly became one of my children’s favorite activities, I began searching for specific items to round out their collection. I cleaned out closets and shopped thrift stores and yard sales for wonderful items: a faded prom dress had been discarded in a yard sale “free” box, and my daughter played with it for years afterward. Here are some basic categories of dress-up goodies to help you get started on your own fanciful fashion collection.

1. Hats. Ladies’ hats; men’s hats; silly, Dr. Seuss-style stocking caps; construction hard-hat; sailor hat; baseball caps; cowboy hats; berets; English-style driving caps; plastic crowns and tiaras; any type of specialty headwear you can find! We had extra boxes just for hats to keep the fancier ones from being crushed.

2. Skirts and Dresses. Elastic-waist skirts, with the elastic made tight enough to fit small kiddies. Full, twirly skirts are best! Dresses are wonderful, especially an old prom dress or bridesmaid’s dress with lace, sparkles, and/or layers of ruffles. My mom sewed spaghetti straps onto a formerly-strapless 1950’s prom dress so that it could hang from my ultra-thin childhood frame. She also made me a “Miss America” banner (which I still have to this day) when I entered the 2nd grade costume carnival in my beautiful gown. It didn’t matter to me that some of the canary-yellow lace ruffles were torn or that the gown was woefully out of style–I loved it and felt very special when I was wearing it. It was originally designed as mid-calf in length, but it dragged on the floor when worn by a 7-year-old, making me feel beautiful and elegant in my tattered, hand-me-down gown.

3. Vests. Dark colors or leather vests work just right for playing cowboys or sheriff. Add a necktie for a businessman’s look. (Keep the knot tied, and just loosen it to slip over the child’s head. For safety with very small children, hand-stitch the knot in place, then cut the tie at the back of the neck and sew in a section of elastic.)

4. Suit Coat or Blazer. Don’t forget that boys like to play dress-up, too! And both boys and girls have fun dressing up as Mommy and Daddy.

5. Gloves. Any colors, all lengths–children love gloves. I snagged opera-length gloves in bright turquoise and short brown gloves trimmed in shiny gold glass beads at a yard sale for 25 cents per pair.

6. Costume Jewelry. Ear clips, bangle bracelets, long strings of beads–the gaudier, the better. Old eyeglass frames (lenses removed) and sunglasses fall into this category as well. You may want another box just to hold the junky jewelry!

7. Shoes. I combed dozens of yard sales before I found the ultimate treasure: women’s black suede pumps in a petite size 5 (for only $1)–the perfect size for a small child to clomp around in. We also had a pair of lace-up shoes large enough that my youngsters could put their foot (shoe and all) inside them for clown shoes they could actually walk in!

8. Furs. Fake furs are best for wash-ability after tea party accidents. We had stoles, wraps, and hats. (Real furs can be quite heavy, especially if the garment is very large and the child is very small. Real furs also attract insects to your dress-up closet!)

9. Scarves. The larger, the better–a really large scarf can double as a superhero’s cape, a princess’s train, an elegant shoulder wrap, an apron, a doll blanket, etc. Include remnants of lace (even a discarded lace tablecloth or lace curtain panel) for veils or wedding dress trains. Remember to include bandanas for your cowboys.

10. Props. Plastic swords, holsters and six-guns, purses and tote bags, a sheriff’s badge, artificial flower corsages, aprons, suspenders, tool belts or carpenter’s nail aprons, etc. Bring out the toy dishes for the tea parties, the toy doctor’s kit and old elastic bandages, and the play tools and an afternoon of make-believe will be unstoppable.

We tossed everything into a huge cardboard carton, large enough that the children could clean up after themselves easily. The size of your storage box is important: it should easily hold everything when tossed in carelessly. Folding the garments as they are put away will result in better looking costumes at the next play session, but diligence sometimes gives way to speed in clean-up. From time to time, I went through the items as we cleaned up and sorted out things which needed laundering, mending, or disposal.

A full-length mirror is another valuable item–the children will love seeing their creative couture, and the resulting giggles will fill your home with the sounds of happiness. Be prepared for costume parades, spontaneous dramatizations, and strange looks from the neighbors if your children venture outdoors in their finery. One mom even asked me how we created a hoop skirt, and she praised our ingenuity: several sizes of hula hoops suspended with string from a belt worn underneath the full-skirted dress.

My children are now grown, but they still cherish their favorite costume pieces and manage to find uses for them year after year. They also find new items now and then that they want to save for their future children’s dress-up collections! Dress-up and make-believe are excellent ways to ignite a child’s imagination, stimulate creative thinking, and reward Mom with a bit of free time while the kiddies entertain themselves.

10 Ways to Ease into Homeschooling

(For Your 1st Year or Any Year)

1. Do any simple craft project together. Don’t obsess about neatness: have fun. Make decorations for a “Family Friday Feast” party and kick off your new school year with a celebration.

2. Read aloud to your children, even if it’s only for one week of the summer or for a short period each day. Pick a short, simple book or use fun poetry. Be expressive! Use different voices for each character. Take turns and let the children read, too. Listen to an audio book as an alternative.

3. Take your children for a walk each day. Keep it short, if desired. Focus on everyday sights you usually overlook. Use this time to get into the routine of discussing simple things together.

4. Use the hot summer days to hide in the air conditioning and learn italic handwriting, read and write silly poetry, read a stack of books from the library (even picture books), do a jigsaw puzzle, or play every board game you own at least once.

5. Visit a museum, zoo, or other “field trip.” Follow up with a time of family discussion about each person’s favorite points and new discoveries.

6. Hold a “Cooking Marathon Day” to make some basic meal components ahead and freeze them for use on busy homeschool days. Make a huge batch of cookies and freeze them in small packages for quick treats in the car on field trip days.

7. Hold a “Game Day” and let each child select a favorite game, and everyone plays together, rotating through the selections. Relax, laugh and get silly, and enjoy each other’s company.

8. Hold a “Family Conference” to discuss what each member expects from homeschooling. Let each express his hopes and fears, likes and dislikes. This time of open sharing will reveal some new things you had not thought of trying and some other things you may want to avoid. (I had not realized how traumatizing a teacher’s red pencil had become to my formerly public schooled child until she shared, so I then began marking her papers with other, happier colors.)

9. Back-to-school shopping–even homeschoolers enjoy a few new items. Find some new containers for homeschool storage, art materials, or just some fun pencils and notebooks. Purchase a special reference book, wall map, or other useful learning aid for the whole family. If your students have left public or private school to begin homeschooling, allow them to choose some things that were not allowed for use in their last classroom (Trapper binders, mechanical pencils, colored-ink pens).

10. Begin classes with only one subject per day for each student. After a week, add a second subject; week three, add two more subjects. Continue until you are up to your full schedule.

From the Mailbox: Read-Aloud Disruptions

This is part of a series of articles based on actual questions I have received and my replies to them. Real names will not be used, and I will address my responses to a generic “Mom”; if you are a homeschooling Dad, the advice can usually be applied to you as well. The wording will be altered from the original letters (and often assembled from multiple letters) and personal details will be omitted or disguised in order to protect the privacy of the writers while still maintaining the spirit of the question. If you have a specific homeschooling question that you would like me to address, please write to me at guiltfreehomeschooling@gmail.com. If part of your letter is used in an article, your identity will be concealed.

Dear Carolyn,
I am the HS mother of several children, with only two old enough for school. I really want to improve on reading aloud to my kids. They do okay with picture books, aside from the jockeying for position on Mom’s lap and crying about whether or not they can see the pictures well enough, but chapter books just don’t hold their interest. The kids are fighting, playing (loudly), leaving the room, and otherwise ignoring my attempt to read to them these wonderful books that I so enjoy. I am trying to pick age/gender appropriate books. Help! Do you have any suggestions? I feel like I’ve been waiting so long for them to be “ready” for chapter books. Should I have to discipline them into good behavior for listening to a good book? This seems to defeat the purpose for me–I want them to enjoy it! Do I have to wait for them to be older still? My oldest is very hands on, active, etc., and he tends to lead the behavior of the others (for the worst).
–Mom

“Discipline,” meaning punishment, is probably not required, but “discipline” — by its definition of training — is definitely in order. This will be a fundamental learning experience for your children: your goal is not merely to read them a book, your goal is teaching your children how to listen and how to show respect.

Your older children can learn to enjoy longer stories, but the youngest ones will not be able to sit still for very long or comprehend the extended plot of a longer story. You may need to do read-aloud time when the youngest ones are napping, just to limit disruptions until the older children begin to understand what behavior you want them to exhibit.

Very few people (adults included) are able to sit absolutely still and listen with strict attention for more than a few minutes. Work with your oldest child’s hands-on needs and allow the children to color, paint, play with clay or Play-Doh, or build with Lego’s while you read to them. As long as they have a quiet activity, they can still hear you reading, and they will probably listen for a longer period of time if their hands are kept busy. The preschoolers might do wood or foam puzzles or lacing cards — I am sure you will come up with several ideas from your stash of toys and art materials. It is also a good idea for each child to have his own activity, to prevent squabbles over “I need that piece” during the story. You might also consider designating certain playthings for story-time only, making them more special and keeping the children from becoming bored with them.

Since your children’s behavior has not met your expectations up to this point, consider starting over by laying some ground rules. Allow each child to pick a quiet activity while you spread a bath towel on the floor for each child to sit on. Leave enough space between the towels so that the children will not be elbow-to-elbow. Explain to them that their towel is their personal space while Mom is reading the story, and they are to remain within its boundaries during story-time. Assure them that today’s story has no pictures (or that you will let each child see the pictures in turn), that each of them will be able to hear well from his space, and that, since each child’s arms and legs must remain within his towel-space, no one will be disturbing anyone else. Limit the interruptions by giving each child a chance to get a drink, go potty, and “get the wiggles out” before they all take their places for story-time.

Start this new routine of “personal space” with a short reading time from a book that the children already enjoy (especially the oldest “ringleader”). If anyone disrupts the story, you may allow one or two warnings on the first day as practice, but close the book at the next infraction. Stop reading and put the book, toys, and towels away for the day. It may take several days for them to adapt to the new routine, but your persistence will pay off, and they will gradually learn that leaving their space means that the reading time comes to an abrupt end for everyone.

Once the children have mastered the lesson of staying within their own spaces to listen, you may want to allow the older ones to change their space from a towel on the floor to a seat at the table, allowing them to do a wider variety of quiet activities during the reading. The older children may even be able to work together on a jigsaw puzzle while you read. However, your toddlers may take longer to understand the “space” limitations, so do not advance the older students too quickly, before the younger children are able to understand the purpose behind the concept.

Bit by bit, your children will learn how to sit quietly, how to listen, and how to respect their siblings. Start with a short reading time, and increase it gradually as a reward to your children for their improved behavior. Minor setbacks are temporary: remember that your children are practicing a new skill. Above all else, praise your children for their accomplishments!

[For further insight, see the articles linked below]
Is This “Acceptable Behavior”?
“Parent” Is a Verb
Respect Must Be Earned
Siblings as Best Friends
Learning to Walk — Seen as a New Lesson
Social Skills — What Should I Teach My Preschooler?

Applying Learning Styles with Skip-counting

I have often written about learning styles and how each person can relate to material presented in certain ways better than they can grasp the same material presented in other ways. Today’s lesson is for the parent who is saying, “Okay, I understand that this child is more auditory and that child is more visual, but what do I do with that information?” I will walk you through a basic lesson for early math, skip-counting. While giving you some tips for teaching skip-counting, I will also show you how to adapt any lesson to cover each of the various learning styles. Covering all learning styles in a lesson will enable all of your students to learn the material at the same time and give each student a more complete understanding of the material being presented.

Begin by explaining the principle of skipping to your child: walk across the room with him, then skip across the room with him to illustrate how skipping covers the same distance faster and requires fewer steps than merely walking does. Explain that skip-counting is a short-cut way to count things, by using fewer steps and skipping over certain numbers to cover the distance faster.

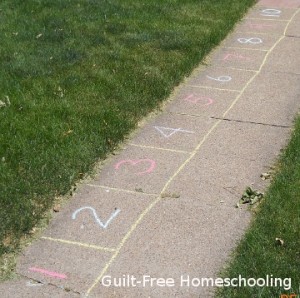
Children love kinesthetic applications, so if the weather allows, let’s take the math outside. Use sidewalk chalk to draw a long line down the sidewalk or driveway. Now mark the line off in reasonable increments (approximately the length of your child’s foot) and number each mark to create a number line so that your child can step from number to number. Drawing this as a long row of numbered boxes (instead of just a thin line) might make the concept easier for your child to understand, as it will resemble a giant game board where he can jump from box to box. Have him stand at the beginning (make a “start” or “zero” place), then have him step or jump to the “2” place, then to 4, and then to 6 to show him the concept of counting by two’s. Can he tell you where he should go next?

Once he is able to skip-count by 2’s, you can repeat the activity by having him skip-count by 4’s. If the increments become too large to step or jump to, he can run quickly across the “skipped” numbers and stop on the desired number, shouting the number loudly as he skip-counts the increments. If numbered boxes on the sidewalk do not work for your situation, try using kitchen floor tiles or stairs, or use masking tape to “mark” a line on your floor or carpeting.

Next, shift the concept from kinesthetic to tactile by drawing a series of smaller numbered boxes on paper and have him do “finger skipping” from one number to another, first by 1’s, then by 2’s. You may eventually want to let him use some game pawns, moving them from square to square while counting off the increments.

When your child understands the entire concept of skip-counting, you can pour out a large quantity of the substance of your choice onto the table (or a cookie sheet) and allow your student to start counting objects: M&M’s, oyster crackers, dry beans, buttons, Lego’s, or checkers. Count them by 1’s until he has the idea that counting them all individually will be a long process. Now have him move two at a time and try counting by 2’s. Allow him some time to practice this concept — it can be difficult to do any task until you are used to it. After he has the 2’s mastered, then you can move on to skip-counting by 4’s, 3’s, 5’s, 10’s, or any desired increment. (Counting by 4’s is an easy concept to follow counting by 2’s, since it is just a larger extension of counting by 2’s — counting just the even numbers by 2’s. I recommend doing the 4’s before the 3’s for this reason. In the same manner, follow counting by 3’s with 6’s, and follow 5’s with 10’s.)

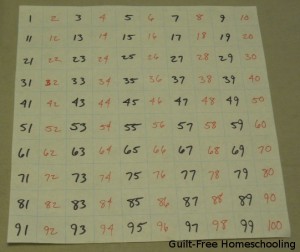
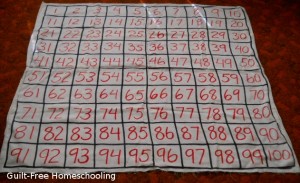
Another activity to help a student understand skip-counting by 2’s is to fill in a 100-chart with colored markers (adding a strong visual element). Draw* a chart of 10 x 10 boxes (10 rows of 10 squares each). Now alternate filling in the numbers: Mom writes an odd number in black, and the student writes an even number in red. Say each number aloud (here is the auditory part of the lesson) as you write them. Read the numbers over again when the chart is all filled in, alternating as Mom says a number she wrote and the student says a number he wrote — and suddenly the student is counting by 2’s! Then Mom can be quiet while he reads only his numbers aloud to reinforce his new skill. (Adapt this activity to other increments as needed for skill in skip-counting.) *Note: 1-inch graph paper is available at office supply stores in a poster-sized display tablet. I LOVE THIS STUFF! It is great for fast number charts — and hundreds of other homeschool uses. I rolled mine up and tied the roll securely with string for easier storage on a closet shelf.


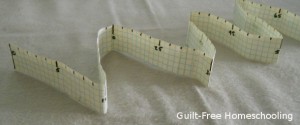
Graph paper marked with five squares per inch (also available in office supply stores) can be used to make a measuring tape for math as a good tactile and visual learning aid. Cut a few sheets into 1-inch wide strips and tape them together for the length you desire. This scale is compatible with the centimeter-scale Cuisenaire Rods: 2 graph-squares = 1 centimeter, so marking numbers on every other line produces a centimeter measuring tape. I used it to illustrate multiplication and division facts by accordion-folding the paper tape into 6 sections of 8 centimeters to show 6 x 8 = 48 and other facts, but a similar principle will work for skip-counting. Fold the tape on every other number, and then read off (auditory) the numbers at each fold for skip-counting by 2’s. Adapt and repeat for other increments.

When your student has advanced to skip-counting by 10’s, draw a large 100-chart on the driveway, and your student can jump or run from box to box (kinesthetic), or have him fill in the numbers with colored chalk (tactile & visual). Do the 100-chart activity on paper with red numbers on the 10’s only (tactile & visual), but black numbers on the other squares. Then write 1-10 in a vertical column on paper, saying them aloud (auditory). Now add a zero to each number, and read aloud again to count by 10’s. Repeat, adding more zeroes, to count by 100’s, 1,000’s, 10,000’s, or as many zeroes as your child can handle.

Kinesthetic teaching tactics will involve large muscle groups: moving arms from the shoulders or moving legs from the hips. Walking, hopping, running, and jumping, and throwing, catching, and reaching are excellent ways to teach a kinesthetic child. You want to have him move his entire body whenever possible. If a child is easily distracted while trying to sit still, he is probably a kinesthetic learner. If the lesson takes place while the student is seated, it is probably not a kinesthetic lesson. If you want a kinesthetic child to learn, do not try to keep his bottom stuck to a chair seat. Let him stand, let him walk around, let him throw a ball to you while reciting, if necessary, but incorporate his need for movement into your lessons. (Notice that this is not wiggling and moving around just for the sake of wiggling and moving and trying to disturb others. This is taking in information through well-coordinated muscles and reinforcing it through repeated muscular actions.)

Tactile teaching tactics will involve small muscle groups: moving hands from the wrist, moving fingers, and touching, feeling, and rubbing with fingertips. Textures, from dramatic and rough to subtle and smooth, and finger and hand movements are excellent ways to teach a tactile child. You want to have him touching something related to the lesson whenever possible. If a child is easily distracted while trying to keep his hands still, he is probably a tactile learner. If the lesson takes place while the student’s hands are empty, it is probably not a tactile lesson. If you want a tactile child to learn, do not try to keep his hands empty and quiet. Let him touch things, let him make something, let him hold a toy while reciting, if necessary, but incorporate his need for touching into your lessons. (Notice that this is not touching and fiddling with things just for the sake of touching and fiddling and trying to disturb others. This is taking in information through an acute sense of touch and reinforcing it through repetitive touches.)

Auditory teaching tactics will involve sound: incoming sounds and outgoing sounds. Speaking, singing, and humming, and listening are all ways to teach an auditory child. You want to involve his ears and vocal chords whenever possible. If a child is easily distracted while the room is quiet, he is probably an auditory learner. If the lesson requires the student to read quietly, it is probably not an auditory lesson. If you want an auditory child to learn, do not try to keep him quiet. Let him hum, let him sing, let him read his assignments aloud, let him discuss the lessons with you, let him listen to music in the background, if necessary, but incorporate his need for vocalization into your lessons. (Notice that this is not making noise just for the sake of making noise and trying to disturb others. This is taking in information through highly sensitive ear-gates and reinforcing it through vocal repetition.)

Visual teaching tactics will involve illustrations and colors: graphs, charts, and diagrams, and lots of bright, stimulating colors. Posters, maps, forms, and worksheets, and color-coding are excellent ways to teach a visual child. You want to involve his eyes whenever possible. If a child is easily distracted while listening, but is not bothered by sitting still, he is probably a visual learner. If the lesson takes place while the student has no examples to look at, it is probably not a visual lesson. If you want a visual child to learn, do not try to keep his eyes focused on you. Let him read, let him draw, let him color while you read aloud, if necessary, but incorporate his need for visual details into your lessons. (Notice that this is not looking around and daydreaming just for the sake of looking and daydreaming and trying to disturb others. This is taking in information through very observant eye-gates and reinforcing it through recalling memory-pictures.)

Any lesson can be adapted to include elements of the various learning styles. Do not be afraid to be creative in trying revolutionary approaches that seem to be unusual applications for the subject at hand. Your “crazy idea” may be the exact key that unlocks the door to learning for your students.

Goal: To Learn Equally Well in All Learning Styles!

Teach Your Children the Art of Amusing Themselves

“I’m bored.” “Mommy, come play with me.” Have you heard these laments lately? By teaching your children to enjoy a variety of “by-myself” activities, you can prevent the incessant whining, cure the boredom, and gain a tiny bit of free time for yourself. You will also be fostering independence in your children by teaching them the basics of teaching themselves.

Your time, Mom, is too valuable to be spent merely entertaining your children. Individual entertainment is a skill very valuable in homeschooling. A student of any age needs to be able to learn on his own, and solitary time is the ideal situation in which to practice independent study. Once they have acquired interest in a few solo activities, your students can entertain themselves while you tend to their siblings, to your housework, or to your own leisure pursuits. They can begin to see the advantages of striving to complete their schoolwork quickly in order to return to their own recreational activities. Children who learn how to entertain themselves will be much more content personally and able to adapt to new circumstances better than will their counterparts who rely on others for entertainment.

Just as some tiny tots need to be spoon-fed the first bite or two of a new food before taking over to feed themselves, some children may need guidance in learning to play by themselves. Start an activity with them, and then slowly wean yourself away from the action: dump out a 100-piece jigsaw puzzle, and get Sammy started on assembling the easy border pieces while you sort out the pieces for a few main elements in the puzzle. (Do not assemble the parts completely, just sort or put a few pieces together to help Sammy along. This is the all-important “teaser” stage: you want to make it irresistible for Sammy to finish the puzzle.) Before long, Sammy will be engrossed in his task with enough confidence to carry him through, and you can excuse yourself to shuffle the laundry, promising to check on his progress later (then be sure that you do come back to praise him). Sometimes, Mom or an older sibling may need to give a few quick lessons in a new activity, but the real learning sets in when the child begins to explore a craft or leisure pursuit on his own. Be sure to praise the child for his time dedicated to working alone, and show him how valuable the skills are that he is developing.

Consider these leisure pursuits that work well as independent activities:

–jigsaw puzzles
–crossword & other word puzzles
–sudoku & other number/logic puzzles
–solitaire card games
–sewing, crocheting, knitting & other needle arts
–painting & drawing
–whittling & woodworking
–Lego’s & other construction toys
–building models
–gardening
–reading
–bicycling, rollerblading, & other individual sports
–(what can you add to this list?)

On one particularly lazy day when my children were small, we had picnicked at a city park and the children were growing bored with the playground equipment. With too much month left at the end of the money, we were seeking no-cost diversions, but boredom was overtaking the usual ideas. As we sat at a picnic table discussing what else we could do for the day, I picked up a handful of the small stones and pea gravel that covered the playground surface. Fingering the tiny rocks led to watching them tumble across each other. Before long, we had stumbled upon a new and challenging game: Rock Stacking. We spent the next hour stacking up the pebbles and seeing who could create the tallest stacks. Height was replaced by quantity as we began counting who could stack the most rocks before their stack toppled over. Soon other children had joined us and we had several families involved with our new game, all cheering each other’s accomplishments. Steady hands were as valuable as a sharp eye for spotting flat surfaces on the rocks, and all participants had to be careful not to jiggle the table and send everyone’s stack back to the starting line. It was a wonderfully enjoyable afternoon that I will not soon forget, especially the amazement on the faces of the children we did not know, who begged to be included in our fun — with not a penny of expenditure to anyone. I am sure that none of those other children would ever previously have considered joining a friend who asked, “Hey, want to go stack rocks?”

As they grow into adults, the inventiveness and creativity that has been developed through individual activities and solo entertainment will show forth in the ability to provide cheap (or free) alternatives to eating out or going to movies. Children who have grown up constantly being entertained by their parents or older siblings have little imagination for how to spend “down time,” so they continue to seek someone to entertain them and need a constant flurry of activity to keep them happy (usually at considerable financial cost). My daughter’s college friends quickly ran out of money and ideas for recreation, prompting the invention of her Shopping Trip Bingo game, an exercise in no-cost entertainment. We have often gone on short nature hikes as a family, and our children have continued their love of that no-cost activity by taking special friends back to our favorite lake for quiet walks and peaceful getaways.

To paraphrase an old saying, “If you give a man a fish, that man knows where to go to get fish.” So if you consistently entertain your children when they are bored, your children will always know whom to go to for entertainment. However, a child who can occupy himself with satisfying leisure activities is learning hobbies that will last a lifetime. The more he explores and learns on his own, the more he hones his skills for teaching himself — skills valuable for homeschooling and for continuing his education throughout life. Any time that you spend in teaching your child a solitary activity (knitting, for example), will be returned to you in multiplied hours that you can dedicate to other pursuits while your child carries on independent activities. Not every child can automatically see how to entertain himself, some need more guidance than others, and a few will continue to need Mom’s approval and encouragement from time to time, but a child who learns to amuse himself will be opening the door to a world full of knowledge and adventure.

Shopping Trip Bingo

Once upon a time, a girl named Jenny went to college in a big city far, far away. It was fun. She made many new friends. They went to classes together and studied together and had all sorts of fun together. Then one day, Jenny and all of her friends realized that they were broke. No one had any more money for movies, or shopping, or any of the things they usually did for fun. Jenny’s friends were very sad. They had all studied very hard and needed a break. They wanted to go have some fun. They wanted to go shopping at the mall, but they had no money to buy things.

Then Jenny had an idea. “Let’s play BINGO!” said Jenny. “Oh, that’s boring,” said her friends. “I know how to make it fun!” said Jenny, and she disappeared into her dorm room. When she came back out a few minutes later, Jenny was holding several small cards. The cards were divided up into squares like Bingo cards, but each square had words written in it, instead of numbers. “Now let’s go to the mall, and I will show you how to play,” said Jenny.

When they got to the mall, Jenny gave each person a card and a pencil. “We will all walk around the mall like we always do, but you have to find the things written in the boxes. The first person to find all of their things and cross them off will win the game!” said Jenny. “Wow! This sounds FUN!” said her friends. Jenny and her friends had so much fun playing her new game that they played it over and over. They loved to go the mall and play Jenny’s Mall Bingo game. Jenny and her friends were happy again, and they did not have to spend any money. That made them extra happy.

* * * * * * * * * *

You do not have to be in college or live near the Mall of America to enjoy Jenny’s game. Your children may enjoy doing this during long car trips or during grocery shopping trips with Mom. Adapt your bingo cards to the area that you will be visiting, and keep your children occupied in boredom-free bliss.

MOA Bingo consisted of a patchwork block of random items to spot during study-break trips to the Mall of America. Suddenly, instead of meandering through the mall, bemoaning their lack of money for shopping, the students had a mission — finding all the items on their bingo cards. Each trip yielded more bizarre items to include on the cards for the next visit.

The Mall of America houses a travel store with posters of far-away places and stuffed toys of exotic animals, in addition to the usual mall-fare of sports shops, clothing stores, and a wide variety of shoppers. The bingo cards contained a balance of hard-to-find and easy-to-find items, along with common, everyday, household objects that can be hard to find in the shopping mall setting. Gift wrapping counters, vending machines, and First Aid Stations are often overlooked while shopping, but become of vital importance in the strategy of Mall Bingo.

Players had to become creative in finding their listed items, especially if their opponents craftily steered them away from the obvious sources. Your card might list “Mickey Mouse,” but your opponent has carefully kept you away from the Disney Store. Now is the time to improvise by heading into a bookstore and looking in the collectibles section. However, the same strategy will work for “Ronald McDonald” if you are trying to steer your opponent away from the Food Court.

Sample items from Mall Bingo cards:
Card A
–obelisk
–snake
–red shoe
–#21
–aspirin
–Ronald McDonald

Card B
–pyramid
–tree frog
–green hat
–#52
–tape
–Mickey Mouse

Notice how the easier-to-find pyramid is balanced by the harder-to-find tree frog. The obelisk is hard to find, but snakes (oddly) were easier to find. Random numbers could be spotted on sports jerseys or price tags. Two or three players stayed together in one group with each individual working to steer the group in favorable directions, but larger groups could split up and work as teams with one card per team. The objects were not purchased, and did not even have to be for sale, but someone besides the player had to witness the object before the college student could check an item off of his card.

My son used the same concept to stay alert during a particularly monotonous college class: Professor Bingo. The squares listed the professor’s many habits, turning them from repetitive mannerisms into delightful antics. Would the prof misplace his chalk, would he hitch up his pants, would he argue against his own notes, or would he emphasize a statement by flicking imaginary water from his fingers?

This game can be adapted to your personal needs. Use more or fewer items, depending on the skill level of your players. On your food-buying trips, teach your little ones to recognize fruits, vegetables, or other items by using pictures from the grocery ads instead of words on the cards, or play it like the Alphabet Game by challenging your kiddies to find a grocery item for each letter of the alphabet.

Having fun does not always have to mean spending money. Our family has invented many enjoyable activities from whatever our circumstances were, and Mall Bingo is a prime example. Now, who wants to go to the mall?

Verified by MonsterInsights