Workshop Wednesday: Hopscotch – A Powerful Learning Game

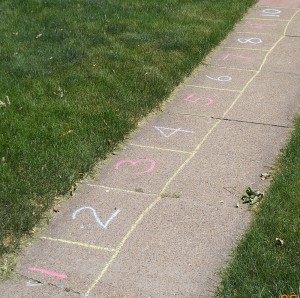
Who knew that a patch of concrete, some chalk, and a couple of rocks could produce a fun way to learn just about anything? When I was a little girl, I played hopscotch in the traditional way, tossing my stone and jumping from square to square, just as a game for practicing my tossing and balancing skills. Hopscotch can also be used as a kinesthetic learning method, involving the big muscles of arms and legs, pumping information through the blood vessels to the brain. I can see many other uses for the basic method of hopscotch, providing a great method for teaching preschoolers, kinesthetic learners, active children, or anyone else who just needs a break from sitting at a table for one more worksheet.

Let’s start by changing the standard hopscotch pattern to a row of 10 squares, numbered from left to right, and let your little ones practice counting as they hop from box to box and back again—tossing a marker stone or beanbag can be used later as their counting skills increase. Do the same thing with a row of ABC’s, first for letter recognition and later for reciting the sounds made by each letter or for a word beginning with that letter. Mom can say a word, and the child can hop to the letter that begins the word. For more advanced students, change the ABC’s to a grid pattern, and try “Twister Spelling” by putting hands and feet in the correct squares to spell the word. Use multiple beanbags, poker chips, or plastic yogurt lids for markers, and challenge your kiddies to spell out words by placing their markers on the correct letter squares.

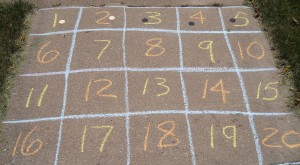
You can also practice addition and subtraction facts with a hopscotch grid. Draw a 1-10 grid by making two rows of five squares each: 1-5, 6-10. Make these boxes large enough for your student to stand in, sort of like a hopscotch game. Start with simple addition problems by asking: If you put down [this many] markers, starting with Box #1 and putting one marker in each box, and then you add [this many] more markers, how many boxes will have markers in them? What is the largest number box that contains a marker? Repeat this activity with as many different number combinations as possible, until your student knows addition facts from 1-10 so well that he cannot be stumped. Then draw two more rows of boxes, extending the grid to 20 (11-15, 16-20), and continue the addition practice with problems up to 20. You can also work on learning doubles in the teens: 5+5=10, 6+6=12, 7+7=14, 8+8=16, 9+9=18, 10+10=20. These facts will help him with problems where the answer is between 10 and 20.

Does one of your students have trouble with subtraction? Using the 1-20 grid, pick a problem that may have stumped your child, like 13-9=? In this example, cover all numbers larger than 13. Ask: If you put down 9 poker chips, with one on each box, starting with 13 and counting down, what is the largest number box that will still be showing? If he’s already experienced at using the 1-20 grid of numbered boxes, he will be able to recognize the row of 6-10 as being 5 boxes. Then he can see that there are 3 boxes for 11-13, so those two rows will use 8 of his 9 poker chips; now he can put the last chip in the largest numbered box in the top row (the 5), and he’s left with 4 as the largest number box still showing: 13-9=4

Another helpful trick is to show your student how to work up or down from 10 when the answer to a problem doesn’t come to him immediately. For example, 13-9=? Let’s see, I know that 10-9=1, and 13 is 3 more than 10, and 3+1=4, so 13-9=4! How about 17-9=? 10-9=1; 17=10+7, and 1+7=8, so 18-9=8! Did you follow that? Children can get discouraged when they don’t know or can’t remember an answer immediately. Showing them several different methods for figuring out the answer helps them to see that they are smart enough to find the answer anyway. Working toward the answer from 10 or from the nearest double is a legitimate method of solving the problem and is actually a better way to learn than just rote memorization, since it uses more creative solving methods.

Are you ready to take this up one more notch? Help your students draw a 1-100 grid (10 rows of 10 squares each, numbered 1-100) and challenge your young mathematicians to toss two beanbags onto the grid and add the resulting numbers. Add more beanbags as their skills increase, or switch to subtraction or multiplication. Use beanbags in different colors (or marked with mathematical operation symbols) for students with appropriate abilities: Color #1 means add this number, Color #2 means subtract this number, Color #3 means multiply by this number, and Color #4 means divide by this number. Use several beanbags for each mathematical operation, drawing them at random from a bucket to create an amazing running math problem. Number squares can be chosen by random tossing or through careful aim. Challenging siblings to toss the beanbags and create problems for each other to solve may result in some serious stretching of math skills! Other possibilities are to toss two beanbags to create a fraction, then simplify it as needed—and more beanbags mean more fractions, which can then be added, subtracted, multiplied, or divided, always reducing the answer to its simplest form. The hopping part of hopscotch doesn’t come into play with this method (unless your kids figure out their own creative way to use it), but the tossing and retrieving of beanbags will still give your wiggly kids plenty of action.

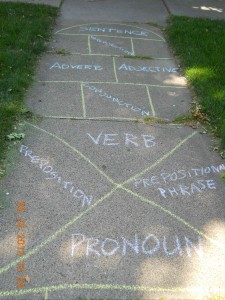
Now you think you’ve heard all of the possible ways to use hopscotch in learning, right? Not at all! Let’s go back to the original hopscotch pattern, but instead of numbering the squares, write in parts of speech: noun, pronoun, verb, adjective, adverb, conjunction, preposition,  prepositional phrase, and interjection.  Hopping through the boxes gives the student a chance to think of a correct example word to give when he stops to pick up his marker. Use more specific terms as your students’ grammar skills increase: irregular verb forms, verb tenses, plurals, reflexive pronouns, dependent clauses, and so on. I included a “sentence” space at the end, and students should make their example sentences match the level of grammar being studied.

If you have a student who is really interested in science, specifically chemistry, and if you have access to a large patch of concrete, consider helping him draw out the periodic table of elements and numbering the squares accordingly. Let him make simple flashcards for each element to fit the boxes on his diagram (cereal boxes are a great source for inexpensive flashcards; write on the back with permanent marker) and practice putting them in their proper places. Flashcards might include the atomic number, the element name and symbol, and the atomic weight. More advanced students may want to include more detailed information and use the jumbo flashcards for memory practice. Other hopscotch applications: a diagram of the solar system would provide practice at naming the planets, a simplified skeleton could be drawn for practice at naming the bones, or a map of the United States (or any geographic area) would provide practice at naming states, capital cities, or other geographic features. Coordinate planes with x- and y-axes provide a large grid for plotting specific points with poker chips. Students of advanced math can solve complex equations, plot the points from multiple solutions, and draw the curves with yarn or string.

Any of these hopscotch learning games may also be drawn with permanent markers on an old, discarded sheet or tablecloth (check local thrift stores), resulting in a reusable “game board” that can be folded up and stored between uses. Use the cloth on grass, carpeting, or other surfaces where it is less likely to slip underfoot. Beanbags aren’t required, but the “marking stone” needs to be something that won’t roll away when tossed—or blow away if used outdoors.

If the weather isn’t cooperating for outdoor activities, or if you don’t have a suitable surface for chalk, or even if your students are just not excited about going outside and jumping around where anyone in the neighborhood might see them, these activities can also be done indoors by using masking tape or sticky-notes on the floor. You can even draw the grids on a large sheet of paper and use coins or game pawns as markers.

See also:
What Is the Missing Element?
Building Blocks for Success in Math
Beanbags (No-Sew DIY)
Workshop Wednesday: Building Blocks for Success in Math

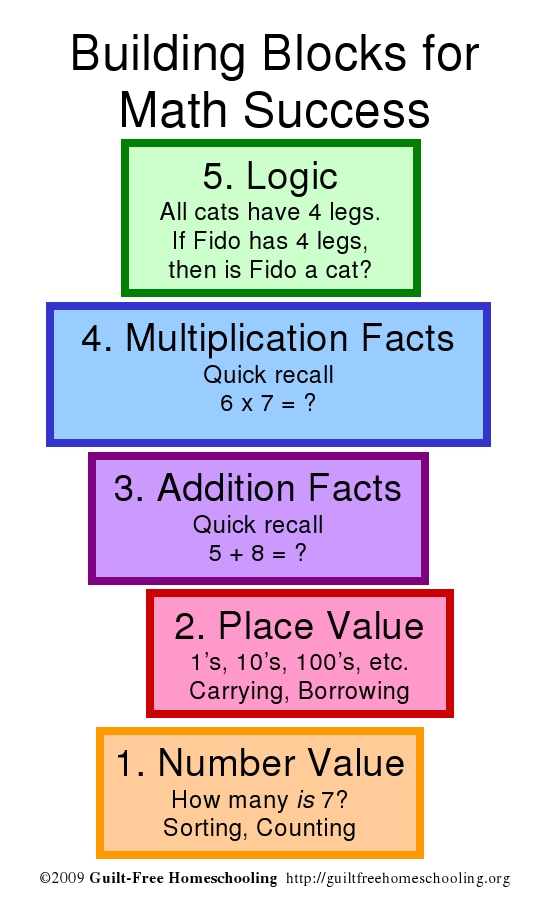
Math is called a foundational subject for good reason: if you don’t have a solid foundation, anything you try to build on top of it is in danger of falling apart. Math is also called a sequential subject, meaning that math skills must be mastered in sequence, each skill building on the skills before it. This picture represents my view of math skills and the order in which they should be mastered, starting at the bottom and building up, one skill upon another.

No one starts teaching math by instructing their preschoolers in differential calculus. The first math skill we teach is Sorting: Which ones match? Is this one like that one? We may start the sorting process with colors or shapes, but Sorting is still the basic skill being learned. Sorting is the #1 most important math skill, used from recognizing number value to solving the most complex equations. Counting is an extension of sorting, assigning a number name to each different quantity. We “know our numbers” when we can group the correct quantity of pieces to represent any given number. We have mastered counting when we can recite the quantities in ascending order. The ability to count backwards is preparation for further skills yet to come.

Place Value might be considered to be an extension of Sorting by placing 1-digit numbers together in one group, 2-digit numbers as another group, yet another with 3-digit numbers, 4-digits, and so on. Children who are learning to count past 10 are learning place value, even though they are not yet adding or subtracting large enough quantities to require carrying or borrowing. Those skills work hand-in-hand with addition and subtraction, but an understanding of place value has to come first. Using a large quantity of identical small manipulatives, such as toothpicks, you can demonstrate the quantities represented by numbers in the ones column and numbers in the tens column to show how and why we write numbers the way we do. As your student gains skill with addition, you can revisit Place Value to demonstrate carrying into the tens, hundreds, thousands, and as many columns as your child wishes to add.

The next natural step after Place Value is Addition. Your child may already be using his counting skills to inform you that since he already has 1 cookie, if you would just give him 2 more cookies, then he would have 3 cookies! He may not recognize 1+2=3 on paper, but he certainly understands cookie quantities! Addition facts are best learned through using real-life objects, manipulatives, or even diagrams, rather than just expecting a young mathematician to transfer immediately to written problems. Hands-on practice makes subtraction easily evident as the un-doing process for addition, thereby taking away the stigma that subtraction is yet another new skill to learn. If a student knows addition facts to the point of quick recall, that same student will be able to perform subtraction. Therefore, a student who struggles with subtraction is a student who has not mastered addition facts.

Multiplication is often presented as one more new skill to master, but when presented as a “short-cut” to repeated addition, the student will see multiplication facts as a convenient tool, not as an obstacle to further learning. Multiplication facts can be demonstrated with a large quantity of small manipulatives that can be grouped into repeated rows (½” squares of heavy paper or cardboard work very well). Some quantities of manipulatives can be rearranged to show various factors which result in the same amount, such as 1×12, 2×6, 3×4, 4×3, 6×2, and 12×1. Grouping and regrouping the manipulatives will give your student a deeper understanding of multiplication facts as he sees the groups (visual), arranges them with his own fingers (tactile), and repeats the facts aloud (auditory). A kinesthetic learner will prefer standing or kneeling to do this activity, providing yet another sensory element.

Why isn’t Division listed in these Building Blocks? Simply because Division is un-doing Multiplication, just as Subtraction is the un-doing of Addition. The only tricky part to Division is that sometimes things don’t come out completely even, and we get “left-overs”—but every child who has tried to share 5 cookies with 3 friends understands that concept already. Division uses the quick recall skills for multiplication facts to regroup as evenly as possible, and the “left-overs” will be dealt with in more detail later on as these skills progress even further into the concepts called fractions and decimals. By the way, fractions, decimals, and percents are all “nicknames” for the same amounts—they are just different ways of looking at the same quantities, such as ½, .5, and 50%, and those all mean that you and I are sharing equal amounts of the same cookie!

The final Math Building Block to be mastered is Logic. Logic means making sense of things, so they come out right. Logic may come in the form of “If/Then” statements, such as the block in the picture shows: If all cats have 4 legs, and Fido has 4 legs, does that then mean that Fido must be a cat? Fido might be a cat, but we also know that other animals besides cats have 4 legs, so we cannot assume that Fido is a cat until we have more information. That is logic: using information to prove a point, but sometimes you realize that you don’t have enough information yet, and the point you prove could be wrong. Another use of logic is in balancing equations. A very simplified example is 7-2=5; if we add 2 to each side, we’ll see 7-2+2=5+2 or 7=7, a true statement. What we do to one side of an equation must also be done to the other side to keep it balanced, as if the equals sign was the pivot point on a balancing scale.

If your student is struggling with any of these building block skills, back up and practice the previous block’s skills until they are mastered. Recall of these facts should come as easily as a reflex action before the student is ready to move on successfully to the next building block. Don’t worry that other students may be moving ahead already—they may not be ready either, and their “progress” will soon result in more struggles. Remember that a student who cannot do division does not know multiplication facts well enough. A student who struggles with multiplication does not know addition facts well enough, and neither does the student who struggles with subtraction. A student who has trouble with addition does not understand place value or number values well enough. Success in math is achieved by mastering skills in sequence and building a solid foundation with each skill before attempting more challenging skills.

For more tips, see also:
Looking for the “Hard Part”
Why Does Math Class Take SO LONG?

Workshop Wednesday: ABC Flashcards

Anyone want to upcycle some of that ubiquitous cardboard packaging that passes through our homes and turn it into teaching/learning tools? You’re on! Let’s make some flashcards!!

DIY flashcards from upcycled cereal boxes

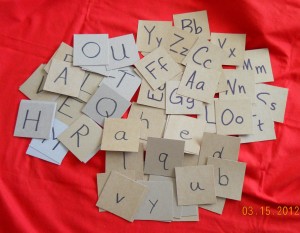
This week’s photo actually shows three related sets of alphabet flashcards that measure 3” square. Call these approximate measurements, because no one needs to waste precious time obsessing over the precision and exactness of something we’re making for free. I collected cereal boxes, brownie mix boxes, popsicle boxes, tissue boxes, pudding cup boxes, and pretty much every flavor of thin cardboard box that was large enough to cut up into something else. Confession: I made these with a paper cutter, but only because I saved up and treated myself to one. During most of our homeschooling years, I used a ruler and scissors for projects like this, and the results were just as good.

Open the boxes flat and start measuring and cutting. Again, don’t let perfectionism sidetrack you with thoughts of non-90-degree corners or less-than-perfect sides. Your students can learn from playing with these cards even after they are rescued from an eager-to-play-fetch-with-anything puppy. When you have a decent supply of cards cut from the cardboard, grab your Sharpie marker and write on the blank sides. Here we have one set with upper case letters (upper left), a set with lower case letters (lower center), and a set with both upper and lower case letters in pairs (upper right). I have also made sets with numbers 1-100, states and capitals, and many other topics that I hope to address in future Workshop Wednesday posts. (Anticipation!)

Bonus Tips:

  • I favor teaching letter recognition with upper case letters first, since reversals are less likely; then introducing the lower case letters as the “little brothers” of the capitals. Kids get it, even when the big brothers and little brothers don’t look exactly alike. Learning to group the larger and smaller letters as pairs is another method for avoiding reversals.
  • Making multiple sets of letters will allow your students to spell out vocabulary words, play word games, or leave traces of their newly-acquired knowledge all around the house as they spell out the names of every lamp, vase, and throw pillow.
  • If your students have mastered letter recognition, you can make 3×5” word cards and practice turning sounded-out words into sentences.

Learning Style Activities

Visual learners will appreciate flashcards with color, so you can either use colored markers for the main information or let your visual student draw designs on the edges and corners of the cards with colored pencils or fine-point markers to jazz up the natural gray or brown of the cardboard.

Auditory learners will love to read each letter aloud, no matter what activities or games you play with the cards. Switch things up by asking them to say the sound of the letter instead of (or in addition to) its name.

Tactile learners have already grabbed your new supply of flashcards and are spreading them out on the floor or table, rearranging the letters into words. That’s how you can confirm that you have a tactile student: their hands and fingers are into everything, learning as much as they possibly can about texture, heft, and balance. Please don’t scold them for grabbing and touching—it’s how they learn best. A tactile learner who is forced to keep his hands in his lap is like a visual learner wearing a blindfold. Seriously.

Kinesthetic learners will adore playing games with these cards, especially if you spread things out. Drop the stack of upper case letters on the floor in the living room. Drop the stack of lower case letters on the kitchen table. Now shuffle the “pairs” cards and place that stack in a neutral location somewhere between the other two piles of cards. Ask your student to look at the top card and run to find the matching letter cards from each of the other locations and bring them back. (Beginning students may need to take the pairs card with them for reference.) Grouping all three cards together will prove he brought the correct ones. Your energetic student can repeat this activity until he is worn out enough to sit down for reading time or some other lesson that requires seatwork.

Combine all learning styles into challenging activities that will help your students learn from all situations and all styles of teaching. Let your imagination run free with ideas and adaptations for your own students, living quarters, and academic needs. If the weather is agreeable, take the cards outside and combine relay races with spelling or vocabulary words. Mud puddles can’t destroy your prized set of flashcards, since replacements are easily made from the next empty box. You may soon find yourself rescuing cardboard boxes from the recycling bin and calling them your “homeschool supplies” as you think of more and more uses for homemade flashcards!

Workshop Wednesday: What Is the Missing Element?

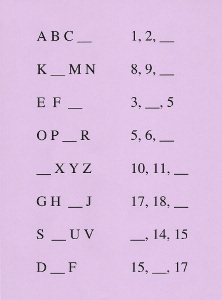
Use this worksheet as an example to make simple Missing Element worksheets for your children. No one should have to stop and sing the Alphabet Song from beginning to end, just to figure out what letter comes after P. The same concept applies to numbers and counting, just without the song. My young kids viewed little worksheets like this as a fun challenge. After a little practice, they could do these orally, asking “What letter comes after V?” any time we had a few seconds to fill: while standing in line at the store, waiting for a red light, any waiting, anywhere. It kept them mentally active, which made the waiting much more bearable for them. I used the same process for numbers, asking “What number comes after 19?” and similar questions. The worksheet itself is a visual method; the oral question and answer exercise is an auditory method.

These are good mental exercises for those students who already know letters and numbers, but who don’t automatically recognize a short segment of the longer series. This is also a good skill to build into those youngsters who are just mastering the ABC’s and counting—notice that I said mastering, not initially learning.

For those students who need a more tactile application, let them match alphabet blocks or letter tiles to the challenges on the worksheet, filling in the gap with the appropriate letter on a block or tile. Number tiles can be used to create the number challenges, using multiple tiles to produce multiple-digit numbers. Borrow letter or number tiles from games, or make your own by cutting 1-inch squares from cereal box cardboard and marking with a Sharpie on the plain side.

Be sure to allow your students plenty of free-play time with the Missing Element exercise, as they will be sure to want to challenge each other (or you) with more examples. When a child continually quizzes you for the answer, give the correct answer each time, knowing that he is learning from your consistent responses. When you are confident that he really does know the correct answer, you can give the wrong answer with a questioning tone of voice or say “Is it K?” to see if he will correct you!

For a young kinesthetic learner, spread out the letter or number series on the floor using Post-It notes or flashcards and let the child hop on each one as he reads them off and shouts out the missing element as he hops into the gap. Another method for energetic children is to have flashcards for the series in one room and extra flashcards for the missing element in another room. Challenge your little Tigger to run, hop, or somersault into the other room to search for the correct card(s) to bring back and fill in the gap in the series.

Combining all of these learning style methods will give your students practice at using more than just their preferred style of learning, which helps them gain a better understanding while also broadening their experiences. As your students get older and expand their knowledge base, you can adapt this Missing Element concept for other academic pursuits as well.

10 Ways to Improve a Lesson

Sometimes we all need help teaching a lesson. The lesson may be too confusing, too short, or just plain boring. Your student may need a more complete explanation or just want to delve more deeply into the subject. You may need to expand the lesson to include an activity to fit your student’s learning style. No matter what the reason, here are a few suggestions for how to improve a lesson.

  1. Make it bigger. — Suppose your child is learning fractions, and the book’s diagrams are rather small. Draw similar diagrams using an entire sheet of paper for each one — sometimes bigger IS better! Simple drawings and diagrams do not demand precision: children are good at pretending, and they can pretend along with you that your drawing is accurate.
  2. Take it outside. — Fresh air and elbow room can improve anyone’s ability to think. Even reading a favorite storybook outdoors can give it new perspective.
  3. Add color. — Say good-bye to black-and-white; say hello to understanding. Use colored pencils or markers, highlighters, construction paper, or colored index cards. For example, write each step of a complicated math problem in a different color to help clarify the progression.
  4. Add texture. — Go beyond flat and give your fingertips a chance to enjoy themselves. Form ABC’s with Play-Doh, cut letters out of sandpaper, or draw with chalk on the sidewalk.
  5. Let your student play with it. — Exploration is the birthplace of genius. Go beyond the lesson plan and indulge your student with his own session of free experimentation, whether with math manipulatives, Scrabble letter tiles, vinegar and baking soda, etc. Playing is learning.
  6. Add more details. — Why strain to understand a single example, when ten examples will make it crystal clear? Suppose your child is trying to learn the letter A; show the child many examples of what A looks like, from several ABC books, from newspaper headlines, on packages in your pantry; draw A with crayons and markers, in shaving cream smeared on a window, in dry cornmeal poured in a baking pan; arrange small items into an A shape: pennies, pipe cleaners, pencils, building blocks, toy cars, fingers, etc. — after all of these examples, your child will better understand how to recognize an A!
  7. Discuss it. — Skip the one-sided lecture and the interrogation-style Q & A session; try an open and honest give-and-take, valuing your student’s opinions, reactions, and ideas. How would you react if those opinions were coming from your friend, instead of from your child?
  8. Build it. — Cardboard, scissors, and tape are the stuff that feeds imagination. Projects don’t have to be constructed well enough to last forever, just long enough to illustrate the concept.
  9. Research it (together). — Expand two great minds at the same time. The teacher doesn’t always have to know the answers before the student does — your student will develop new respect for you as he sees you willing to learn with him.
  10. Make it personal. — Use a personal application to your student’s own life, activities, or possessions, and he’ll never forget it. Instead of math manipulatives, use the student’s building blocks, toy cars, baseball cards, Barbie doll shoes, etc.

The specific examples given above might be either too simple or too advanced for your current needs, but you can adapt them to your student’s situation. Even if you think some of these ideas may not help with your particular struggles, dare to give them a try anyway. You may be pleasantly surprised at the results!

Preschool Is Not Brain Surgery

I have tackled the topic of homeschooling older students while you have preschoolers around several times before, but I’ve never yet directly addressed homeschooling for preschool itself, especially when preschool marks the official beginning of schooling for your oldest child. This changes now: I am here to encourage you that you can teach your own child for preschool. You do not need an advanced degree in education to be able to effectively teach your child at home for preschool.

I have prepared a list of things that my children and I did during their preschool years that cover all of the types of activities and subjects your child will need to prepare them for their future academics. These activities may be done in any order, corresponding to your child’s interests and abilities. Progress according to your child’s abilities: if your child has difficulty understanding any given concept, set it aside for two weeks or two months while you do other activities and see what a difference that makes. Pick it up again later, or set it aside a second time, if necessary. All children learn at different rates, just like they begin to walk or talk or get teeth at different times. Faster or slower is not better, it’s just different.

Multiple activities can be done each day, if it works with your schedule and with your child’s interests. Fifteen minutes at a time may be adequate for the average preschooler, but the child may enjoy several of these short sessions throughout the day. Focus on only one activity at each session, but if your child is really enjoying the activity, you can let him continue playing with it after the formal “lesson” time is completed.

Read books to your child. Snuggle up together for special Mommy-and-me time. Use funny voices for the characters. Vary your tone to match the scene: fast and loud for the exciting parts, slow whispers for the sneaky parts, sniffling when the character is sad, bouncy and happy when the character is happy. When the book is a familiar favorite, stop periodically to ask your child questions: Where is Papa Bear going next? Why is he doing that? What will he find there? These help build your child’s memory by asking him to recall details he has learned from all of the times you have read this story in the past. Which bear is wearing the red shirt? Point to the smallest bear. Can you find a bowl on the bears’ table? Questions of this type help your child notice details and learn to identify colors, sizes, objects, etc. Why did the bears leave the house? Where did they go? What is this little girl’s name? These questions teach comprehension: read a portion of the story, and then ask the child about key elements that were just read. At first, you may want to ask questions about one page at a time, but soon your child will be able to recall details from several pages back.

Include ABC books, even though they usually have no plot or story. As a child, my personal favorite was The Nonsense ABC by Edward Lear. For my own children, their favorite was The Dr. Seuss ABC. What those books have in common are fun, rhyming poems for each letter. Lear’s “A was once an apple pie” was just as easy to remember as Dr. Seuss and his “Aunt Annie’s alligator.” The delightful poems were much more enjoyable than a simple picture book of ABC’s, although those are useful, too, as you will see in a moment.

Learning letters. Gather all the ABC books you have, and compare the pages for the same letter in each book. Linger over one letter per week or a letter every few days, until you know for sure that your child knows that letter. Use sticky-notes or home-made flashcards to label objects in your home that begin with the letter of the week, and help your child make the letter’s sound every time you see one of those objects and say its name. Banana, B, buh, buh-nana. You get the idea — and so will your preschooler. You may need to get creative on a few letters, such as Q, unless you live with a queen in a home full of quilts and have a pet quail. For X, you may need to use words that have an X in them, such as fox. The picture ABC books will come in very handy now, especially if they use several items for each letter. Don’t overlook your public library — they may have ABC books for unique topics, such as animal ABC’s or around-the-world with ABC’s.

Help your child learn to recognize a letter, no matter what font it is written in. Making a Letter Recognition Notebook is an excellent method for this. Focus on the appearance of the letters themselves, instead of what objects begin with each letter. Do one page for the upper case of a letter and another page for samples of the lower case letter. The goal here is for your child to be able to spot an a, whether it looks like a ball against a wall or like an egg underneath a tiny umbrella.

Learning numbers. Repeat the activities from the Learning Letters section above, but do them for the numbers 1-10. Draw a group of dots on the page to correspond to the number represented. Use counting books for activities similar to the ABC book activities. Once your child knows 1-10, you may add numbers up to 20, if you’d like. Your goal here is for the child to recognize each digit and immediately know how many objects that number stands for.

Learn colors. Ditto. A color-of-the-week activity will show your child all the varieties of each color. Light blue, dark blue, bright blue, dusty blue, navy blue, sky blue. Blue jeans, blue socks, blueberries, blue blanket, blue water bottle, blue crayons, blue cars, blue blocks, blue game pieces. How many blue things can you find in your home? You may be surprised!

Learn shapes. Ditto once again. The variety within each shape can be confusing at first to little ones. Is a big circle the same thing as a small circle? Are a cookie and a ring both circles even though one has stuff inside it and the other one is empty? Rectangles and triangles can be particularly tricky. Use a dollar (kids love learning with real money) as an example of a rectangle, then turn it up on end to show the child how the dollar is the same shape as a door. No more tricky rectangles! Long and skinny or short and fat, rectangles will still look mostly like a door or a dollar. Triangles have 3 sides, no matter how long or short those sides may be, and once your preschooler can count to 3, he can begin to recognize triangles. Browse through the snack cracker aisle at the supermarket for some tasty, edible geometric shapes! Careful nibblers will transform one shape into another, naming the shapes as they admire their creations and then eating their artwork.

Fine motor skills. See Preschoolers’ Educational School-time Activities for a variety of helpful activities that your child will enjoy doing and learn wonderfully useful skills at the same time.

Gross motor skills. Let your child practice on a “balance beam” made by drawing a straight line with chalk on the sidewalk or driveway. Masking tape on the floor is a good substitute indoors. When your child can do it easily without stepping off the line, switch to using a 4″ x 4″ board (any length) lying directly on the ground. When the child can walk that board easily without losing his balance, prop the board up with a brick or concrete block (or other stable item) at each end — just don’t go too high, so that the child will not be hurt if he does fall. Please stay close by your child whenever he is practicing this.

Other useful concepts. Play. Notice the weather each day. Go to the park. Walk around the block. Smell flowers. Watch an anthill. Put a bird feeder or a bird bath near a window and keep it filled so you can watch the birds and learn to identify them. Make cookies. Add a set of measuring cups to the bath toys. Visit a zoo. Watch a construction site (from a safe distance) and talk about what each man or machine is doing. Learn from life every day.

Social Skills. See Social Skills — What Should I Teach My Preschooler? for a very complete explanation.

What about school questions? Preschoolers ask questions; it’s what they do, and it’s who they are. Your homeschooled preschooler will undoubtedly ask questions about going to school: Why does my friend go to school and I don’t? When will I go to school? Can I ride on a school bus? Can I play on the school playground? Why does my storybook show kids doing things at school, but I don’t have any stories about kids who homeschool? Ah, yes, those questions.

You can share as much as you think your preschooler will understand about why you chose to homeschool, but try not to make other families look bad for not homeschooling. One way around this is to point out what vehicles are owned by the families on your block or in your neighborhood. Some have small cars, some have pickup trucks, and some have minivans. They pick the type of vehicles that they want for the things they do. Some families send their children to public school, some go to private schools, and some homeschool. Each family picks the type of school that they want for their children. Each family can also decide if they want to plant flowers around their house or raise tomatoes in their garden. They can decide if they want to have a dog or a cat or tropical fish or no pets at all. Some families choose to eat in fancy restaurants, some families get burgers at the drive-through, and some families make all their meals at home. Every family gets to make choices, and homeschooling is one thing your family has chosen.

Sometimes the trickier part of answering these questions is to show that not following the crowd can be more fun. Because you are homeschooling, you can go to the park when the other children are stuck inside the school building. This is also a good way to bring weather (good or bad) into the conversation: you can play outside on nice days instead of having to sit at a desk all day long, or you can stay inside where it’s warm and dry all day long on the cold and rainy days. Perhaps you can visit the school playground after school is over for the day or on a weekend or during the summer. Perhaps you can ride on a city bus or a church bus. I have known preschoolers who begged and begged their parents to let them go to school, only to find out that school was not the fun experience they had imagined it to be. One little boy asked his mommy if he could be homeschooled again, because all he really had wanted from school was to play on the playground, and when he was in school, the teacher only let him go out to the playground at certain times and for very short periods. Being homeschooled with his brothers was much more enjoyable.

Many children (and parents) ask about the lack of homeschooling in storybooks. I agree that there are very few books that portray education at home, but I have a sneaky way around that, too. Not all storybooks show everything that a child does every day, and not all storybooks show children going to school. Therefore, maybe, just maybe, the children in some books are homeschooling, but the story is telling about some other part of their day. Our school books were not in every room of our house — ok, sometimes, but not always. When the Bear family went for a walk to let their porridge cool down, perhaps they had been doing their lessons all morning, and now it was lunch time, and they would continue their lessons after lunch. Stories are not always about what you can see — sometimes there are also lessons to be learned in what the pictures do not show. And finding those lessons also teaches your child to think about the story and what it does and does not say.

Do I need curriculum to homeschool preschool? No. If you don’t believe me, take this quick test:

  • Do you know the alphabet?
  • Can you count to 20?
  • Can you identify basic colors and shapes?
  • Do you know how to use a pencil?
  • Do you know how to use scissors?
  • Can you read a child’s storybook?

If you answered Yes to 3 or more of these questions, you will probably do just fine. Use the money you would have spent on curriculum for a family zoo pass or a storage cabinet for all of the arts and crafts supplies you will accumulate in the next few years!

Preschool-aged children need foundational skills: pre-reading (recognizing letter names and letter sounds; visual distinction: recognizing differences and similarities between objects), pre-writing (small muscle skills and coordination: using fingers), and body control (large muscle skills and coordination: using arms and legs). Children who are only three, four, or five years old do not need to be able to identify nations of the world, Presidents of the United States, or the life cycle of seahorses. These tiny tots will benefit much more from spending 15 minutes cutting colored paper into confetti than they would from endless coloring pages for geography, history, science, or social studies topics. I have probably just stepped on the toes of multiple eager teachers, but please understand that your little ones will not remember very many of these superfluous lessons until they are able to read fluently for themselves. Then you can turn them loose on the library shelves and get ready to hear them recount the myriads of fascinating facts they have read.

Once when I was selling some of our outgrown books at a used curriculum fair, my customer asked if I had the teacher’s manual for the 2nd grade reading text. “No,” I replied with a smile, “I thought if I couldn’t figure out the answers to the questions in a 2nd grade reading book, I had bigger problems than the teacher’s manual could fix.” She thought about that for a few seconds and began laughing along with me. “You’re absolutely right!” And she bought the book. Teaching preschool is even easier than teaching 2nd grade reading. And you will be able to do it just fine without a teacher’s manual or fancy curriculum.

More articles related to Preschoolers are listed in Topical Index: Preschoolers.

The Holidays Are Unit Studies — Learning During the Busy Season

[This article was written by Jennifer (Morrison) Leonhard: Guilt-Free daughter and homeschool graduate.]

The holidays are a hectic time: relatives are coming over, the house needs to be cleaned, presents must be bought and wrapped, and food must be prepared. The schoolwork either gets lost along the way or becomes an added frustration as we try to get everything done at once. Mom planned our school schedule with the knowledge that Dad would be home from work around this time and regular schoolwork wouldn’t get done, but the learning was just beginning.

Mom usually gave us a break from lessons during the entire week of Thanksgiving, and we often stopped our official schoolwork well before Christmas, since extra time before each holiday was more beneficial for Mom’s preparations than time off afterward. However, we found many opportunities for learning, even when the schoolbooks had been put back on the shelf.

Shop Class
Dad usually did some project around the house during his time off from work (after all, you can’t get Dad to just sit around the house doing nothing). We learned to fix cracks in walls, paint, and generally drive Mom crazy with home repairs, all while she was preparing to have people over. Creating homemade presents, like building blocks, picture frames, and ornaments, teach handcrafts while theoretically cutting down on the expenses for gifts.

Math
Mom has always used cooking as math. Make a recipe smaller or larger, and you are automatically learning fractions: 3/4 cup of flour times 2 equals 1 1/2 cups. (Sure you could just use the 3/4 cup twice, but then what are you learning?) The economics of having a budget for Christmas will never fail to provide an opportunity for learning. How about learning some geometry and spatial relationships when wrapping presents? A lesson in possibility vs. impossibility lurks in the concept of a jolly and fat Santa squeezing down a chimney (which also brings up the lesson of “don’t try this at home”) or reindeer in flight (although one can argue that bees are also supposed to be a flight impossibility, and yet they consistently defy logical aerodynamics).

Music
Obviously, Christmas includes music — but that can take on many different forms. You can find many genres of Christmas music, from a symphony orchestra to the sounds of animals barking and mewing Away in a Manger. The latter is rather amusing the first time, but it gets harder to appreciate with frequency. The library and your friends will likely have a variety of holiday music that you can sample. I found a simple song book and learned how to tap out a few tunes on the piano. I knew what Christmas songs were supposed to sound like, so they were easier to learn, and I got a small taste of playing the piano. Explore the lyrics of Christmas songs to learn a little about Christmas history — have you ever wondered why the lyrics to I’ll Be Home for Christmas talk about presents on the tree?

History
Beyond the lyrics of songs giving us a glimpse into Christmas Past, there are many other subjects you can study for history. Thanksgiving is a history lesson in itself, from the voyage of the Pilgrims to learning why we celebrate it in November. American history becomes an interesting pastime instead of boring history when reading a Pilgrim’s personal account of coming to this country. Do you know why we celebrate Christmas around a tree? Or who started the tradition of sending Christmas cards? Do you know how the first Christmas trees were decorated — or the stories behind your family’s favorite decorations?

Literature
From studying Christmases past to reading about the Ghost of Christmas Past, ample literature can be found about others celebrating Christmas. In the spirit of the season, reading holiday stories aloud by a fire while drinking hot cocoa certainly doesn’t feel much like schoolwork!

Spelling
The holidays can provide much inspiration for spelling, from Old World words in songs to sitting around after dinner, playing Scrabble with friends and family. Reindeer pulling a sleigh will provide you with more exceptions to the rule “I before E, except after C.”

Language, Geography & Social Studies
Research the different names for Santa Claus around the world. (And for math, estimate the number of stops he must make in a single night.) Various traditions surround Santa’s visit, from cookies and milk to leaving shoes instead of stockings to be filled. And don’t overlook the traditions of Hanukkah: many interesting studies reside in the holiday celebrations from other cultures.

Cooking
Besides being recruited to help Mom with preparations for large family dinners (and vying for turns at grinding the fruits for our traditional cranberry relish), we often made a variety of cookies and candies to have available during the season. Occasionally, we also made an assortment of mini-casseroles and other freezer meals as gifts for elderly grandparents. Perhaps you could experience popular foods from holiday celebrations in the past — and who doesn’t enjoy a chance to try yummy new foods? You may end up adding a new favorite to the season, or (if you don’t like the new dish) you can at least learn to be more thankful for the old standards your family regularly prepares for holidays.

Many more lessons can be found in the holiday seasons — just make sure to keep your eyes open for learning opportunities and your heart open to the most important lesson of all: being thankful for the Son.

Verified by MonsterInsights