What Made This a “Bad” Homeschool Day?

This day started with such promise. You planned the lessons, and everyone took their places, but then something, somewhere went wrong. Very wrong. And you may have no idea why. Go fix yourself a refreshing beverage, and let’s see if we can analyze what happened.

In my personal vocabulary, a “bad homeschool day” has one basic meaning: We didn’t accomplish all of the lessons that I had planned for us to do. There can be multiple causes for this “failure,” which is probably not as much of an actual failure as it is just not hitting the bull’s-eye of your intended target of Lessons Mastered. To take this analogy just a bit further, think of your day’s homeschooling plans as a standard target of concentric rings. Landing an arrow anywhere on the target is a degree of success (a partially learned lesson), and even coming close to the target is still a degree of success (learning anything at all about any topic, but not necessarily the planned lesson). A complete and utter failure would mean that your arrow never even left the bow (although that in itself teaches a lesson, but we’ll get to that later*). Also notice that the bull’s-eye of that target is not a pinpoint. It is actually roomy enough to hold several arrows, meaning that two or three arrows can be separated by some distance while still occupying the official center of the target. Consider this for a moment: you can hit the bull’s-eye several times, with the arrows landing fairly far apart from each other. Different arrows in different parts of the bull’s-eye equate to different homeschooling days that reach the goal in different ways. You can achieve success while still not reaching pinpoint perfection. (Perfection and success are two entirely different things — and success is much easier to achieve than perfection!)

Now let’s look at some possible causes of today’s Bad Homeschooling Day.

1) A Family Emergency — File this under “Life Happens.” These often cannot be avoided. Emergency Room visits are often considered by active little boys to be sure indicators of bravery and manhood, veritable rites of passage. Other emergencies can come in the guise of a chronic illness, a death in the family, or an unexpected change in career or place of residence. Marriage, divorce, pregnancy, miscarriage, and many other events can have a resounding effect on homeschooling progress and for much longer than a single day. There is usually no way to schedule an emergency: it just happens. Please do not despair when some unexpected event disrupts your calendar. Do keep in mind that extremely valuable *life lessons will still be learned during family emergencies — lessons that do not come from textbooks and cannot be experienced in classroom situations.

2) Your Students Just Didn’t Get It — File this under “Not Unusual.” Students vary in how they learn: God made them that way. What bizarre sort of Stepford Wives-world would this be if everyone reacted exactly like everyone else? The lessons for today were probably not presented in ways that corresponded to your students’ learning styles. See the Titles Index and look for Alternate Methods of Teaching [for various subjects]. Even if the exact subject you need is not listed, the articles contain many suggestions for presenting material to the various learning styles, and you will find ideas that will help.

3) Your Students Would Not Stay On Task — File this under “Learning Styles.” Over there is a daydreamer, here is a wiggler, this one is a goof-off, and that one never stops talking. Sound familiar? This category can also be applied to your students’ styles of learning, but this, too, can be accommodated. It’s not that your students are trying purposely to ignore you; it’s just that they find other facets of life much more intriguing than the way this particular lesson is being presented.

A daydreamer may be thinking up a truly valuable invention, or mulling over a tidbit from a recent conversation or book or movie or song, or puzzling over why something works the way it does, and if that does then shouldn’t this be possible, too? Your daydreamer is very likely not dreaming at all, but thinking very deep and elaborate thoughts and ideas. Allow that child to keep an “idea notebook” handy for quickly jotting down thoughts to be explored more fully later, after the lessons are done. The journal will help the child remember those thoughts, and it just might help him get refocused on the lesson at hand. Plus, you get the bonus of voluntary writing: SHH — don’t let the child know that you are secretly counting this as a writing assignment! This is just a special, personal notebook that can be kept handy during any lesson and pulled out for scribbling a quick note without receiving a scolding for momentarily not paying attention. Assure him this journal will not to be corrected, graded, or even read by anyone else until he chooses to share his ideas. My son kept a notebook that we called his Invention Journal, which he filled with complicated drawings and detailed explanations for items he felt would be valuable, time-saving, or just plain fun.

A wiggler has a serious need to move, so use it to your advantage. Send him off to run an errand to the other end of the house or to run laps around the back yard before you begin presenting the lesson. Once his muscles are awake, he will be a much more attentive listener. Include stretch breaks between lessons or between sections of a long lesson. Hindering this child’s need for movement is equivalent to letting his brain run out of gas.

Talkers have just as great a need to express themselves as the wiggler has a need to move. These are the students who can easily be engaged in discussions, debates, and question-and-answer sessions about lesson concepts. They are not likely to read directions themselves: they are much more likely to ask you to tell them what to do. [See Teach Your Students to Teach Themselves for help with this.] A budding comedian needs to get the funny story out of his system before he will be able to concentrate on any academic input, so invite him to tell it, and enjoy a hearty laugh together. He will be much more attentive to your lessons when he knows you appreciate his humor. You can trust me on this one — by the time my son turned six, I had developed a great empathy for what Jerry Seinfeld’s mother must have endured.

A student who cannot keep his hands still is often accused of goofing off and delaying his work by fiddling with anything within reach. This one will drive you straight to the room with the thickly padded rubber wallpaper unless you realize that those busy fingers are the keys to his ears. Just like the wiggler who must move his legs to activate his brain, The Busy Fingers Kid must have something in his hands to stimulate his brain. Once again, you can use this to your advantage: let him hold a favorite toy or keep his special blanket folded underneath him on his chair or give him modeling clay to work with while you read aloud or explain a lesson concept. Do not insist on eye contact with this child to prove he is paying attention — his ears will only be able to listen to you if his hands are busy, and his eyes may or may not focus on you. This child will respond especially well to manipulatives, learning aids, and educational gadgets. It’s not that he wants something to play with, he just needs to feel something with his fingers to be able to learn.

4) A Defiant Student — File this under “Needs a Little More Time.” This most often occurs when a family is involved in a major change, such as the transition from public or private school to homeschooling, especially if the student is not completely thrilled with the idea. Students who have previously been in a classroom situation need time to decompress and shift gears into the more relaxed atmosphere of homeschooling. A good rule of thumb for the length of the transition is one month for every year the child spent in school, double that if the child went to preschool. That period will be a time of adjustment: expect to find and repair potholes, expect to share tears and triumphs, and be as patient, loving, and forgiving as you possibly can muster. Know that every rough patch you can bring your student through will lead to smoother sailing later on. Remember that this child’s entire academic world is undergoing dramatic changes, and your student has no idea what to expect next. Treat your defiant student with respect, and he will respect you in return. [See Troublesome Students for more specific suggestions.]

5) Using a Homeschooling Style That Is Counter to Your Family’s Lifestyle — File this under “Common Mistakes.” Many families who are new to homeschooling, especially families who are leaving public or private school, make the all-too-common-but-well-intended mistake of trying to duplicate a formal school routine at home. Reasoning that the children have been used to precisely timed periods, clocks and bells to signal those periods, structured lessons, and periodic tests, innocent first-time homeschoolers may think it is wrong to finish a subject in less than 30 minutes (or to extend it longer than 60 minutes), wrong to start the day’s lessons after 10 AM (or before 8 AM), or wrong to finish all of the day’s lessons in only 2 hours (or wrong not to have everything finished up by 3:15 PM). Let me assure you that you may use as much or as little time as seems fitting to your students’ abilities, and daily variances are not at all uncommon. Furthermore, it is absolutely permissible to take stretch breaks and play breaks and snack breaks as often as they may be necessary. You are allowed to teach students of close but differing ages as though they were in the same grade at the same time, if that fits well into your situation and their needs. You are allowed to skip a lesson now and then, spread a single lesson over several days, take a day off when you really need it, and choose educational materials that match your family’s values and interests.

If your students need structure and precise scheduling, then by all means use it. But if your family feels stifled and pressured by demanding schedules and tedious lessons, explore learning in a more relaxed, more motivating environment. Perhaps your plans have been too aggressive. Perhaps you do need more personal discipline. Whatever your family’s needs may be, find the combination of lesson materials and supplemental activities that works for your family and begin to thrive.

I cannot promise that you will never again have a Bad Homeschooling Day. I cannot promise that every Bad Homeschooling Day can be magically transformed into an Exceptional Learning Day. What I can guarantee is that you will get out of homeschooling exactly what you will put into it: if you work toward teaching your students in the ways they learn best, you will reap attentive, eager learners who may often be several steps ahead of you. When a student’s interest veers away from the planned lesson, do not be afraid to pursue his suggestion — you may both end up learning much more than the textbook’s authors intended.

The poet Robert Burns is often paraphrased, The best laid plans of mice and men often go awry. Proverbs 16:9 provides a more optimistic conclusion: The mind of man plans his way, but the Lord directs his steps. No matter what your plans may be, remember that they are only plans: ideas and intentions of what you hope to accomplish with your students during a set period of time. Some days are slow learning days — you know yourself that on some days you can think faster or more clearly than you can on other days, depending on the weather, a mild illness, or the unpredictable distractions of life. Your children are exactly the same: some days their progress will be slow, and on other days they will make up for lost time and amaze your socks off! Give yourselves time to adapt to learning at home, and experiment with schedule changes until you find the ideal solution for your family’s needs. Use Life’s interruptions to teach the lessons not found in books, and recognize the lessons your students are learning, whether or not the worksheets get completed today.

For further encouragement, please see these additional articles:
Redeeming a Disaster Day
Homeschooling Is a Choice
What Is Your “Best”?
Reschedule, Refocus, Regroup
Math Awareness: Tactile Counting

An interesting idea occurred to me when we were driving home late a few nights ago. My throat was dry, so I pulled a box of Tic-Tacs out of my purse, shook some pieces into my hand (without turning on a light), and popped them into my mouth. As I rolled the candies around with my tongue, I began trying to count them to see just how many there were. The box that usually releases only one or two pieces with a good shake had instead given me a mouthful in the dark. One, two. One, two, three, four. No. One, two, three… One… two… three… four… FIVE? Yes, Five. A number that would have been very simple to identify with my eyes in a lighted situation was suddenly very difficult to count with just my tongue!

That experience set my mind to working overtime. How simple is it to count objects that I can see? How much more difficult is it to count objects that I can NOT see? The whole idea of blind counting made me consider the possibilities of math as a tactile experience. I have often carried coins in my jeans pocket and had to pull out a handful and look at them to select just one or two. If I was more adept at tactile identification, perhaps I could pull out only the coins I needed!

So here is my challenge for the day: experiment with tactile counting. I recommend trying it with fingers first, not letting your young children pop random objects into their mouths — although that can be an interesting lesson for more advanced students (who are less likely to swallow). Expanding the awareness of number values to tactile skills and not just visual skills will allow the student to count quickly and easily by touch, even when seeing the objects in question is difficult or impossible.

I tested my own tactile counting skills by spreading a towel on the table, folded in half, with the fold farthest away from me. Then I closed my eyes and grabbed a large handful of goodies from my Activity Jar and inserted the objects between the layers of the towel. (The towel kept balls, marbles, and other small, round objects from rolling away.) Carefully keeping the upper layer of the towel in place to conceal the objects, I slipped my hands underneath it and began feeling the hidden treasures. To my surprise, there were a lot of things inside my towel — many more objects than I expected to find.

I eventually pulled one hand out and began writing notes of what I had found, so I could record how many buttons and how many game tokens were included in this cache. I wrote down each basic category of items and used tally marks for the duplicates. When I was satisfied that I had sorted and counted everything successfully, I opened up the towel to check my accuracy. Oops. Close, but not perfect! I had miscounted the buttons: 14, instead of 15; but I had correctly identified five different types of game tokens: large, small, ridged, smooth, and cardboard (not plastic like the others). I had also correctly identified a coin as feeling different from the plastic game chips and accurately concluded (by touch only) that the coin was a penny, not a nickel or dime.

This was such a fascinating challenge that I repeated it several more times! Once, I purposely sorted out a large group of flat game tokens from my Activity Jar, some smooth and some with ridged edges. Placing those inside the towel, I attempted to sort them into two piles and count how many were in each pile. I accurately counted the ridged tokens, but I was off by two when I counted the smooth chips. My conclusion was that the thin, smooth chips could slip out of my hands unnoticed much more easily than the ridged chips could.

How about some other variations of this tactile math challenge?

  • Blindfolded; count objects with your fingers
  • Blindfolded; feel and count objects in a box on the floor with your toes
  • Use several sizes of the same shape, such as a variety of coins
  • Use a variety of shapes and sizes of different objects, such as buttons
  • Count behind your back, feeling objects placed into your hands by a helper
  • Feel objects placed inside a sack, box, or pillowcase (so you can’t see them)
  • For older or advanced students: tiny, hard candies in the mouth to count with the tongue. Tic-Tacs work well, since they are quite small and don’t melt quickly.

The variations using toes or tongue develop tactile skills beyond the usual finger skills. Even a student who can quickly count or identify with finger-touches will find it a challenge to repeat the assignment with toes. I suggest starting with fewer than ten objects for toe-counting and using 3-dimensional objects, not flat items like coins.

For tongue-counting, be sure the student is not likely to choke or swallow the candies, and start with fewer than five small pieces. Keeping the head tilted forward can also prevent accidentally swallowing the candies. I cannot recommend putting non-edible objects in the mouth, nor do I suggest using anything larger than a plain M&M candy. Hard candies work better for this experiment than do soft, chewable candies. Tic-Tac candies are ideal: small and solid.

One more variation would be to turn this into an auditory activity by counting sounds. Conceal your hands behind a large book or similar partition and tap quickly several times, while your student attempts to count how many taps he hears. A more complex version would involve listening to music and counting notes, beats, or instruments heard. Take this activity outdoors and listen for vehicles, horns, or bird songs.

Math is primarily a visual task, but stretching our abilities and learning to sort and count with our other senses will bring the benefits of increased skills and a related increase in thinking power. And just imagine the fun of impressing your friends with your ability to count the change in your pocket without looking!

10 Ways to Ease into Homeschooling

(For Your 1st Year or Any Year)

1. Do any simple craft project together. Don’t obsess about neatness: have fun. Make decorations for a “Family Friday Feast” party and kick off your new school year with a celebration.

2. Read aloud to your children, even if it’s only for one week of the summer or for a short period each day. Pick a short, simple book or use fun poetry. Be expressive! Use different voices for each character. Take turns and let the children read, too. Listen to an audio book as an alternative.

3. Take your children for a walk each day. Keep it short, if desired. Focus on everyday sights you usually overlook. Use this time to get into the routine of discussing simple things together.

4. Use the hot summer days to hide in the air conditioning and learn italic handwriting, read and write silly poetry, read a stack of books from the library (even picture books), do a jigsaw puzzle, or play every board game you own at least once.

5. Visit a museum, zoo, or other “field trip.” Follow up with a time of family discussion about each person’s favorite points and new discoveries.

6. Hold a “Cooking Marathon Day” to make some basic meal components ahead and freeze them for use on busy homeschool days. Make a huge batch of cookies and freeze them in small packages for quick treats in the car on field trip days.

7. Hold a “Game Day” and let each child select a favorite game, and everyone plays together, rotating through the selections. Relax, laugh and get silly, and enjoy each other’s company.

8. Hold a “Family Conference” to discuss what each member expects from homeschooling. Let each express his hopes and fears, likes and dislikes. This time of open sharing will reveal some new things you had not thought of trying and some other things you may want to avoid. (I had not realized how traumatizing a teacher’s red pencil had become to my formerly public schooled child until she shared, so I then began marking her papers with other, happier colors.)

9. Back-to-school shopping–even homeschoolers enjoy a few new items. Find some new containers for homeschool storage, art materials, or just some fun pencils and notebooks. Purchase a special reference book, wall map, or other useful learning aid for the whole family. If your students have left public or private school to begin homeschooling, allow them to choose some things that were not allowed for use in their last classroom (Trapper binders, mechanical pencils, colored-ink pens).

10. Begin classes with only one subject per day for each student. After a week, add a second subject; week three, add two more subjects. Continue until you are up to your full schedule.

From the Mailbox: Read-Aloud Disruptions

This is part of a series of articles based on actual questions I have received and my replies to them. Real names will not be used, and I will address my responses to a generic “Mom”; if you are a homeschooling Dad, the advice can usually be applied to you as well. The wording will be altered from the original letters (and often assembled from multiple letters) and personal details will be omitted or disguised in order to protect the privacy of the writers while still maintaining the spirit of the question. If you have a specific homeschooling question that you would like me to address, please write to me at guiltfreehomeschooling@gmail.com. If part of your letter is used in an article, your identity will be concealed.

Dear Carolyn,
I am the HS mother of several children, with only two old enough for school. I really want to improve on reading aloud to my kids. They do okay with picture books, aside from the jockeying for position on Mom’s lap and crying about whether or not they can see the pictures well enough, but chapter books just don’t hold their interest. The kids are fighting, playing (loudly), leaving the room, and otherwise ignoring my attempt to read to them these wonderful books that I so enjoy. I am trying to pick age/gender appropriate books. Help! Do you have any suggestions? I feel like I’ve been waiting so long for them to be “ready” for chapter books. Should I have to discipline them into good behavior for listening to a good book? This seems to defeat the purpose for me–I want them to enjoy it! Do I have to wait for them to be older still? My oldest is very hands on, active, etc., and he tends to lead the behavior of the others (for the worst).
–Mom

“Discipline,” meaning punishment, is probably not required, but “discipline” — by its definition of training — is definitely in order. This will be a fundamental learning experience for your children: your goal is not merely to read them a book, your goal is teaching your children how to listen and how to show respect.

Your older children can learn to enjoy longer stories, but the youngest ones will not be able to sit still for very long or comprehend the extended plot of a longer story. You may need to do read-aloud time when the youngest ones are napping, just to limit disruptions until the older children begin to understand what behavior you want them to exhibit.

Very few people (adults included) are able to sit absolutely still and listen with strict attention for more than a few minutes. Work with your oldest child’s hands-on needs and allow the children to color, paint, play with clay or Play-Doh, or build with Lego’s while you read to them. As long as they have a quiet activity, they can still hear you reading, and they will probably listen for a longer period of time if their hands are kept busy. The preschoolers might do wood or foam puzzles or lacing cards — I am sure you will come up with several ideas from your stash of toys and art materials. It is also a good idea for each child to have his own activity, to prevent squabbles over “I need that piece” during the story. You might also consider designating certain playthings for story-time only, making them more special and keeping the children from becoming bored with them.

Since your children’s behavior has not met your expectations up to this point, consider starting over by laying some ground rules. Allow each child to pick a quiet activity while you spread a bath towel on the floor for each child to sit on. Leave enough space between the towels so that the children will not be elbow-to-elbow. Explain to them that their towel is their personal space while Mom is reading the story, and they are to remain within its boundaries during story-time. Assure them that today’s story has no pictures (or that you will let each child see the pictures in turn), that each of them will be able to hear well from his space, and that, since each child’s arms and legs must remain within his towel-space, no one will be disturbing anyone else. Limit the interruptions by giving each child a chance to get a drink, go potty, and “get the wiggles out” before they all take their places for story-time.

Start this new routine of “personal space” with a short reading time from a book that the children already enjoy (especially the oldest “ringleader”). If anyone disrupts the story, you may allow one or two warnings on the first day as practice, but close the book at the next infraction. Stop reading and put the book, toys, and towels away for the day. It may take several days for them to adapt to the new routine, but your persistence will pay off, and they will gradually learn that leaving their space means that the reading time comes to an abrupt end for everyone.

Once the children have mastered the lesson of staying within their own spaces to listen, you may want to allow the older ones to change their space from a towel on the floor to a seat at the table, allowing them to do a wider variety of quiet activities during the reading. The older children may even be able to work together on a jigsaw puzzle while you read. However, your toddlers may take longer to understand the “space” limitations, so do not advance the older students too quickly, before the younger children are able to understand the purpose behind the concept.

Bit by bit, your children will learn how to sit quietly, how to listen, and how to respect their siblings. Start with a short reading time, and increase it gradually as a reward to your children for their improved behavior. Minor setbacks are temporary: remember that your children are practicing a new skill. Above all else, praise your children for their accomplishments!

[For further insight, see the articles linked below]
Is This “Acceptable Behavior”?
“Parent” Is a Verb
Respect Must Be Earned
Siblings as Best Friends
Learning to Walk — Seen as a New Lesson
Social Skills — What Should I Teach My Preschooler?

Applying Learning Styles with Skip-counting

I have often written about learning styles and how each person can relate to material presented in certain ways better than they can grasp the same material presented in other ways. Today’s lesson is for the parent who is saying, “Okay, I understand that this child is more auditory and that child is more visual, but what do I do with that information?” I will walk you through a basic lesson for early math, skip-counting. While giving you some tips for teaching skip-counting, I will also show you how to adapt any lesson to cover each of the various learning styles. Covering all learning styles in a lesson will enable all of your students to learn the material at the same time and give each student a more complete understanding of the material being presented.

Begin by explaining the principle of skipping to your child: walk across the room with him, then skip across the room with him to illustrate how skipping covers the same distance faster and requires fewer steps than merely walking does. Explain that skip-counting is a short-cut way to count things, by using fewer steps and skipping over certain numbers to cover the distance faster.

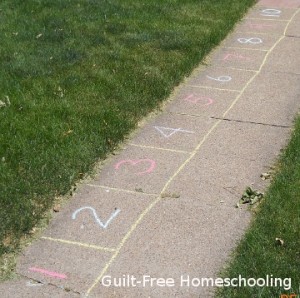
Children love kinesthetic applications, so if the weather allows, let’s take the math outside. Use sidewalk chalk to draw a long line down the sidewalk or driveway. Now mark the line off in reasonable increments (approximately the length of your child’s foot) and number each mark to create a number line so that your child can step from number to number. Drawing this as a long row of numbered boxes (instead of just a thin line) might make the concept easier for your child to understand, as it will resemble a giant game board where he can jump from box to box. Have him stand at the beginning (make a “start” or “zero” place), then have him step or jump to the “2” place, then to 4, and then to 6 to show him the concept of counting by two’s. Can he tell you where he should go next?

Once he is able to skip-count by 2’s, you can repeat the activity by having him skip-count by 4’s. If the increments become too large to step or jump to, he can run quickly across the “skipped” numbers and stop on the desired number, shouting the number loudly as he skip-counts the increments. If numbered boxes on the sidewalk do not work for your situation, try using kitchen floor tiles or stairs, or use masking tape to “mark” a line on your floor or carpeting.

Next, shift the concept from kinesthetic to tactile by drawing a series of smaller numbered boxes on paper and have him do “finger skipping” from one number to another, first by 1’s, then by 2’s. You may eventually want to let him use some game pawns, moving them from square to square while counting off the increments.

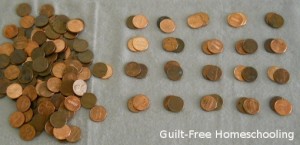
When your child understands the entire concept of skip-counting, you can pour out a large quantity of the substance of your choice onto the table (or a cookie sheet) and allow your student to start counting objects: M&M’s, oyster crackers, dry beans, buttons, Lego’s, or checkers. Count them by 1’s until he has the idea that counting them all individually will be a long process. Now have him move two at a time and try counting by 2’s. Allow him some time to practice this concept — it can be difficult to do any task until you are used to it. After he has the 2’s mastered, then you can move on to skip-counting by 4’s, 3’s, 5’s, 10’s, or any desired increment. (Counting by 4’s is an easy concept to follow counting by 2’s, since it is just a larger extension of counting by 2’s — counting just the even numbers by 2’s. I recommend doing the 4’s before the 3’s for this reason. In the same manner, follow counting by 3’s with 6’s, and follow 5’s with 10’s.)

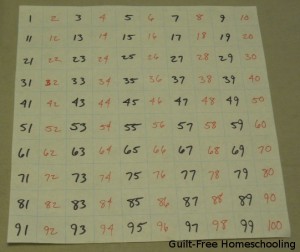
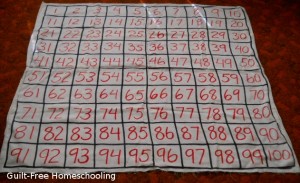
Another activity to help a student understand skip-counting by 2’s is to fill in a 100-chart with colored markers (adding a strong visual element). Draw* a chart of 10 x 10 boxes (10 rows of 10 squares each). Now alternate filling in the numbers: Mom writes an odd number in black, and the student writes an even number in red. Say each number aloud (here is the auditory part of the lesson) as you write them. Read the numbers over again when the chart is all filled in, alternating as Mom says a number she wrote and the student says a number he wrote — and suddenly the student is counting by 2’s! Then Mom can be quiet while he reads only his numbers aloud to reinforce his new skill. (Adapt this activity to other increments as needed for skill in skip-counting.) *Note: 1-inch graph paper is available at office supply stores in a poster-sized display tablet. I LOVE THIS STUFF! It is great for fast number charts — and hundreds of other homeschool uses. I rolled mine up and tied the roll securely with string for easier storage on a closet shelf.


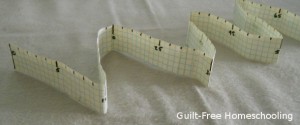
Graph paper marked with five squares per inch (also available in office supply stores) can be used to make a measuring tape for math as a good tactile and visual learning aid. Cut a few sheets into 1-inch wide strips and tape them together for the length you desire. This scale is compatible with the centimeter-scale Cuisenaire Rods: 2 graph-squares = 1 centimeter, so marking numbers on every other line produces a centimeter measuring tape. I used it to illustrate multiplication and division facts by accordion-folding the paper tape into 6 sections of 8 centimeters to show 6 x 8 = 48 and other facts, but a similar principle will work for skip-counting. Fold the tape on every other number, and then read off (auditory) the numbers at each fold for skip-counting by 2’s. Adapt and repeat for other increments.

When your student has advanced to skip-counting by 10’s, draw a large 100-chart on the driveway, and your student can jump or run from box to box (kinesthetic), or have him fill in the numbers with colored chalk (tactile & visual). Do the 100-chart activity on paper with red numbers on the 10’s only (tactile & visual), but black numbers on the other squares. Then write 1-10 in a vertical column on paper, saying them aloud (auditory). Now add a zero to each number, and read aloud again to count by 10’s. Repeat, adding more zeroes, to count by 100’s, 1,000’s, 10,000’s, or as many zeroes as your child can handle.

Kinesthetic teaching tactics will involve large muscle groups: moving arms from the shoulders or moving legs from the hips. Walking, hopping, running, and jumping, and throwing, catching, and reaching are excellent ways to teach a kinesthetic child. You want to have him move his entire body whenever possible. If a child is easily distracted while trying to sit still, he is probably a kinesthetic learner. If the lesson takes place while the student is seated, it is probably not a kinesthetic lesson. If you want a kinesthetic child to learn, do not try to keep his bottom stuck to a chair seat. Let him stand, let him walk around, let him throw a ball to you while reciting, if necessary, but incorporate his need for movement into your lessons. (Notice that this is not wiggling and moving around just for the sake of wiggling and moving and trying to disturb others. This is taking in information through well-coordinated muscles and reinforcing it through repeated muscular actions.)

Tactile teaching tactics will involve small muscle groups: moving hands from the wrist, moving fingers, and touching, feeling, and rubbing with fingertips. Textures, from dramatic and rough to subtle and smooth, and finger and hand movements are excellent ways to teach a tactile child. You want to have him touching something related to the lesson whenever possible. If a child is easily distracted while trying to keep his hands still, he is probably a tactile learner. If the lesson takes place while the student’s hands are empty, it is probably not a tactile lesson. If you want a tactile child to learn, do not try to keep his hands empty and quiet. Let him touch things, let him make something, let him hold a toy while reciting, if necessary, but incorporate his need for touching into your lessons. (Notice that this is not touching and fiddling with things just for the sake of touching and fiddling and trying to disturb others. This is taking in information through an acute sense of touch and reinforcing it through repetitive touches.)

Auditory teaching tactics will involve sound: incoming sounds and outgoing sounds. Speaking, singing, and humming, and listening are all ways to teach an auditory child. You want to involve his ears and vocal chords whenever possible. If a child is easily distracted while the room is quiet, he is probably an auditory learner. If the lesson requires the student to read quietly, it is probably not an auditory lesson. If you want an auditory child to learn, do not try to keep him quiet. Let him hum, let him sing, let him read his assignments aloud, let him discuss the lessons with you, let him listen to music in the background, if necessary, but incorporate his need for vocalization into your lessons. (Notice that this is not making noise just for the sake of making noise and trying to disturb others. This is taking in information through highly sensitive ear-gates and reinforcing it through vocal repetition.)

Visual teaching tactics will involve illustrations and colors: graphs, charts, and diagrams, and lots of bright, stimulating colors. Posters, maps, forms, and worksheets, and color-coding are excellent ways to teach a visual child. You want to involve his eyes whenever possible. If a child is easily distracted while listening, but is not bothered by sitting still, he is probably a visual learner. If the lesson takes place while the student has no examples to look at, it is probably not a visual lesson. If you want a visual child to learn, do not try to keep his eyes focused on you. Let him read, let him draw, let him color while you read aloud, if necessary, but incorporate his need for visual details into your lessons. (Notice that this is not looking around and daydreaming just for the sake of looking and daydreaming and trying to disturb others. This is taking in information through very observant eye-gates and reinforcing it through recalling memory-pictures.)

Any lesson can be adapted to include elements of the various learning styles. Do not be afraid to be creative in trying revolutionary approaches that seem to be unusual applications for the subject at hand. Your “crazy idea” may be the exact key that unlocks the door to learning for your students.

Goal: To Learn Equally Well in All Learning Styles!

The Value of Supplemental Activities

A friend recently posed an intriguing question to a group of homeschooling moms: “If money were no object, what would you purchase first for your homeschool?” The usual wish-list items came out: specific curriculum choices, books, more books, shelves for all the books, rooms just for school stuff, and books. However, I was the most surprised by reading a spontaneous part of my own answer: “For us, it wasn’t the curriculum itself that ‘made’ homeschooling — it was the extra-curricular activities and supplemental things we did that we remember most and learned the most from.” It was an aspect of homeschooling that I had never truly pondered before, at least not in so many words. I have often suggested various activities to help struggling students bridge the learning styles gap with assorted curricula, but suddenly I was seeing activities as The Most Important Part of any homeschooling experience.

It is not the curriculum itself that matters most; it is what you do with the program and what you do besides the program that will make all the difference in your homeschooling endeavor. Supplemental activities can turn a mediocre program into an educational experience far better than the most renowned program on the market. The activities you choose can be tailored to your child’s individual needs and interests, whereas a boxed program must be universally applicable.

Some programs are better than others, but that still goes only so far. My regular readers already know how much I loved Miquon Math for grades 1-3, but the suggested activities were what really drove the concepts home. Practice away from the workbooks and playing and experimenting with Cuisenaire rods are what solidified the knowledge that was presented in the books. Saxon Math effectively used real-life examples through word problems to teach the students how to set up a formula. (Once they have the formula, any math student can solve the formula.) Our supplemental activities for Saxon math included applying the formulas to more areas of real life: relating fractions to pies and candy bars, doubling recipes for practice using fractions, calculating the areas, perimeters, and angles for home improvement projects, and applying the mathematics of probabilities to everyday situations in my students’ lives. When my daughter had trouble understanding probability from the textbook example of red marbles and blue marbles, I changed the problem to fit her teddy bear collection. Suddenly, her favorite white polar bear stood out in marked contrast to the other bears, and the chances of selecting him at random from a pile of stuffed bears was more easily understood.

We played a great deal with construction toys, but we always built something, even if our projects were not elaborate architectural models. We never stacked the bricks just for the sake of stacking bricks. Instructions for Erector Set models or K’nex figures were a launching pad for our imaginations as we challenged ourselves to combine patterns or build bigger or better designs. Real life usually requires you to have some type of plan, so our activities always had a basic plan as well. We dared to dream, and we learned through the trying, whether we succeeded or not.

We are all familiar with the jokes about students who put a book underneath their pillows, hoping to absorb information by osmosis while they slept. We smile and laugh, knowing that there is no possible way for that to happen, but many times we urge a child to “read the book,” expecting him to absorb all the information in that manner. If the child is adept at visual learning, it may happen, but so much more knowledge and understanding can be gained through the addition of a few supplemental activities. Activities break down the barriers of learning styles, making it possible to teach your child in the way he learns best, no matter what curriculum you are using.

When I took a college chemistry course, I worked industriously at memorizing vast quantities of information. They were only meaningless words to me, but I forced myself to memorize them so that I could reproduce them on test papers. However, through working in the chemistry lab, experimenting with the acids, bases, minerals, and gases, I began to understand the concepts behind those words. I had read the book, and I had learned the facts, but I did not gain understanding until I got into a supplemental activity. Watching bubbles form in a beaker of water as electrodes forced the hydrogen and oxygen molecules to separate made the atomic bonding process straightforward and uncomplicated. It was right there in front of me. I could watch it happen. I collected bubbles of the two gases in separate test tubes and proved their identities with another test. A similar experiment electroplated a nickel coin with the copper from a penny. The diagrams my professor scribbled on the chalkboard became stop-motion animations of the molecular breakdown process. He showed me through symbols and arrows the explanation for what I saw forming in the beaker. It was not sleight-of-hand illusion; it was science taking place at my fingertips. It was not something I could learn sufficiently from merely reading a book. I had read about the process, but actually doing it made the reading portions of my lesson obsolete.

Supplemental activities do not have to be expensive or use fancy materials. Many wonderful, educational activities can be obtained from the simple things you already have around the house.
* Read aloud and discuss plot lines, characters, and what-do-you-think-will-happen-next.
* Play with art and craft materials, even if you have no natural artistic ability whatsoever. If you have difficulty drawing, get off the paper and try “sculpting” with Play-Doh — maybe you are more of a three-dimensional thinker.
* Draw diagrams, even if you have no natural artistic ability whatsoever. The simple chalkboard illustrations that have helped me gain understanding were not artistic or even dimensionally accurate, but I still learned and understood.
* Use manipulatives: hands-on learning aids, whether they are homemade flash cards, things for counting and sorting, or a clock-face made from a paper plate and cardboard “hands.” If it helps your student understand a concept, it is worth your time, trouble, and expense.
* Build models. Who cares if popsicles sticks do not resemble quality building materials? I bought my students a small package of pre-notched “popsicle” sticks (think miniature, flat Lincoln Logs) in the craft department of Wal-Mart. They never looked like much when we built things with them, but the knowledge gained from the process of fitting them together was irreplaceable.
* Do experiments. A vinegar and baking soda reaction is fascinating to someone who has never watched it before. Woodburning with nothing more than a magnifying glass and the sun is another unforgettable experience (especially when you stop paying attention to where you have the light focused and your leg suddenly gets hot).
* Play games. Children sometimes balk at spending more time studying their lessons, but have you ever had a child turn down the chance to play a game? Any game using money is math; many games require forethought and strategy, and all games teach sportsmanship. Get together with other homeschooling families and share your favorite games with each other.
* Invent a new game: take a concept that your students need work on and invent a new game for practicing that concept. Make the pieces yourself or borrow them from other games and write all the necessary rules for some real-life problem-solving experience. I dare you to try it.
* Take on hosting a group project (even if it is nothing more than a Monopoly marathon) and enlist your students to help you plan and execute it. We learned much more from preparing large-scale events than we ever could have learned from merely participating in them. My daughter first ventured into administrative duties when we tackled an event that combined several homeschool support groups. The skills she developed then still serve her today in retail management.
* GO see things and DO stuff: zoos, museums, libraries, etc. A “family pass” will often be usable at more than one location. We purchased a season-long family pass to a small local zoo, only to find that it also entitled us to free admission to a much larger zoo in another city an easy day-trip away. Our pass also included other zoos, history museums, art museums, and science museums for a full year. For a little more than the standard admission for one family visit, we were able to take in multiple wonderful experiences. Another amazing surprise for me was how fascinating unfamiliar libraries were to my children. We dropped by the public library in another city and ended up spending hours exploring it and seeing how its features differed from our local library. Whether you take an extended, educational, family vacation or just walk around your neighborhood noticing the architectural differences, it can be a memorable learning experience.

Anything that takes place outside of the textbooks or outside of the house is always memorable. If I were to ask my children to name their “Top 10 Favorite Things” from our homeschooling days, none of their responses would include the textbooks we used. Their “Top 1,000” list would barely touch on textbooks. Let me say this again: it is not the curriculum itself that matters the most. It is what you do with the program and what you do besides the program that will make all the difference in your homeschooling experience.

A New Approach to Spelling-Word Lists

I despise the way spelling is taught. I managed to get through the spelling workbooks that I had in school only because I was a word puzzle aficionado. When it came time to teach spelling to my own children, I became terribly frustrated. They did not instantly share my fascination for words or word puzzles. In fact, they found spelling workbooks to be very confusing and incredibly boring.

I remember spending hours as an early reader compiling my own lists of rhyming words and noticing that foot and boot appeared the same, but did not sound the same, which generated more lists. Writing all the possible combinations of certain sounds led me to a deep understanding of phonics rules and their applications. Exploration of prefixes and suffixes took me even further.

The public school method of test and retest used in the books we tried simply did not teach how to spell. Over the years, we abandoned the workbook pages and came up with our own methods for a spelling class. I emphasized prefixes, suffixes, Greek and Latin roots, and spelling patterns. Too often, the published spelling curricula grouped together words with nothing in common, ignoring the obvious patterns to be found.

I think that focusing on those patterns is an excellent way to learn spelling. Public school teachers have been told repeatedly in their college training classes that there are too many exceptions to too few rules. I disagree. I found a marvelous book called The ABC’s and All Their Tricks, which shows the patterns, the words sharing those patterns, and explains the origins of those patterns. It is a wonderful reference work — which finally explained to me how “w” can be used as a vowel.

Your lists of words can follow phonics rules or come from pre-prepared lists, such as the weekly lists found in spelling workbooks or from grade-level-specific lists. Another possibility for the avid reader is to compile his own list of unfamiliar words from his regular reading. Encourage your student to look up those words in the dictionary for origin, meaning, and pronunciation, and then incorporate them into your own customized spelling and vocabulary study program. My son expanded his own vocabulary by routinely browsing through the dictionary looking for new words.

My personal preference for learning a list of words would be to print out the chosen list (the time period for learning the words should be based upon your student’s ability) and post it in a prominent place where it will be seen multiple times throughout each day. Study the spelling patterns and then use repeated observation to cement the correct spelling into the brain. The student can use those words as the basis for exploring various art mediums: alphabet rubber stamps, calligraphy pens, or paper collage (cut and paste letters from newspapers and magazines). Bring out the letter tiles and cards from various table games and assemble all of the words from the current spelling list. If you have students who share my love of word puzzles (bless them!), challenge them to create their own puzzles — making the puzzles will teach much more than simply solving a puzzle will.

Daily observation can teach much more than we realize. Frank Gilbreth, the real-life father of Cheaper by the Dozen fame (stick with the book or 1950’s movie), painted information on the bathroom walls for his children to absorb while they performed their daily bathing and brushing rituals. After completing Morse code charts, Dad painted silly coded messages in various places around the house, fully expecting his children to translate them — and they did.

Repetition and drill by themselves are painfully boring, but when used creatively can become an enjoyable way to learn without wasting endless hours in rote memorization. Use what you have around your house and come up with clever new ways for your students to study the words they are learning.

Verified by MonsterInsights