When Did I Become an Unschooler???

I went to public school for my education. It was a rural school with Kindergarten through twelfth grade all in one rather small, three-story building. The teacher-to-student ratios were fairly low, since most classes rarely exceeded twenty students. Most of the teachers used traditional methods of oral lectures and reading assignments.

I remember feeling detached from the rest of the class, because I was either way ahead of the teacher or way behind. In Kindergarten, I could already read enough to know what the workbooks said, and I could tell when my teacher was changing those directions and leaving out the parts that I thought sounded like more fun than what she wanted us to do. I had to sit and wait and sit some more, surrounded by a roomful of enticing learning toys that could never be touched. And my teacher insisted that sitting quietly and listening quietly were the best and only suitable ways to learn anything.

In fourth grade, I knew nearly all of the spelling and vocabulary words before my teacher wrote them on the board, but she often mispronounced them. I had my very own personal dictionary in my desk, something I loved to read more than any of the storybooks on the classroom shelves. I pulled it out one day to show my teacher what the correct pronunciation of a certain vocabulary word was, because I thought she would want to teach things accurately. Instead, she just got upset. For some unknown reason, we didn’t get along for the rest of that year.

In sixth grade, I had a very old, very worn out teacher. She had her methods that she had used for decades, and she expected them to work forever and for every student. She also had certain subjects that she didn’t care to teach, so she glossed over them with the same three words for every assignment: “Outline the chapter.” I learned nothing from geography that year, except that I could not possibly produce an outline to her satisfaction.

Occasionally, a random teacher would allow us to do a special project as an assignment, but it didn’t happen more than once every few years and never in more than one subject. Any project was also limited to about a week in length and still had to meet that particular teacher’s expectations. The year I prepared a typical Medieval meal for my World History teacher, I thought he was going to have a stroke right there in the classroom. He seemed very concerned that I had smuggled some beer into the school building, until I whispered to him that his tankard contained cream soda as a visually-similar substitute. Despite all my research into the types of foods, serving utensils, and customs common to the time period, he didn’t know how to grade my beef stew and fake beer. He was much better with salt-dough castles and cardboard armor.

All in all, I hated school. I hated the teachers who treated me with contempt for daring to want something other than outlining the entire geography textbook and droning through random passages from Shakespeare read aloud in class. I hated the endless repetition, year after year of boring textbooks that all said the same boring things. I hated it all.

Once I had my own children, everything changed. I loved watching my kids discover the world for the first time. I loved the expression of recognition on their faces each time something new began to make sense. We played games, we played house, we played dress-up, we played everything we could play. We made forts, we made cookies, we made make-believe. We read stories and more stories until we knew them by heart, and then we recited them together when the books weren’t close at hand. I read them simple stories, pointing out the details in every picture. I read them chapter books beyond their years, allowing them to meet brave explorers like Christopher Robin and form pictures in their minds of what “heffalumps” and “woozles” must look like. I read them the lyrical poetry of A.A. Milne, Edward Lear, Robert Louis Stevenson, and countless others. And then suddenly they were old enough for school.

When I sent my children off to public school, they fit into their classrooms just as well as I had in mine, which is to say “poorly.” They wanted to play with the hundreds of wooden blocks at the back of the classroom, instead of sitting at the teacher’s feet as she did yet another mind-numbing counting-to-ten exercise. They had to endure adding 1 + 2 + 3, being told it was difficult and challenging, when they had already figured out how to do 2-column subtraction in their heads. They had to sit and wait and sit some more, surrounded by a roomful of enticing learning toys that could never be touched. And their teachers insisted that sitting quietly and listening quietly and reading quietly were the best and only suitable ways to learn anything.

When my husband and I made the decision to remove our children from public school to begin homeschooling, I used the traditional school model of textbooks and worksheets, simply because it was the only thing any of us had ever known. There I was, ordering boring curriculum, assigning boring lessons, and grading boring worksheets, doing all the same things I had hated all through my own school years and boring my own children with every step.

My students began stumbling over what I called “potholes”—missing portions of vital information that their former teachers had failed to impart. My 5th-grader was delighted to discover that anything she hadn’t understood at public school could be re-studied at home without penalty or ridicule, and she provided me with a list of math concepts that she wanted to master, including fractions, decimals, percents, and measurements. Specialty workbooks helped us fill in those gaps, but actual practice in real life experiences gave the concepts purpose. We measured dozens of things around the house, maybe hundreds of things. We converted the measurements into fractions and decimals. We converted the fractions and decimals into percentages, until it was apparent that the different forms were just “nicknames” for the same amounts. Manipulating the numbers became fun, and math lessons became less intimidating.

I realized that my children were benefiting from the hands-on experiences that solidified what the textbooks had to say. When a math problem spoke of so many red trucks and so many blue trucks, and my child wasn’t understanding it, we used colored blocks to illustrate the problem in a way she could do over and over again until she got it. When my daughter couldn’t solve an anagram for her spelling lesson, she took the letter tiles from the Scrabble game and rearranged them until she figured out the word. The enticing learning toys gave the lessons tangibility, and the fingers understood what the eyes had missed.

I haven’t met a spelling curriculum yet that I like. Phonics is a systematic method for learning to read, but why should that be followed by repetitive lists of spelling words that anyone with a decent grasp of phonics could spell without difficulty? Vocabulary words were never much different from the spelling words. If my students could break the word down into its phonetic components and learn to read that word, either they already knew its meaning, or we would look it up in the dictionary together.

As a child, I had loved having my own personal dictionary, which I routinely browsed for new words. That was the basis of my own vocabulary expansion. Using the pronunciation guides, I could learn to read any word I came across, and the definitions, origins, and various forms of the words added even more to my personal studies. My son picked up this habit himself and regularly quizzed me with new words he had discovered, trying (usually unsuccessfully) to stump Mom. Reading material is an excellent source of new vocabulary words – if it’s not, then your students are reading things that are too simple for them. Another personal habit of mine is to keep a dictionary and pencil close by while I’m reading. Any unfamiliar words get their definitions written in the margin of the book. (Don’t tell anyone, but I’ve even been known to pencil a definition in the margin of a library book, reasoning that if I didn’t know that word, the next reader probably wouldn’t know it either and would be grateful for the notation.)

No matter how many curriculum programs we tried, nothing was a perfect fit for us. The textbooks were too boring and too far removed from everyday life. We supplemented the textbook studies with activities, games, and field trips, and we always found that we learned much more from the extra activities than we did from the textbooks and workbooks. Even the math texts that provided solid teaching were tedious in their repetition-without-application. Board games could always be counted on for practice in the same concepts, but with much more enjoyment. Although we enjoyed a wide variety of supplemental activities, most of the time we stuck to a pretty structured sequence of academic studies. It was only toward the end of our homeschooling journey that I began to research and understand learning styles and see the full value and effect of alternative types of study over traditional methods.

Today, I’m much more likely to recommend family activities, a video-and-discussion session, or a round of board games instead of textbook lessons. How did I get to this point? When did I become an unschooler? If we had it all to do over again, we would probably be more like that eccentric unschooling family we met when we first started homeschooling—their spontaneous and unconventional approach to learning did not fit into my definition of education at all (but they did seem to be having a lot more fun at learning than we were). We would read more biographies from the library shelves, instead of purchasing over-priced textbooks that barely scratched the surface of any remotely interesting topics. We would spend hours dropping Mentos into Diet Coke, instead of just watching the You Tube videos. We would have all sorts of wonderful fun, we would learn all sorts of wonderful things, and we would enjoy journaling all our wonderful exploits, because we would be making and documenting real history instead of slogging through yet another tedious assignment made up by some stranger who knew nothing about us or our interests.

The way I see it, looking back over many years of actively homeschooling and many more years of mentoring homeschoolers, if a student can learn something well by reading it in a book, he doesn’t need anyone’s help. On the other hand, if a student is struggling to learn from reading and struggling to learn from discussions and explanations, that student needs a hearty dose of unschooling methods. Get elbow-deep in an experiment, work out a physical representation of a math problem with some type of thingamabobs, watch someone demonstrate a real-life skill and ask them to help you learn it step-by-step. Going places, seeing stuff, and doing things are much more valuable methods of learning than just reading about someone else going places, seeing stuff, and doing things. If unschooling means leaving the books behind and getting out there to learn from life itself, then I’ll happily call myself an unschooler. I never did fit into a classroom very well.


[For a further explanation of educational potholes, see Meatball Education: Filling in the Potholes of Public School]

Husbands & Wives: Why They Teach Differently

If you and your spouse have shared the teaching responsibilities at your house, you have probably experienced this phenomenon: husbands and wives approach homeschooling from very different perspectives.

Here is a typical scenario: Dad goes off to work each day, earning the paycheck that makes homeschooling possible, and Mom is the primary teaching parent. One day when Dad is not at work, Mom’s normal teaching duties are handled by Dad. Mom may be sick in bed with whatever despicable virus has finally caught her unawares, or perhaps Dad has a vacation day, it’s a holiday break, Mom just needs a Me-Day, or fill-in-the-blank other reason that can take Mom away from the action. An efficiently organized Mom may leave a list of the lessons that she feels should be accomplished for the day, but Dad may also scan through the list and do things his way. The children may even think Mom wouldn’t do it this way, and they may or may not voice their opinions aloud, depending on how the day proceeds. Dad will get important things done, but they may not be the same things that are on Mom’s list, or they may not be completed with the same methods or in the same order or in the same time frame that Mom would do them. Husbands and wives approach homeschooling from very different perspectives.

I remember returning home after a day away from my homeschooling role to find that my husband had supervised some of the lessons but allowed the children to handle others on their own—whereas my normal routine might have been to micro-manage every lesson throughout the day. He had completed several household chores during my time off, but they definitely were not the same ones that I would have done, or they were done in an entirely different manner from my normal routine. I do know that it was always a good thing for me to see his very different approach to things: it usually taught me that I could step back and give up a little more of my control and allow others to handle the responsibilities in their own ways. I frequently found myself stuck in the rut of routine, thinking that this job must be done this way, every time. Witnessing my husband’s approach to the same job was very often a delightful revelation of time-saving, energy-saving shortcuts. My focus had been on managing the whole operation at once, concentrating on the end results, where his focus had been on each task individually, revealing unnecessary steps.

Women multitask. God designed women to be nurturers: able to maintain a comfy and cozy home environment, prepare the meals, tend to the baby’s needs, care for the growing children, and so on—all at the same time. Whether or not today’s woman is a stay-at-home mom-of-many, she has the God-given ability to handle multiple tasks at any given time, capably and efficiently.

Men maintain a singular focus. God designed men to be providers and protectors. As hunters and defenders, men must keep their eyes on the objective. Glancing away could mean death through attack or starvation from losing sight of the target. Even though most modern men do not spend every day literally in search of the next meal or fending off predatory enemies, they still approach their day-to-day business with the singular focus that God has placed within them.

Moms and Dads approach homeschooling differently, by God’s design. Moms can teach several kids at once, each child in a different subject, in multiple rooms, while keeping track of laundry cycles and watching the clock to know when to start dinner. On the other hand, Dad can get Junior unstuck from a tricky math problem in under 5 minutes. Then Dad will take Junior out back and teach him how to throw the football in a perfect spiral.

Mom may vent to Dad about her frustration with that day’s homeschooling, giving him a blow-by-blow account of all she did to try to discourage the twins from kicking each other under the table. Dad will quickly see past the details of the squabble and offer the simple solution of putting them in two separate rooms to do their work tomorrow.

Dad may come up with the idea for a great dad-and-lads camp-out for this weekend. Mom will gather all the necessary comforts of home, packing the cooler with sodas and milk, and send along all of the ingredients for making s’mores by the campfire—including clean marshmallow roasting sticks. Dad may protest at Mom’s insistence that they take along the band-aids and antiseptic wipes, but he will use them when Junior skins his knee after tripping on the hiking trail and sliding down the rocky hillside (but it wasn’t all that far, just a few yards).

Moms and Dads bring different sets of skills and talents to the task. Moms are good at cuddling and kissing boo-boos; Dads are good at rough-housing and playing horsey. Dad’s tools are hammers and saws and power-drills; Mom’s tools are rubber spatulas. Moms do have tools called beaters, but they get used for things like eggs and cream. “Changing the oil” may not sound very exciting, but when Dad does it, he gets sufficiently greasy and dirty to satisfy any child lucky enough to be allowed to help him. Moms often plan their lessons and stick to their plan. Dads often walk away from the books and teach lessons from real life. Moms and Dads both make excellent teachers, but we should never expect them to do the same job in the same way, with the same tools, or with the same flourish and finesse. To expect Mom and Dad to teach the same subjects to the same children in the same way is to expect at least one of them to deny the instincts God has placed within them both and to work counter to everything God has programmed them to do and to be.

Consistency in teaching is a good thing, but taking a break now and then is a good thing, too, and children and parents will be blessed by both. Moms and Dads, please recognize that your way and your spouse’s way are both valid, no matter how dissimilar they may be. One way is not necessarily the only right way, and another method is not necessarily a wrong approach. Sometimes different is just different, and variety is the key to learning.

Surviving the Mid-Year Slump

What is getting you down right now? The “We’re Only Halfway Through This School Year” blues? The “This Book Isn’t Working Any More” blahs? Or is it the “After-Christmas and No One Wants to Work” wall? Maybe you’ve been hit by the “Pestilence Apocalypse”? A suitable subtitle for this article might be “Stuck in the Middle with You,” since this is the time of year when homeschooling tends to take on a kids v. mom perspective. We want to turn that around to its proper alignment of us v. the books, proving to the kids that mom really is on their side in this educational endeavor.

Step One, get serious about what you want to learn. More than just getting serious, it’s time to get realistic about expectations. If your plans for the year were so incredibly lofty that your students have barely even completed the introduction to the material at the mid-year point, it’s time for some reevaluating. Don’t get me wrong — there is nothing wrong with having lofty goals, as long as you have the means to accomplish them. However, no one can run a 26-mile marathon in 4 minutes. You can make it your goal to run that full marathon or have the goal to run a mile in four minutes, but you can’t have it both ways, especially since either of those goals is still a lot of work!

When it comes to schoolwork, remember that publishers sell all-in-one products that cover a wide variety of needs, which is why teachers rarely use an entire book. (I’ll say rarely just in case there is a class out there somewhere that regularly completes every book from first chapter to last, but I haven’t seen it done yet, except by a few over-achieving homeschooling families who quickly burned out and then wondered why.) Therefore, don’t guilt yourself into thinking that just because the publisher included all those chapters in this book, that must mean that you must push your students to complete every one of them. Absolutely not! This now means that you and your students can browse through the rest of the book, deciding which chapters look the most interesting, which ones are repetitive or boring and can be skipped, and which ones might be included if you have enough time. Textbooks are the least efficient method for learning anything, since someone else had to pick and choose what would be included and what would be ignored. Biographies, autobiographies, journals, and first-hand-account histories give a much more accurate (and more interesting) portrayal of any topic, as far as books go (I like hands-on methods even better). Conquering the books puts you back in control of the lessons. Maybe you decide to skip the chapter on bugs that would have taken several days to go through, and instead you and your students spend an afternoon exploring everything you can find about bugs online. The intensity of the learning is what’s important, not the time involved. (More on this in Step Three)

Step Two, don’t let a schedule bog you down in unnecessary work. If a student gets it, let him move on. A wise mom once said, “If my kid knows how to start a sentence with a capital letter and end it with a period, why should I frustrate him by making him do 12 more lessons of starting a sentence with a capital letter and ending it with a period???” I regularly gave my kids a pep talk, reminding them that if they would take their time and get everything correct the first time, they wouldn’t have to go back over it again and again. Giving them incentive to pay closer attention made them more diligent at their work. By all means, stick with the child until he understands a concept, but once he’s definitely got it, let him move on.

Effective, daily communication requires a working knowledge of grammar, vocabulary, spelling, and so on, and handling personal finances every day requires a working knowledge of basic math, so I taught those daily. Skills that will be used every day as an adult should be studied and practiced every day as a student, but Google and “Siri” can now supply quick answers for just about anything else that is not needed on a daily basis.

Step Three, get away from the books more often, which does not mean to stop learning. If your students have been learning how to multiply fractions, let them put that knowledge into practical practice by tripling their favorite recipe for chocolate chip cookies. Make them and bake them, or freeze little balls of cookie dough for a quick-to-bake treat another day, but measuring, mixing, and tasting will prove whether or not they did their math correctly (and since it’s a yummy treat, they will be extra careful to get it right, because no one wants to eat cookies with too much salt in them!). Now pick another cookie recipe and double or triple it for more fraction practice. (Bonus tip: freeze some baked cookies in grab-and-go bags for your next field trip day!)

Watch movies related to literature or history as another pleasant diversion from the printed pages, one that can impart basic themes in a quick but memorable way. My teenaged son enjoyed reading books more if he knew what to expect from the story, so we fell into the method of watching the video first, so that he could learn the plot twists and who was connected to whom, and then he wouldn’t lose interest while reading through the book at a much slower pace. There was one day when we rented an action-adventure-movie-made-from-a-book, only to find out that Jane Eyre had accidentally been slipped into the wrong case, the one we had just brought home. He watched it anyway, so as not to lose his allotted video-watching time and ended up knowing the story of Jane Eyre, a book/movie he would never have chosen on his own.

Explore online. Watch a tutorial video. Read a website. Follow a blog. Play a podcast. Find a live webcam. Search for images. Find an out-of-print book in eBook form. Read a review. Zoom in on Google maps’ street-view. Listen to music. Download an app. In this 21st century, electronic age, it’s becoming more and more vital to expand our definition of learning to include paperless forms of information. I can learn a new skill from watching a You Tube tutorial faster than I can find a printed version of the same instruction. And I have. Learning is learning, no matter what the source — it’s not cheating, just because I didn’t learn it from an over-priced, hardback book. A very old but very worthy book that libraries no longer stock can be downloaded as an eBook faster than I can say “for free.” An elderly neighbor can tell personal stories from World War II that will never be written in books, because he was there and lived through it. A great musician no one knows can demonstrate techniques in an online video, reaching students he will never meet. Learning is learning, no matter what the source.

Play games. Board games are an under-appreciated educational resource. If the game isn’t fun, find a better way to play it: drop the score-keeping, loosen up the rules a bit, or add three extra dice to get you around the board faster. Invent your own “house rules” for certain games, such as “Jabberwocky Scrabble,” where any nonsense word is allowed as long as the player can pronounce it and make up a reasonably-acceptable (and probably hysterical) definition for it. Create  “Slumlord Monopoly” by letting each player roll the dice to determine how many properties he can pick from the deck and roll again to see how many houses he can put on them for free, before normal game play begins. Put a simple jigsaw puzzle together upside-down, placing all the pieces face-down on the table. Players will be forced to rely on the shapes of the pieces alone, improving their visual skills.

My kids quickly learned that if they could spend a break playing games together without squabbling, they got to stretch that break into a longer time period — but a frivolous argument would land them right back at the school table for structured lessons. They became very adept at figuring out the rules, solving disputes… and getting along. I called that a Win in every column: they became good problem solvers, they learned how to teach themselves, and mom got more time with fewer interruptions. The lessons still got done, sometimes more quickly because of the lessons learned while playing games: reading the instructions, critical thinking, math practice, and so on. Kids view playing games as just playing, not learning, but the savvy mom knows what lessons are being learned through the playing!

Step Four, schools and colleges create their own special-interest classes, and so can you! Use a child’s unique interest as a mini-class that cuts through the twaddle and gives him a boost in learning something he really enjoys. Maybe Penelope is begging to raise rabbits. Encourage her to do some extensive research first, to guarantee her success, then suggest she enter her future bunnies in the county fair, ensuring her diligence. Stewart wants another bookcase in his bedroom, but he never gets enough time after lessons for woodworking — so turn the project into a lesson by challenging him to design the bookcase, double-check the measurements for accuracy, visit the lumberyard to note the cost of all materials and compare them to the cost of a ready-made bookcase of similar size and quality. His completed bookcase might also make it to the fair, along with the photos of him proudly doing every step. Victoria is bored with her history book, but is intrigued by Abraham Lincoln. Let her have some time away from the traditional books to read his speeches and letters and a biography or two. Listen as she recounts every interesting tidbit, because those are much more exciting than any stuffy book report ever written.


The key to surviving the mid-year slump is to change your methods enough to put the focus back on the learning and not get bogged down in the tedium of the methods themselves. Some families may only need a one-day break from the normal routine; others may need a full week or two of refreshing change; still others may decide to scrap their former routines altogether and adopt the completely new approach as a routine-less routine. The choice is yours, and you’ll know what you want when it starts to work.

See these articles for more slump-busting ideas:

10 Ways to Ease into Homeschooling (great for getting started again after a long break, whether from holidays or illness)

Reschedule, Refocus, Regroup

Redeeming a Disaster Day 

How to Adapt Lessons to Fit Your Student’s Interests and Make Learning Come Alive 

Applying Learning Styles with Skip-Counting

“Stealth Learning” Through Free Play

Mundanes, Too-days, & Woe-is-me-days

Knowing How to Find the Answer Is the Same as Knowing the Answer 

Troublesome Students

Disrespectful Kids 

Stuck in a Homeschool Rut? 

Workshop Wednesday: Money Land Game

I absolutely love to teach with games. Playing a game transitions a lesson concept from tedious drill to fun and… well, games. My kids might have balked at the idea of doing yet another set of math problems, but they would voluntarily play board games using money, which required the same adding and subtracting as the math problems — only they could do the money problems aloud or in their heads while handling all those tactile game parts, instead of writing them on paper. The ability to do math in your head is a distinct advantage in life, so I encouraged my kids to play money games as often as possible, but they didn’t need much encouragement at all. They loved to play board games of all types, and games with money were a distinct favorite.

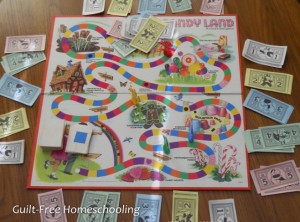
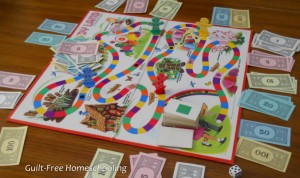
I also believe in borrowing equipment from games and combining those components to create a new game or a new variation of an old game. This is how we got here today, coming up with a new variation of an old game (Candy Land) that often falls into disuse once its players begin to read and move on to more complex games. By adding the math component of money, the Candy Land game once again appeals to older students, and with several variations that increase the complexity of the money transactions, this game can help students of all ages hone their mental math skills in a very stealthy way. Every turn provides all players with opportunities to improve their math skills, whether to avoid paying fines or to catch another player in a mistake and collect a fine from him. Winning the game is highly dependent on chance, giving all players an equal playing field. (Notice that the fines are not intended as meanness, they are simply incentive to pay attention during other players’ turns and to make players aware that they are doing their own math correctly. The fines also provide another way for an alert player to make money.  The fines are intended as a sporting challenge, not a way to make fun of other players. Fines may also be optional — see Fines section below.)

Instructions:

Basic Version #1 — Use the game board, cards, and pawns from a regular Candy Land game, but include the money from Monopoly, Monopoly Junior, or any other source. Begin a money “pot,” by placing $5 (in any combination of bills) on the Home Sweet Home area of the Candy Land game board, and give each player a total of $50 in bills of various denominations. Players do not all need to have the exact same denominations of bills, as long as they all start with the same total. (Suggested amounts for each player — standard denominations: 10 $1’s, 4 $5’s, 2 $10’s; Monopoly Junior denominations: 6 $1’s, 5 $2’s, 4 $3’s, 3 $4’s, 2 $5’s) Any leftover bills should be set aside and not used.

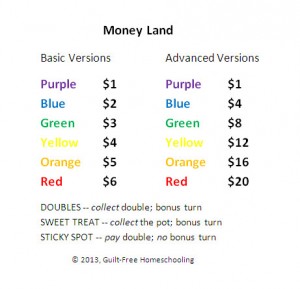
Assign the following number values to the Candy Land color cards, based on the colors of the Candy Land game board:

  • Purple square = $1
  • Blue square = $2
  • Green square = $3
  • Yellow square = $4
  • Orange square = $5
  • Red square = $6

Place the shuffled stack of cards face-down near the starting square. Play begins with the oldest player and proceeds to his left. Each player in turn draws a Candy Land card and moves his pawn to the nearest square of that color as in a normal game, but when his pawn lands on the square, he must pay the corresponding amount listed above into the Home Sweet Home pot. (The Rainbow Trail and Mountain Pass shortcuts have no significance in this game and are not used.)

Special Plays: 

Doubles card — Player moves to the appropriate square and collects an amount of money from the pot that is equal to double the dollar value of his color square (Example: a double-red card = $12). The player may then take a bonus turn.

Sweet Treat card — Player moves to the appropriate square, collects all the money in the pot, and takes a bonus turn.

There is no limit to how many Doubles and/or Sweet Treat cards may be drawn in succession by a single player, as long as the pot contains sufficient funds. However, if the pot does not contain enough money when a player draws a card that would allow him to collect more, that player collects all the money available in the pot, his turn ends, and play moves to the next player. If there is no money in the pot, the player’s turn ends, and he does not move his pawn.

Sticky Spot– A player whose pawn lands on a Sticky Spot must pay double the amount for its color, but may move on his next turn (he is not required to remain on that square until the appropriate color card is drawn). No bonus turn is awarded. In the rare event that a player draws a Doubles card that lands him on a Sticky Spot, no money is either paid or collected, and the player’s turn ends.

Fines —  If a player either pays or collects an incorrect amount of money, or pays when he should be collecting, or collects when he should be paying, any other player who notices this mistake may point it out at the end of the player’s turn, before the next player has drawn his card. In the case of a player who has earned a bonus turn, the mistake must be pointed out before the next card is drawn. In each case, the player who made the mistake must correct the amount AND pay a $5 fine to the player who pointed it out. If a player catches himself in a mistake and corrects it before the next card is drawn, no fine is required. (Fines may be considered optional, especially when young players are just beginning to learn math facts.  The fines can also be imposed by much younger players against more experienced players, and not vice versa, depending on the skill levels involved.)

Players who need to do so may make change from the pot in order to obtain the correct amount required for their turn. (Example: A player owing $8 to the pot may pay with a $10 bill and remove $2.) A player may also trade a large bill to another player in exchange for an equivalent amount of smaller bills, if the pot does not contain a sufficient amount for exchange.

If a player’s pawn lands on an occupied space, the other player’s pawn is moved backwards to the nearest empty space. The owner of the moved pawn does not pay or collect any money because his pawn was moved.

If the stack of cards runs out before the game has been won, the stack should be shuffled well and turned over to start again.

A PLAYER’S TURN ENDS WHEN —

1) he has drawn a card, moved his pawn to the appropriate square, and paid the correct amount into the pot, OR

2) he has met condition #1 as a bonus turn, following a Doubles card or Sweet Treat card, OR

3) he has collected less than what was owed to him from the pot, because it didn’t contain enough money, OR

4) he pays all of his remaining money into the pot. Any player who runs out of money during the game is out for the remainder of the game.

THE GAME ENDS WHEN —

1) one player ends up with all the money, OR

2) the game is down to the final 2 players and one is eliminated by running out of money, OR

3) one player reaches Home Sweet Home and collects any money remaining in the pot.  Home Sweet Home is considered to be located anywhere after the final square of the trail (no exact count is needed). A player whose pawn lands on the final square is not considered to have reached Home Sweet Home until his next turn, provided he draws any color card and not a Sweet Treat card that would send him back to another location on the trail.

Winning — Winner is the player with the most money at the end of the game.

Basic Version #2 (Dice-Addition) — Include a regular, 6-sided game die. Players will add the number on the die to the card’s dollar value. The rest of the rules apply as above, with the only change being the amount of money paid or collected on each turn. Each player rolls the die in addition to drawing a card, and alters the dollar value of the card according to the die. If any bonus turns are awarded, the player draws a new card and rolls the die for each additional turn. The die is not rolled whenever a Sweet Treat card is turned up. The amount paid for a Sticky Spot is not affected by the die. In the case of rolling Doubles and collecting money from the pot, the number on the die is added to the doubled value of the color square (Example: double-red = $12 + 4 on the die, collect $16).

ADVANCED VERSIONS FOR PLAYERS WITH HIGHER MATH SKILLS

Advanced Version #1 — Play proceeds as in Basic Version #1, but players receive a starting total of $200 (Suggested amounts for each player: 10 $1’s, 4 $5’s, 3 $10’s, 2 $20’s, 2 $50’s). The starting pot is increased to $20, and Fines are also increased to $20 each. The dollar value of each square changes as follows:

  • Purple square = $1
  • Blue square = $4
  • Green square = $8
  • Yellow square = $12
  • Orange square = $16
  • Red square = $20

Advanced Version #2 (Dice/Addition) — Include a regular, 6-sided game die. Players will add the number on the die to the card’s dollar value. Play proceeds as Basic Version #2 (Dice-Addition), but increases the starting value of the cards to Advanced Version #1 levels before adding the number shown on the game die. Pencil and paper may be used for calculating correct values. Starting pot is increased to $100, and each player’s starting total of cash is increased to $500 (10 $1’s, 4 $5’s, 7 $10’s, 5 $20’s, 4 $50’s, and 1 $100’s). Fines are also increased to $100 each. If any bonus turns are awarded, the player draws a new card and rolls the die for each additional turn. The die is not rolled whenever a Sweet Treat card is turned up. The amount paid for a Sticky Spot is not affected by the die. In the case of rolling Doubles and collecting money from the pot, the number on the die is added to the doubled value of the color square (Example: double-red = $40 + 4 on the die, collect $44).

Advanced Version #3 (Dice/Multiplication) — Include a regular, 6-sided game die. Players will multiply the number on the die times the card’s dollar value. Play proceeds as Advanced Version #2 (Dice-Addition), with the only change being the amount of money paid or collected on each turn. Pencil and paper may be used for calculating correct values. Starting pot is $100, Fines are $100 each, and each player’s starting total of cash is $500. If any bonus turns are awarded, the player draws a new card and rolls the die for each additional turn. The die is not rolled whenever a Sweet Treat card is turned up. The amount paid for a Sticky Spot is not affected by the die. In the case of rolling Doubles and collecting money from the pot, the number on the die is multiplied times the doubled value of the color square (Example: double-red = $40 x 4 on the die, collect $160).

Advanced players may choose to play subsequent games, continuing with the cash accumulated from previous games (instead of re-counting to starting cash amounts). In this case, no cash is placed on Home Sweet Home as a starting pot. Each subsequent game is started by the next player to the left of the one who began the previous game. Very advanced players may choose to add more than one die to Advanced Versions #2 & 3.

© 2013 Carolyn Morrison. These rules may be printed for personal use or shared for free, but these game concepts and their rules may not be reproduced for sale. This copyright restriction must appear on any printed copies.

Workshop Wednesday: Beanbags (No-Sew DIY)

Who has a child who can’t focus on anything while sitting in a chair? Who has a child who loves playing games and sports, but hates worksheets and written assignments? Who has a child who tries to make everything into an exhibition of physical abilities? You’re in luck! Let us help with some great ideas using beanbags that will enthuse your kinesthetic learner and keep him doing these learning activities on his own while you sneak in a coffee break!

Those energetic students are kinesthetic learners who need to move to be able to learn. Their brains don’t fully wake up and begin to learn until their arms and legs get moving, so these beanbag activities are ideal for getting them involved, holding their attention, and helping them remember what they’re learning.

Inexpensive, no-sew beanbags can be made quickly from discarded socks (no holes or thin spots) by cutting them to an appropriate size and pouring in dry beans or uncooked rice. Tie the ends shut tightly with string, yarn, or plastic zip-ties (trim the ends with scissors), leaving each beanbag about two-thirds full, so that the contents have room to slide around—if filled too full, the bag will be more likely to burst when it lands. Aquarium gravel is a suitable waterproof filler, just in case your beanbags are likely to get left outside in the rain.

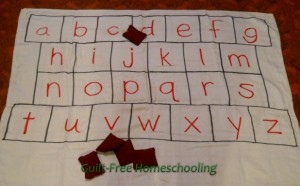
What can you do with all the wonderful beanbags you’ll create from your orphan sock stash? Use them for “throwing stones” for hopscotch (and all its variations), whether playing on the sidewalk, driveway, or patio. For indoor activities, hopscotch grids can be drawn with permanent markers onto an old bed sheet or tablecloth, but please use caution when using a cloth on hard surfaces to avoid slipping.

Learning Activities with Beanbags

Matching — If your clothes dryer has given you an abundance of sock orphans, you can mark them with letters or numbers for some preschooler’s matching activities.

ABC’s — Toss a beanbag onto a jumbo ABC-grid and make the sound of the letter selected. Older students may say a word that is spelled with that letter (beginning, ending, etc. your choice). A bigger challenge is to toss two or more beanbags onto the ABC-grid and think of a word that uses all of them.

1-Sentence Stories — Lay out word cards on the floor (sticky notes will stay in place), toss beanbags onto several words, and create a one-sentence story that includes the words selected.

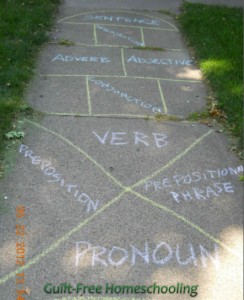
Hopscotch Variations — Make a parts-of-speech hopscotch grid and play the standard hopscotch game with the rules for numbers, but have players give an example of the part of speech selected, such as saying “ticklish” when picking up the beanbag from the adjective section, “skeleton” for a noun, or “angrily” for an adverb. This method can be varied for other subjects, too, such as naming the sections Nations, States, Cities, Lakes, Rivers, and so on for geography. Students would then have to name an appropriate geographical feature.

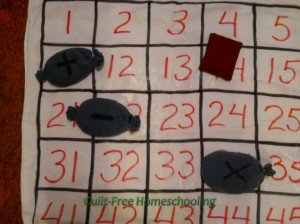
Math Symbols — Mark some beanbags with math operation symbols and toss them onto a jumbo 100-grid for instant math problems. Throw an unmarked beanbag onto a random square for a starting number, then draw a random operation-symbol beanbag from a sack or pillowcase and toss it onto another square, using that number for the designated operation. Repeat as long as your supply of beanbags lasts. Pencil and paper may be used to assist in calculations, but careful aim and an accurate toss may be the most help.

Target Practice — Use laundry baskets or cardboard boxes for target practice to improve eye-to-hand coordination and tossing skills (just don’t hit the lamp!).

Juggle — Learn to juggle!

These beanbags are quick to make and will add hours of fun to indoor or outdoor playtime, and they are a great way to make lessons kinesthetic for your active students!

See also:

Hopscotch, a Powerful Learning Game

100-Grids & Flashcard Bingo

Letter or Number Manipulatives (DIY)

Kinesthetic Learners


Workshop Wednesday: Lacing Shapes, DIY

Whether you call it lacing or sewing, the activity of threading a string through consecutive holes is great for building finger dexterity and coordination, building sequential thinking skills, and teaching cause and effect relationships. Whew, that was a long-winded explanation of why lacing is a good skill builder, but to most kids, it’s just a fun thing to do! It also provides the bonus of independent entertainment for those kids when Mom has other things to do.

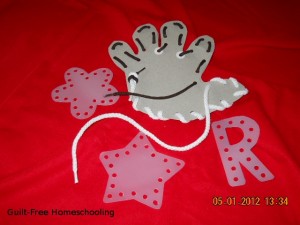
To create my own lacing cards, I turned to my ready stash of “upcyclables,” cereal box cardboard and clean milk jugs. Poster board and craft foam are also suitable materials. Cut out a variety of shapes with scissors and use a paper punch to punch holes around the edges (not too close to the edge), spacing the holes about 1/2-inch to 1-inch apart.

I’ve made geometric shapes, letter and number shapes, and all sorts of symbols: hearts, stars, smiley faces, etc. I traced around my hand and traced around cookie cutters for even more variety. An assortment of smaller geometric shapes with 2 holes in the middle (like a button) can be threaded in a long line to make patterns, such as square-circle-triangle, square-circle-triangle. If you have colored cardboard or craft foam, the combinations can become more complex. Vary the sizes for yet another pattern characteristic.

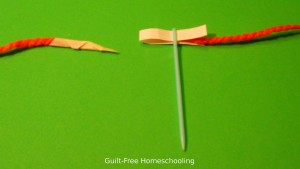
I can hear some of you thinking that you don’t want to trust your little ones with a sharp needle — no need! Wrap a piece of masking tape around the end of a length of yarn, starting at a slight angle to form a tapered “needle” that poses no risks, but will stand up to being threaded through lots and lots of holes. Older children can use a large plastic yarn needle (available in the craft department) to help them learn the fine art of sewing with a needle without having to re-thread it after each and every stitch. [Bonus tip: to easily thread yarn through the eye of a needle, cut a strip of paper about 2 1/2″ long and a bit narrower than the eye. Fold the paper in half the short way, lay the end of the yarn inside the folded strip, and insert the folded edge through the eye. Ta-da!] Other types of “strings” to use are narrow ribbons, heavy crochet thread, shoestrings, leather boot laces, and plastic craft lacing.

There is no wrong way to lace a string through the holes, but you can help your little ones learn some basic sewing techniques. A basting stitch goes up through one hole and down through the next one, repeating up and down, over and over. A whipstitch goes up through one hole, then wraps around the edge of the lacing shape to go up again through the next hole, repeating up and around, up and around, over and over. As their skills advance, your children may enjoy using two colors of yarn in opposite directions (one at a time) for an interesting effect. They can further test their sequencing and patterning skills by alternating whipstitches and basting stitches! Don’t forget to teach that un-threading the strings to make the shapes ready for next time is all part of the learning activity. Yet another older-child challenge is to make several identical shapes that can be sewn together, edge to edge, to create 3-dimensional creations, such as a box made from several squares sewn together (plastic canvas works great for this).

This crafty activity is full of low-cost gift potential: make a set of lacing shapes and cut several lengths of yarn or ribbon for a youngster’s birthday, Christmas gift, or for a travel diversion on a long car trip. This can also be a great quiet activity for “down time.” Older kids may even enjoy the challenge of making bookmarks or Christmas ornaments from plastic canvas and yarn to give as gifts or to use as safe decorations for their younger siblings.

Workshop Wednesday: Wikki Stix as Learning Tools

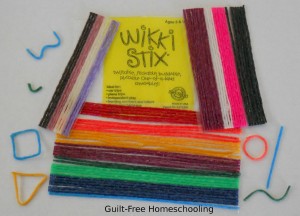
Does your hands-on learner need a new challenge? Try using Wikki Stix as manipulatives. If you’re not familiar with them, Wikki Stix are thin, wax-coated strings that resemble pipe cleaners or chenille sticks, except that they aren’t fuzzy, and they will stick to each other. The sticking-together aspect makes them wonderful learning tools, because they will also stay where you put them, and you can put them just about anywhere: table, window, cookie sheet, poster board — this list can go on forever. Stick them on the glass patio door or the refrigerator door for a kinesthetic, standing-up lesson activity. The Stix are waxy, but leave very little residue, and it is easily cleaned away. Bonus tip: If they accidentally get dropped on the floor and collect a few dust bunnies, cereal crumbs, and pet hair, holding them under running water and air-drying will restore them back to good-as-new condition.

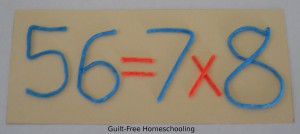
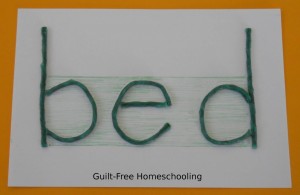
Wikki Stix come in a variety of colors, including neons, and I have also found knock-off brands — check your favorite stores for craft or school supplies. (Wikki Stix brand have a unique bumpy texture that is both tactilely and visually interesting.) Use them full length (8″ long) or cut them into small lengths with scissors, and start creating. Let your students make letters and words, make numbers and math problems, or just have fun making all sorts of fun art projects.

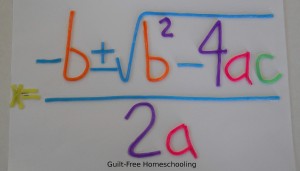
Your older students can combine letters and numbers into the latest complicated formula they are trying to memorize. Yes, Wikki Stix are a fantastic tactile and visual method for color-coding the components of a mathematic or scientific formula! The tactile process of assembling a complex formula from Wikki Stix, complete with color-coding, is a very subtle way of memorizing — once your student has finished this project, he may find he has it committed to memory without even trying!

How can Wikki Stix help with lessons? First of all, let your students use the Wikki Stix as their learning aids — the kids will learn much more if they do it themselves, than if Mom just shows them what she’s made for them. The extended process of building each letter, number, or shape keeps your student’s fingers involved in the lesson, and the child’s brain has to think the process through from a different perspective than if he was just writing normally with a pencil. (By all means, do help the child who needs help getting started with this activity, but encourage his independence once he’s understood what to do.)

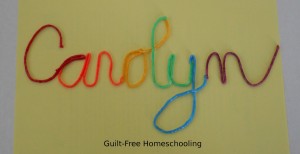
Color-code certain parts of words (vowels, phonics patterns, prefixes & suffixes, etc.) or math problems (use different colors for positive and negative numbers, or x-components in one color and y-components in another color).

Make Wikki Stix flashcards with spelling words, vocabulary words, or formulas on a sheet of cardstock and insert the finished cards into plastic page sleeves. Works for spelling, phonics, math, science, geography, history, foreign language, etc. Using this method to “write” troublesome spelling or vocabulary words allows the student to focus on getting each letter and each syllable in the correct order.

Make geometric shapes on flashcards, just like the idea above, and use them for identification and recall drills, or use the shapes as tactile manipulatives for math problems. For a bigger challenge, let your students try identifying the shapes by touch alone, by feeling them with their eyes closed.

Cursive writing can be tricky to practice, especially for those who are just learning it. Stick several Wikki Stix together end-to-end and shape them into cursive writing. Using Wikki Stix for cursive slows the process down considerably and allows the writer to put the lines exactly where they need to go! (and no pesky eraser crumbs!)

Verified by MonsterInsights