Whether you call it lacing or sewing, the activity of threading a string through consecutive holes is great for building finger dexterity and coordination, building sequential thinking skills, and teaching cause and effect relationships. Whew, that was a long-winded explanation of why lacing is a good skill builder, but to most kids, it’s just a fun thing to do! It also provides the bonus of independent entertainment for those kids when Mom has other things to do.
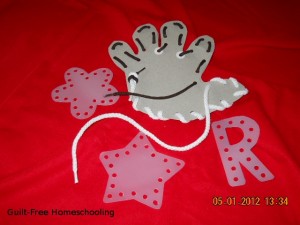
To create my own lacing cards, I turned to my ready stash of “upcyclables,” cereal box cardboard and clean milk jugs. Poster board and craft foam are also suitable materials. Cut out a variety of shapes with scissors and use a paper punch to punch holes around the edges (not too close to the edge), spacing the holes about 1/2-inch to 1-inch apart.
I’ve made geometric shapes, letter and number shapes, and all sorts of symbols: hearts, stars, smiley faces, etc. I traced around my hand and traced around cookie cutters for even more variety. An assortment of smaller geometric shapes with 2 holes in the middle (like a button) can be threaded in a long line to make patterns, such as square-circle-triangle, square-circle-triangle. If you have colored cardboard or craft foam, the combinations can become more complex. Vary the sizes for yet another pattern characteristic.
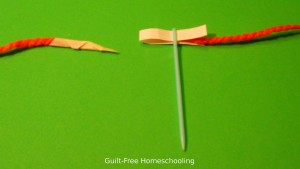
I can hear some of you thinking that you don’t want to trust your little ones with a sharp needle — no need! Wrap a piece of masking tape around the end of a length of yarn, starting at a slight angle to form a tapered “needle” that poses no risks, but will stand up to being threaded through lots and lots of holes. Older children can use a large plastic yarn needle (available in the craft department) to help them learn the fine art of sewing with a needle without having to re-thread it after each and every stitch. [Bonus tip: to easily thread yarn through the eye of a needle, cut a strip of paper about 2 1/2″ long and a bit narrower than the eye. Fold the paper in half the short way, lay the end of the yarn inside the folded strip, and insert the folded edge through the eye. Ta-da!] Other types of “strings” to use are narrow ribbons, heavy crochet thread, shoestrings, leather boot laces, and plastic craft lacing.
There is no wrong way to lace a string through the holes, but you can help your little ones learn some basic sewing techniques. A basting stitch goes up through one hole and down through the next one, repeating up and down, over and over. A whipstitch goes up through one hole, then wraps around the edge of the lacing shape to go up again through the next hole, repeating up and around, up and around, over and over. As their skills advance, your children may enjoy using two colors of yarn in opposite directions (one at a time) for an interesting effect. They can further test their sequencing and patterning skills by alternating whipstitches and basting stitches! Don’t forget to teach that un-threading the strings to make the shapes ready for next time is all part of the learning activity. Yet another older-child challenge is to make several identical shapes that can be sewn together, edge to edge, to create 3-dimensional creations, such as a box made from several squares sewn together (plastic canvas works great for this).
This crafty activity is full of low-cost gift potential: make a set of lacing shapes and cut several lengths of yarn or ribbon for a youngster’s birthday, Christmas gift, or for a travel diversion on a long car trip. This can also be a great quiet activity for “down time.” Older kids may even enjoy the challenge of making bookmarks or Christmas ornaments from plastic canvas and yarn to give as gifts or to use as safe decorations for their younger siblings.


 Guilt-Free Homeschooling is the creation of Carolyn Morrison and her daughter, Jennifer Leonhard. After serious disappointments with public school, Carolyn spent the next 11 years homeschooling her two children, from elementary to high school graduation and college admission. Refusing to force new homeschooling families to re-invent the wheel, Carolyn and Jennifer now share their encouragement, support, tips, and tricks, filling their blog with "all the answers we were looking for as a new-to-homeschooling family" and making this website a valuable resource for parents, not just a daily journal. Guilt-Free Homeschooling -- Equipping Parents for Homeschooling Success!

Speak Your Mind