Workshop Wednesday: Hopscotch – A Powerful Learning Game

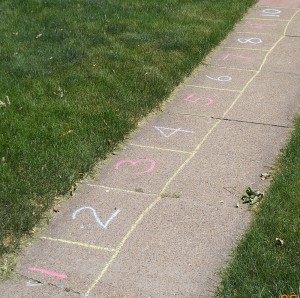
Who knew that a patch of concrete, some chalk, and a couple of rocks could produce a fun way to learn just about anything? When I was a little girl, I played hopscotch in the traditional way, tossing my stone and jumping from square to square, just as a game for practicing my tossing and balancing skills. Hopscotch can also be used as a kinesthetic learning method, involving the big muscles of arms and legs, pumping information through the blood vessels to the brain. I can see many other uses for the basic method of hopscotch, providing a great method for teaching preschoolers, kinesthetic learners, active children, or anyone else who just needs a break from sitting at a table for one more worksheet.

Let’s start by changing the standard hopscotch pattern to a row of 10 squares, numbered from left to right, and let your little ones practice counting as they hop from box to box and back again—tossing a marker stone or beanbag can be used later as their counting skills increase. Do the same thing with a row of ABC’s, first for letter recognition and later for reciting the sounds made by each letter or for a word beginning with that letter. Mom can say a word, and the child can hop to the letter that begins the word. For more advanced students, change the ABC’s to a grid pattern, and try “Twister Spelling” by putting hands and feet in the correct squares to spell the word. Use multiple beanbags, poker chips, or plastic yogurt lids for markers, and challenge your kiddies to spell out words by placing their markers on the correct letter squares.

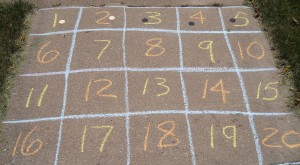
You can also practice addition and subtraction facts with a hopscotch grid. Draw a 1-10 grid by making two rows of five squares each: 1-5, 6-10. Make these boxes large enough for your student to stand in, sort of like a hopscotch game. Start with simple addition problems by asking: If you put down [this many] markers, starting with Box #1 and putting one marker in each box, and then you add [this many] more markers, how many boxes will have markers in them? What is the largest number box that contains a marker? Repeat this activity with as many different number combinations as possible, until your student knows addition facts from 1-10 so well that he cannot be stumped. Then draw two more rows of boxes, extending the grid to 20 (11-15, 16-20), and continue the addition practice with problems up to 20. You can also work on learning doubles in the teens: 5+5=10, 6+6=12, 7+7=14, 8+8=16, 9+9=18, 10+10=20. These facts will help him with problems where the answer is between 10 and 20.

Does one of your students have trouble with subtraction? Using the 1-20 grid, pick a problem that may have stumped your child, like 13-9=? In this example, cover all numbers larger than 13. Ask: If you put down 9 poker chips, with one on each box, starting with 13 and counting down, what is the largest number box that will still be showing? If he’s already experienced at using the 1-20 grid of numbered boxes, he will be able to recognize the row of 6-10 as being 5 boxes. Then he can see that there are 3 boxes for 11-13, so those two rows will use 8 of his 9 poker chips; now he can put the last chip in the largest numbered box in the top row (the 5), and he’s left with 4 as the largest number box still showing: 13-9=4

Another helpful trick is to show your student how to work up or down from 10 when the answer to a problem doesn’t come to him immediately. For example, 13-9=? Let’s see, I know that 10-9=1, and 13 is 3 more than 10, and 3+1=4, so 13-9=4! How about 17-9=? 10-9=1; 17=10+7, and 1+7=8, so 18-9=8! Did you follow that? Children can get discouraged when they don’t know or can’t remember an answer immediately. Showing them several different methods for figuring out the answer helps them to see that they are smart enough to find the answer anyway. Working toward the answer from 10 or from the nearest double is a legitimate method of solving the problem and is actually a better way to learn than just rote memorization, since it uses more creative solving methods.

Are you ready to take this up one more notch? Help your students draw a 1-100 grid (10 rows of 10 squares each, numbered 1-100) and challenge your young mathematicians to toss two beanbags onto the grid and add the resulting numbers. Add more beanbags as their skills increase, or switch to subtraction or multiplication. Use beanbags in different colors (or marked with mathematical operation symbols) for students with appropriate abilities: Color #1 means add this number, Color #2 means subtract this number, Color #3 means multiply by this number, and Color #4 means divide by this number. Use several beanbags for each mathematical operation, drawing them at random from a bucket to create an amazing running math problem. Number squares can be chosen by random tossing or through careful aim. Challenging siblings to toss the beanbags and create problems for each other to solve may result in some serious stretching of math skills! Other possibilities are to toss two beanbags to create a fraction, then simplify it as needed—and more beanbags mean more fractions, which can then be added, subtracted, multiplied, or divided, always reducing the answer to its simplest form. The hopping part of hopscotch doesn’t come into play with this method (unless your kids figure out their own creative way to use it), but the tossing and retrieving of beanbags will still give your wiggly kids plenty of action.

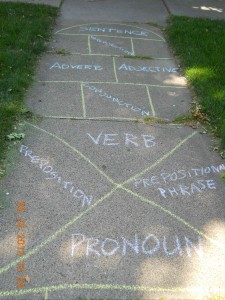
Now you think you’ve heard all of the possible ways to use hopscotch in learning, right? Not at all! Let’s go back to the original hopscotch pattern, but instead of numbering the squares, write in parts of speech: noun, pronoun, verb, adjective, adverb, conjunction, preposition,  prepositional phrase, and interjection.  Hopping through the boxes gives the student a chance to think of a correct example word to give when he stops to pick up his marker. Use more specific terms as your students’ grammar skills increase: irregular verb forms, verb tenses, plurals, reflexive pronouns, dependent clauses, and so on. I included a “sentence” space at the end, and students should make their example sentences match the level of grammar being studied.

If you have a student who is really interested in science, specifically chemistry, and if you have access to a large patch of concrete, consider helping him draw out the periodic table of elements and numbering the squares accordingly. Let him make simple flashcards for each element to fit the boxes on his diagram (cereal boxes are a great source for inexpensive flashcards; write on the back with permanent marker) and practice putting them in their proper places. Flashcards might include the atomic number, the element name and symbol, and the atomic weight. More advanced students may want to include more detailed information and use the jumbo flashcards for memory practice. Other hopscotch applications: a diagram of the solar system would provide practice at naming the planets, a simplified skeleton could be drawn for practice at naming the bones, or a map of the United States (or any geographic area) would provide practice at naming states, capital cities, or other geographic features. Coordinate planes with x- and y-axes provide a large grid for plotting specific points with poker chips. Students of advanced math can solve complex equations, plot the points from multiple solutions, and draw the curves with yarn or string.

Any of these hopscotch learning games may also be drawn with permanent markers on an old, discarded sheet or tablecloth (check local thrift stores), resulting in a reusable “game board” that can be folded up and stored between uses. Use the cloth on grass, carpeting, or other surfaces where it is less likely to slip underfoot. Beanbags aren’t required, but the “marking stone” needs to be something that won’t roll away when tossed—or blow away if used outdoors.

If the weather isn’t cooperating for outdoor activities, or if you don’t have a suitable surface for chalk, or even if your students are just not excited about going outside and jumping around where anyone in the neighborhood might see them, these activities can also be done indoors by using masking tape or sticky-notes on the floor. You can even draw the grids on a large sheet of paper and use coins or game pawns as markers.

See also:
What Is the Missing Element?
Building Blocks for Success in Math
Beanbags (No-Sew DIY)
Workshop Wednesday: Pipe Cleaners

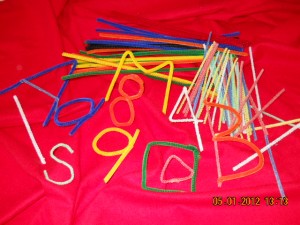
A supply of pipe cleaners, also called chenille sticks, in various sizes and colors provides a great quiet-time activity that will keep almost any child busy for a good, long time. For teaching purposes, pipe cleaners can be formed into a variety of shapes as versatile manipulatives for your tactile students who need to get their hands on something to be able to learn it. The activities listed below can be used interchangeably for letters, numbers, or geometric shapes. Some students may need to try just a few of these activities, while others may want to try all of them… repeatedly.

Bonus tip: It helps to store the pipe cleaners in a shoebox or other container that is large enough to hold several of your students’ artistic creations! You can also take pictures of the more complex creations, enabling the student to dismantle the project and straighten out the pipe cleaners for their next use, while still saving proof of his hard work and imaginative designs.

• Challenge an early learner to duplicate the letters made by Mom or an older sibling.

• Use multiple pipe cleaners to make bigger letters. Using several colors can help younger students recognize the various components of each letter as the separate pencil strokes required to write it.

• Make multiples of each letter in various colors and sizes, and then play a matching game by grouping all the matching letters together. Students can also match pipe cleaner letters to other sets of letters: magnetic letters, letter tiles from games, flashcards, ABC books, etc.

• Match upper & lower case letters together as big brother/little brother pairs.

• Make letters to match those shown on letter tiles from games or on letter flashcards (even home-made). Shuffle cards and place stack face down, turning up the top card for the challenge letter, or put letter tiles in a clean sock or paper bag, then draw one tile at random for the challenge letter.

• Another version of the letter challenge game is to make the opposite case letter of the challenge card or tile. If a flashcard shows a lower case letter, challenge the student to make the upper case version of that letter; if a letter tile shows an upper case letter, make its lower case counterpart.

• Show how flipping a lower case “b” can transform it into a “d,” “p,” or “q” to help children learn to differentiate between the letters. The same principal works for turning a lower case “n” over to become a “u,” or turning an upper case “M” over to look like a “W.” Demonstrating that certain letters do have similar shapes can help children understand which is which and be certain they are using the correct one.

• Twist the ends of several pipe cleaners together to make a long line of pipe cleaners and bend it into the shape of cursive letters or entire words in cursive script.

• FEEL the letters blind-folded or with eyes closed (no peeking!) and try to identify them correctly. This can be tricky if the letter is held upside down or backwards, but turning it over and all around will help students learn to identify and distinguish between similarly-shaped letters. Some students may enjoy the challenge of trying to identify letters that are purposely positioned upside-down or backwards.

• Challenge students to “reproduce this pattern” of geometric shapes, numbers, or letters, even repeating the same colors used. This same activity works well for teaching pattern recognition when stringing beads, but mistakes can be corrected more simply in this version by moving a few pieces around, instead of un-stringing the entire project, and can therefore be less stressful for a sensitive student.

• Numbers made from pipe cleaners can be used to illustrate early math problems in a fuzzy, tactile way, providing a helpful transition between the “counting beans” stage and doing written problems.

• Lay a sheet of paper over any flat pipe cleaner creation and rub across the paper with the side of a crayon to create a “rubbing” image of the letter, number, or shape.

See also:
ABC Flashcards
Letter and Number Recognition

Workshop Wednesday: Macaroni as Manipulatives

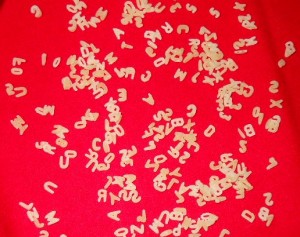
Have you ever found yourself wishing you could afford hundreds, or maybe even thousands of letter or number manipulatives? Head for the pasta aisle in your favorite grocery store—a bag of alphabet macaroni contains both letters and numbers! The pasta is low-cost, so if you have several children who would each enjoy their own supply, you can buy several bags. Letting each student store his macaroni in a large zipper bag will help to make clean up simple and easy.

I sorted through a bag just to see if all the letters and numbers were represented, and yes, they were. My adult-sized fingers found the task a little tricky, but a set of tweezers made it simpler. Children’s small fingers are much more suited to this assignment, and tactile learners will really love digging in. Muffin pans, egg cartons, or cookie sheets are great receptacles for sorting!

Let your students play with the uncooked macaroni at first, and see what activities they devise for themselves. If they need a little encouragement or a starting place, suggest sorting the letters, forming spelling words, making random words (like “magnetic poetry” but without the magnets), or writing sentences. If they’d like to save their work, the words can be spelled out on a line of white glue on a piece of cardstock or an index card. The glue will be invisible when dry, and the cardstock can then be cut into appropriate sizes, creating miniature word-cards (add small magnets to the backs of the cards for even more versatility; a steel cookie sheet makes a good lap desk). These cards can be arranged into sentences, poetry, or lists of rhyming words or spelling patterns, and saved in a zipper bag for another day. Be serious, get silly, have fun with nonsense words, or use the letters to form the answers to lesson worksheets, and the learning will take on a whole new dimension. Don’t stop with just phonics, spelling, and grammar, however. Use these letters to practice spelling place names for geography, complicated scientific words for science or chemistry, or important people, places, and events for history. The letters can easily be scooted apart to break words into syllables or prefixes, suffixes, and root words—a great method for word study, and it adds a memory link for better recall later.

The tiny pasta numbers can be used for sorting and matching or set up as math statements by writing operation symbols on paper, leaving blank spaces for the numbers. Select specific numbers or grab random pieces for a new twist on math problems. Younger students will enjoy the challenge of putting the numbers in order or experimenting to see how many different numbers can be formed from just a few digits. Keep the pasta dry and away from toddlers and the family dog, but rest assured that a new supply is readily available in case too many pieces get stepped on, eaten, or sucked up by the vacuum cleaner!

Workshop Wednesday: Building Blocks for Success in Math

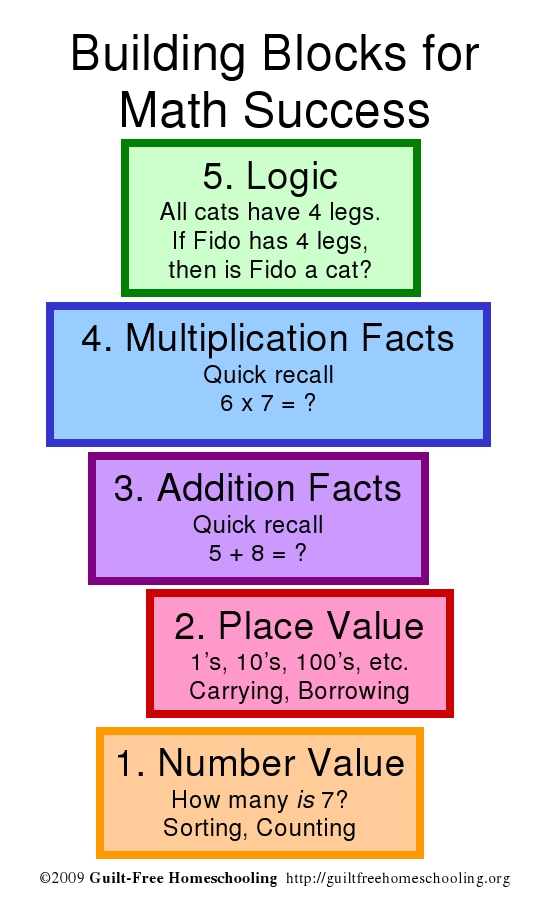
Math is called a foundational subject for good reason: if you don’t have a solid foundation, anything you try to build on top of it is in danger of falling apart. Math is also called a sequential subject, meaning that math skills must be mastered in sequence, each skill building on the skills before it. This picture represents my view of math skills and the order in which they should be mastered, starting at the bottom and building up, one skill upon another.

No one starts teaching math by instructing their preschoolers in differential calculus. The first math skill we teach is Sorting: Which ones match? Is this one like that one? We may start the sorting process with colors or shapes, but Sorting is still the basic skill being learned. Sorting is the #1 most important math skill, used from recognizing number value to solving the most complex equations. Counting is an extension of sorting, assigning a number name to each different quantity. We “know our numbers” when we can group the correct quantity of pieces to represent any given number. We have mastered counting when we can recite the quantities in ascending order. The ability to count backwards is preparation for further skills yet to come.

Place Value might be considered to be an extension of Sorting by placing 1-digit numbers together in one group, 2-digit numbers as another group, yet another with 3-digit numbers, 4-digits, and so on. Children who are learning to count past 10 are learning place value, even though they are not yet adding or subtracting large enough quantities to require carrying or borrowing. Those skills work hand-in-hand with addition and subtraction, but an understanding of place value has to come first. Using a large quantity of identical small manipulatives, such as toothpicks, you can demonstrate the quantities represented by numbers in the ones column and numbers in the tens column to show how and why we write numbers the way we do. As your student gains skill with addition, you can revisit Place Value to demonstrate carrying into the tens, hundreds, thousands, and as many columns as your child wishes to add.

The next natural step after Place Value is Addition. Your child may already be using his counting skills to inform you that since he already has 1 cookie, if you would just give him 2 more cookies, then he would have 3 cookies! He may not recognize 1+2=3 on paper, but he certainly understands cookie quantities! Addition facts are best learned through using real-life objects, manipulatives, or even diagrams, rather than just expecting a young mathematician to transfer immediately to written problems. Hands-on practice makes subtraction easily evident as the un-doing process for addition, thereby taking away the stigma that subtraction is yet another new skill to learn. If a student knows addition facts to the point of quick recall, that same student will be able to perform subtraction. Therefore, a student who struggles with subtraction is a student who has not mastered addition facts.

Multiplication is often presented as one more new skill to master, but when presented as a “short-cut” to repeated addition, the student will see multiplication facts as a convenient tool, not as an obstacle to further learning. Multiplication facts can be demonstrated with a large quantity of small manipulatives that can be grouped into repeated rows (½” squares of heavy paper or cardboard work very well). Some quantities of manipulatives can be rearranged to show various factors which result in the same amount, such as 1×12, 2×6, 3×4, 4×3, 6×2, and 12×1. Grouping and regrouping the manipulatives will give your student a deeper understanding of multiplication facts as he sees the groups (visual), arranges them with his own fingers (tactile), and repeats the facts aloud (auditory). A kinesthetic learner will prefer standing or kneeling to do this activity, providing yet another sensory element.

Why isn’t Division listed in these Building Blocks? Simply because Division is un-doing Multiplication, just as Subtraction is the un-doing of Addition. The only tricky part to Division is that sometimes things don’t come out completely even, and we get “left-overs”—but every child who has tried to share 5 cookies with 3 friends understands that concept already. Division uses the quick recall skills for multiplication facts to regroup as evenly as possible, and the “left-overs” will be dealt with in more detail later on as these skills progress even further into the concepts called fractions and decimals. By the way, fractions, decimals, and percents are all “nicknames” for the same amounts—they are just different ways of looking at the same quantities, such as ½, .5, and 50%, and those all mean that you and I are sharing equal amounts of the same cookie!

The final Math Building Block to be mastered is Logic. Logic means making sense of things, so they come out right. Logic may come in the form of “If/Then” statements, such as the block in the picture shows: If all cats have 4 legs, and Fido has 4 legs, does that then mean that Fido must be a cat? Fido might be a cat, but we also know that other animals besides cats have 4 legs, so we cannot assume that Fido is a cat until we have more information. That is logic: using information to prove a point, but sometimes you realize that you don’t have enough information yet, and the point you prove could be wrong. Another use of logic is in balancing equations. A very simplified example is 7-2=5; if we add 2 to each side, we’ll see 7-2+2=5+2 or 7=7, a true statement. What we do to one side of an equation must also be done to the other side to keep it balanced, as if the equals sign was the pivot point on a balancing scale.

If your student is struggling with any of these building block skills, back up and practice the previous block’s skills until they are mastered. Recall of these facts should come as easily as a reflex action before the student is ready to move on successfully to the next building block. Don’t worry that other students may be moving ahead already—they may not be ready either, and their “progress” will soon result in more struggles. Remember that a student who cannot do division does not know multiplication facts well enough. A student who struggles with multiplication does not know addition facts well enough, and neither does the student who struggles with subtraction. A student who has trouble with addition does not understand place value or number values well enough. Success in math is achieved by mastering skills in sequence and building a solid foundation with each skill before attempting more challenging skills.

For more tips, see also:
Looking for the “Hard Part”
Why Does Math Class Take SO LONG?

Workshop Wednesday: ABC Flashcards

Anyone want to upcycle some of that ubiquitous cardboard packaging that passes through our homes and turn it into teaching/learning tools? You’re on! Let’s make some flashcards!!

DIY flashcards from upcycled cereal boxes

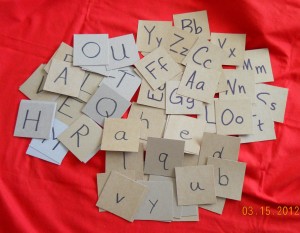
This week’s photo actually shows three related sets of alphabet flashcards that measure 3” square. Call these approximate measurements, because no one needs to waste precious time obsessing over the precision and exactness of something we’re making for free. I collected cereal boxes, brownie mix boxes, popsicle boxes, tissue boxes, pudding cup boxes, and pretty much every flavor of thin cardboard box that was large enough to cut up into something else. Confession: I made these with a paper cutter, but only because I saved up and treated myself to one. During most of our homeschooling years, I used a ruler and scissors for projects like this, and the results were just as good.

Open the boxes flat and start measuring and cutting. Again, don’t let perfectionism sidetrack you with thoughts of non-90-degree corners or less-than-perfect sides. Your students can learn from playing with these cards even after they are rescued from an eager-to-play-fetch-with-anything puppy. When you have a decent supply of cards cut from the cardboard, grab your Sharpie marker and write on the blank sides. Here we have one set with upper case letters (upper left), a set with lower case letters (lower center), and a set with both upper and lower case letters in pairs (upper right). I have also made sets with numbers 1-100, states and capitals, and many other topics that I hope to address in future Workshop Wednesday posts. (Anticipation!)

Bonus Tips:

  • I favor teaching letter recognition with upper case letters first, since reversals are less likely; then introducing the lower case letters as the “little brothers” of the capitals. Kids get it, even when the big brothers and little brothers don’t look exactly alike. Learning to group the larger and smaller letters as pairs is another method for avoiding reversals.
  • Making multiple sets of letters will allow your students to spell out vocabulary words, play word games, or leave traces of their newly-acquired knowledge all around the house as they spell out the names of every lamp, vase, and throw pillow.
  • If your students have mastered letter recognition, you can make 3×5” word cards and practice turning sounded-out words into sentences.

Learning Style Activities

Visual learners will appreciate flashcards with color, so you can either use colored markers for the main information or let your visual student draw designs on the edges and corners of the cards with colored pencils or fine-point markers to jazz up the natural gray or brown of the cardboard.

Auditory learners will love to read each letter aloud, no matter what activities or games you play with the cards. Switch things up by asking them to say the sound of the letter instead of (or in addition to) its name.

Tactile learners have already grabbed your new supply of flashcards and are spreading them out on the floor or table, rearranging the letters into words. That’s how you can confirm that you have a tactile student: their hands and fingers are into everything, learning as much as they possibly can about texture, heft, and balance. Please don’t scold them for grabbing and touching—it’s how they learn best. A tactile learner who is forced to keep his hands in his lap is like a visual learner wearing a blindfold. Seriously.

Kinesthetic learners will adore playing games with these cards, especially if you spread things out. Drop the stack of upper case letters on the floor in the living room. Drop the stack of lower case letters on the kitchen table. Now shuffle the “pairs” cards and place that stack in a neutral location somewhere between the other two piles of cards. Ask your student to look at the top card and run to find the matching letter cards from each of the other locations and bring them back. (Beginning students may need to take the pairs card with them for reference.) Grouping all three cards together will prove he brought the correct ones. Your energetic student can repeat this activity until he is worn out enough to sit down for reading time or some other lesson that requires seatwork.

Combine all learning styles into challenging activities that will help your students learn from all situations and all styles of teaching. Let your imagination run free with ideas and adaptations for your own students, living quarters, and academic needs. If the weather is agreeable, take the cards outside and combine relay races with spelling or vocabulary words. Mud puddles can’t destroy your prized set of flashcards, since replacements are easily made from the next empty box. You may soon find yourself rescuing cardboard boxes from the recycling bin and calling them your “homeschool supplies” as you think of more and more uses for homemade flashcards!

Workshop Wednesday: Placemat + Magnets = Educational FUN!

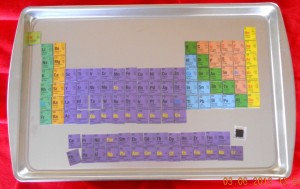
Find a placemat with educational information you’d like your students to learn: states & capitals, U.S. Presidents, whatever you can find. I’ve used both the laminated plastic placemats and the thicker, foam placemats. The former placemat in this photo was a laminated periodic table of elements, proving that educational manipulatives DO work for kids older than five. Notice the element in the lower right corner that is flipped over to show the magnet on its back. The placemat cost me about $3, which is an amazing price for educational gadgetry of this quality!

Periodic Table of Elements

Cut the placemat apart into its various components; scissors will usually work, but you may want to use a razor-knife or X-Acto blade for accurate cuts on thicker materials. Don’t worry about leftover pieces—you can throw them away. The thicker, foam placemat pieces are good for more projects that we’ll cover in a later post (think of them as craft foam that is not subject to static electricity), so you might choose to hang onto those for a while.

Now is a good time to rid your refrigerator door of all those freebie magnets you’ve collected from the pizza guy, hairdresser, auto mechanic, insurance agent, and every politician who marched in last summer’s parades. I always accept freebie magnets when offered (regardless of political affiliations)—they are my favorite homeschool supply! Using your scissors again, cut the magnets into pieces about ½” square or whatever size will fit easily onto the back of the placemat pieces you cut in the last step.

The next step may require a trip to the scrapbooking department of whatever store is near you, unless you are already an avid scrapbooker…er, bookscrapper…uh, person who documents life events in keepsake albums with pretty papers, ribbons, and all variety of cutesy add-ons. I’m not one of them, but I do recognize the homeschooling value of all those fabulous supplies! What you need right now is a box of the adhesive squares that are used for mounting photos or other items onto scrapbook pages. Stick one of those double-stick-tape squares onto the printed side of the little magnets you just cut up, then stick the other side of the tape to the back of your placemat piece. Don’t go all perfectionist in trying to line things up, just smack it on there and move on to the next one—you’ve got a lot of these to make. When each placemat piece has a magnet on its back, stick them all to a steel cookie sheet, pizza pan, or other flat metal item that will hold magnets and is more portable than the refrigerator door.

BONUS TIP: Let your kids help you with any of these steps and they won’t be able to wait until it’s all done to play with it. Now turn them loose and pretend you really don’t care if they learn what’s printed on this new magnetic educational gadget. Your kids will think they are just playing, but you’ll know they will learn from it, even if they think they are building houses or roads or flowers with the magnetic pieces. [wink]

Workshop Wednesday: What Is the Missing Element?

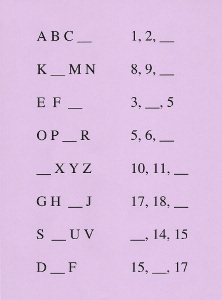
Use this worksheet as an example to make simple Missing Element worksheets for your children. No one should have to stop and sing the Alphabet Song from beginning to end, just to figure out what letter comes after P. The same concept applies to numbers and counting, just without the song. My young kids viewed little worksheets like this as a fun challenge. After a little practice, they could do these orally, asking “What letter comes after V?” any time we had a few seconds to fill: while standing in line at the store, waiting for a red light, any waiting, anywhere. It kept them mentally active, which made the waiting much more bearable for them. I used the same process for numbers, asking “What number comes after 19?” and similar questions. The worksheet itself is a visual method; the oral question and answer exercise is an auditory method.

These are good mental exercises for those students who already know letters and numbers, but who don’t automatically recognize a short segment of the longer series. This is also a good skill to build into those youngsters who are just mastering the ABC’s and counting—notice that I said mastering, not initially learning.

For those students who need a more tactile application, let them match alphabet blocks or letter tiles to the challenges on the worksheet, filling in the gap with the appropriate letter on a block or tile. Number tiles can be used to create the number challenges, using multiple tiles to produce multiple-digit numbers. Borrow letter or number tiles from games, or make your own by cutting 1-inch squares from cereal box cardboard and marking with a Sharpie on the plain side.

Be sure to allow your students plenty of free-play time with the Missing Element exercise, as they will be sure to want to challenge each other (or you) with more examples. When a child continually quizzes you for the answer, give the correct answer each time, knowing that he is learning from your consistent responses. When you are confident that he really does know the correct answer, you can give the wrong answer with a questioning tone of voice or say “Is it K?” to see if he will correct you!

For a young kinesthetic learner, spread out the letter or number series on the floor using Post-It notes or flashcards and let the child hop on each one as he reads them off and shouts out the missing element as he hops into the gap. Another method for energetic children is to have flashcards for the series in one room and extra flashcards for the missing element in another room. Challenge your little Tigger to run, hop, or somersault into the other room to search for the correct card(s) to bring back and fill in the gap in the series.

Combining all of these learning style methods will give your students practice at using more than just their preferred style of learning, which helps them gain a better understanding while also broadening their experiences. As your students get older and expand their knowledge base, you can adapt this Missing Element concept for other academic pursuits as well.

Verified by MonsterInsights