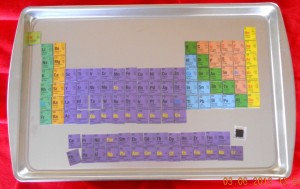
Find a placemat with educational information you’d like your students to learn: states & capitals, U.S. Presidents, whatever you can find. I’ve used both the laminated plastic placemats and the thicker, foam placemats. The former placemat in this photo was a laminated periodic table of elements, proving that educational manipulatives DO work for kids older than five. Notice the element in the lower right corner that is flipped over to show the magnet on its back. The placemat cost me about $3, which is an amazing price for educational gadgetry of this quality!
Cut the placemat apart into its various components; scissors will usually work, but you may want to use a razor-knife or X-Acto blade for accurate cuts on thicker materials. Don’t worry about leftover pieces—you can throw them away. The thicker, foam placemat pieces are good for more projects that we’ll cover in a later post (think of them as craft foam that is not subject to static electricity), so you might choose to hang onto those for a while.
Now is a good time to rid your refrigerator door of all those freebie magnets you’ve collected from the pizza guy, hairdresser, auto mechanic, insurance agent, and every politician who marched in last summer’s parades. I always accept freebie magnets when offered (regardless of political affiliations)—they are my favorite homeschool supply! Using your scissors again, cut the magnets into pieces about ½” square or whatever size will fit easily onto the back of the placemat pieces you cut in the last step.
The next step may require a trip to the scrapbooking department of whatever store is near you, unless you are already an avid scrapbooker…er, bookscrapper…uh, person who documents life events in keepsake albums with pretty papers, ribbons, and all variety of cutesy add-ons. I’m not one of them, but I do recognize the homeschooling value of all those fabulous supplies! What you need right now is a box of the adhesive squares that are used for mounting photos or other items onto scrapbook pages. Stick one of those double-stick-tape squares onto the printed side of the little magnets you just cut up, then stick the other side of the tape to the back of your placemat piece. Don’t go all perfectionist in trying to line things up, just smack it on there and move on to the next one—you’ve got a lot of these to make. When each placemat piece has a magnet on its back, stick them all to a steel cookie sheet, pizza pan, or other flat metal item that will hold magnets and is more portable than the refrigerator door.
BONUS TIP: Let your kids help you with any of these steps and they won’t be able to wait until it’s all done to play with it. Now turn them loose and pretend you really don’t care if they learn what’s printed on this new magnetic educational gadget. Your kids will think they are just playing, but you’ll know they will learn from it, even if they think they are building houses or roads or flowers with the magnetic pieces. [wink]


 Guilt-Free Homeschooling is the creation of Carolyn Morrison and her daughter, Jennifer Leonhard. After serious disappointments with public school, Carolyn spent the next 11 years homeschooling her two children, from elementary to high school graduation and college admission. Refusing to force new homeschooling families to re-invent the wheel, Carolyn and Jennifer now share their encouragement, support, tips, and tricks, filling their blog with "all the answers we were looking for as a new-to-homeschooling family" and making this website a valuable resource for parents, not just a daily journal. Guilt-Free Homeschooling -- Equipping Parents for Homeschooling Success!

What an easy, creative and fun way to learn. I am so excited to get out and buy placemats today. It is always nice to have a new manipulative to use in our homeschool classes, especially when they are this affordable.Thanks for the ideas.
Thank you very much for the ideas. God bless you for sharing great thoughts!!!
This is our first year homeschooling and I am overwhelmed by how helpful the homeschooling community is. I love the ideas on your blog. Can’t wait to make some of these place-mats! I know my girls will love this project!
Brilliant!!!
What a GREAT idea!! I have a US Presidents place mat in my gift bin that never seems to get gifted. What a great use for it!