Workshop Wednesday: Take It Outside!

Homeschooling does not have to mean exclusively house-schooling. When the weather is favorable, taking a lesson outdoors can revitalize learning, whether you take a nature walk around the neighborhood, sit on a blanket for read-aloud time, or do worksheets at the patio table.

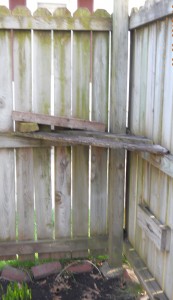
When my kids were old enough and responsible enough to complete an assignment on their own, I rewarded them with the privilege of taking a lesson away from the school table and doing it elsewhere. Sometimes they took work to their bedrooms, but one location my daughter loved was her “reading ledge.” She had asked Dad to use a couple of extra boards to build a shelf in the corner of the fence in our backyard. It’s just the right size for a child to sit and read a while, nestled into the corner, listening to the birds and squirrels and the occasional car pulling up in the neighbor’s driveway. Notice that my husband also added a slim “step” board, about halfway between the ledge and the ground, for just the right amount of a boost to climb up onto the ledge.

For a few years, we had a tree-house in another part of the yard—more of a platform up in a tree, but there were a few boards attached to the trunk for steps, and it was high enough to give a lofty view of the neighboring yards. The kids would climb up there with a book to read or a math lesson to work on, and they were transported from just another homeschool day to the Swiss Family Robinson’s island.

Even a child who is not thrilled about reading can suddenly find it an enjoyable activity when it takes place in a unique environment: inside a tent, under a shady tree, in a make-shift clubhouse in the attic of the garage, or anywhere else out of the ordinary “school” locale. Whether reading for pleasure or reading an assigned passage in a textbook, whether writing a short essay or writing out math problems, taking the lesson outdoors can free the mind to think deeper thoughts and understand greater concepts just because the realm of ideas is not limited within four walls and a solid ceiling. The sounds of birds, leaves, wind, and other ambient noises can actually stimulate more thoughts than a quiet room. Yes, sometimes those thoughts may be slightly “off topic,” but that freedom is why we chose homeschooling in the first place. And there is always the bonus of new lesson ideas that come from time spent in nature: studying the busy-ness of an anthill, learning the names of all those parts of flowers, discovering that bees won’t notice anyone watching them while they work at collecting pollen from every blossom on an apple tree, focusing the sun’s rays through a magnifying glass to burn your initials into a piece of scrap wood, and seeing who can bite into the first stalk of spring rhubarb without puckering.

Ready for some learning style applications? A kinesthetic student may be more prone to reading when his surroundings require him to balance or brace himself against the tree limbs or fence corner or while swaying a swing. A tactile child may enjoy the feel of the grass on his fingers and toes, the leaves brushing against his face or between his fingers, or feeling the smooth rocks he chose to use as a bookmark or paperweight while reading his book in the breeze.  The visual learner may appreciate reading his biology textbook in the tree-house because he can look around the neighborhood from his lofty perch and see if he can glimpse an elm, an eagle, or imagine he can see the photosynthesis of the sun on leaves as it happens.  An auditory child may find that the songs of the birds help him to concentrate on his math problems because his ears aren’t busy wondering what his siblings are up to at the moment, or that the music from the radio of the neighbor working on his car will help to remind him of the correct formula when he needs to recall it later.

Homeschooling does not have to mean exclusively house-schooling, and life does not take place between the pages of a workbook. When the weather cooperates, take your homeschooling outside and meet life face to face.
Workshop Wednesday: ABC Flashcards

Anyone want to upcycle some of that ubiquitous cardboard packaging that passes through our homes and turn it into teaching/learning tools? You’re on! Let’s make some flashcards!!

DIY flashcards from upcycled cereal boxes

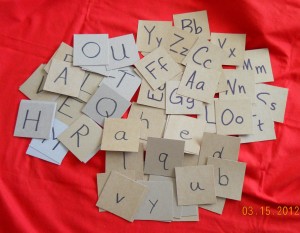
This week’s photo actually shows three related sets of alphabet flashcards that measure 3” square. Call these approximate measurements, because no one needs to waste precious time obsessing over the precision and exactness of something we’re making for free. I collected cereal boxes, brownie mix boxes, popsicle boxes, tissue boxes, pudding cup boxes, and pretty much every flavor of thin cardboard box that was large enough to cut up into something else. Confession: I made these with a paper cutter, but only because I saved up and treated myself to one. During most of our homeschooling years, I used a ruler and scissors for projects like this, and the results were just as good.

Open the boxes flat and start measuring and cutting. Again, don’t let perfectionism sidetrack you with thoughts of non-90-degree corners or less-than-perfect sides. Your students can learn from playing with these cards even after they are rescued from an eager-to-play-fetch-with-anything puppy. When you have a decent supply of cards cut from the cardboard, grab your Sharpie marker and write on the blank sides. Here we have one set with upper case letters (upper left), a set with lower case letters (lower center), and a set with both upper and lower case letters in pairs (upper right). I have also made sets with numbers 1-100, states and capitals, and many other topics that I hope to address in future Workshop Wednesday posts. (Anticipation!)

Bonus Tips:

  • I favor teaching letter recognition with upper case letters first, since reversals are less likely; then introducing the lower case letters as the “little brothers” of the capitals. Kids get it, even when the big brothers and little brothers don’t look exactly alike. Learning to group the larger and smaller letters as pairs is another method for avoiding reversals.
  • Making multiple sets of letters will allow your students to spell out vocabulary words, play word games, or leave traces of their newly-acquired knowledge all around the house as they spell out the names of every lamp, vase, and throw pillow.
  • If your students have mastered letter recognition, you can make 3×5” word cards and practice turning sounded-out words into sentences.

Learning Style Activities

Visual learners will appreciate flashcards with color, so you can either use colored markers for the main information or let your visual student draw designs on the edges and corners of the cards with colored pencils or fine-point markers to jazz up the natural gray or brown of the cardboard.

Auditory learners will love to read each letter aloud, no matter what activities or games you play with the cards. Switch things up by asking them to say the sound of the letter instead of (or in addition to) its name.

Tactile learners have already grabbed your new supply of flashcards and are spreading them out on the floor or table, rearranging the letters into words. That’s how you can confirm that you have a tactile student: their hands and fingers are into everything, learning as much as they possibly can about texture, heft, and balance. Please don’t scold them for grabbing and touching—it’s how they learn best. A tactile learner who is forced to keep his hands in his lap is like a visual learner wearing a blindfold. Seriously.

Kinesthetic learners will adore playing games with these cards, especially if you spread things out. Drop the stack of upper case letters on the floor in the living room. Drop the stack of lower case letters on the kitchen table. Now shuffle the “pairs” cards and place that stack in a neutral location somewhere between the other two piles of cards. Ask your student to look at the top card and run to find the matching letter cards from each of the other locations and bring them back. (Beginning students may need to take the pairs card with them for reference.) Grouping all three cards together will prove he brought the correct ones. Your energetic student can repeat this activity until he is worn out enough to sit down for reading time or some other lesson that requires seatwork.

Combine all learning styles into challenging activities that will help your students learn from all situations and all styles of teaching. Let your imagination run free with ideas and adaptations for your own students, living quarters, and academic needs. If the weather is agreeable, take the cards outside and combine relay races with spelling or vocabulary words. Mud puddles can’t destroy your prized set of flashcards, since replacements are easily made from the next empty box. You may soon find yourself rescuing cardboard boxes from the recycling bin and calling them your “homeschool supplies” as you think of more and more uses for homemade flashcards!

Workshop Wednesday: Dot-to-Dot Skip-Counting

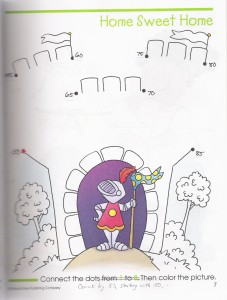
I bought a dot-to-dot coloring book, which was much harder to find than I had anticipated (this one is from School Zone Publishing). Their pictures only used numbers from 1-25, so I dug out some small white stickers, grabbed my scissors and a black fine-point Sharpie, and went to work. I cut the stickers into pieces small enough to cover the numbers on the picture and re-numbered the drawing using skip-counting. Sometimes the pictures are complicated enough that it’s important to only do one number at a time (cover previous number with a sticker, write new number on the sticker, then move on to next number), just so you don’t lose your place and mess up the whole thing. With more complex drawings, my stickers sometimes overlapped the lines of the picture, so I just re-connected those lines, drawing right across the sticker.

Click on photo for larger image.

I changed the directions at the bottom of the page to correspond to the new, improved numbering system: Count by 2’s; Count by 3’s; Count by 10’s; Count by 12’s; and so on. I made the skip-counting harder as the difficulty of the pictures progressed. To make things even more challenging, I changed some of the directions to say “Start at 3. Guess the rule?” so that the pictures didn’t always begin at 1 and the student would have to analyze the numbers to determine which one came next. I made some pictures start at 2, 3, 4, 5, 50, 55, 101, etc. and vary in increments. Some pages counted by 2’s on even numbers; some counted by 2’s on odd numbers. Some counted by 5’s, 10’s, or 100’s—a wide variety of skip-counting experiences.

Skip-counting is good practice for multiplication, and following the numbers of a dot-to-dot puzzle helps your students learn what interval comes next by connecting them in numerical order. The complexity of the numbering system quickly overtakes the simplicity of the picture, providing a worthy challenge to math students who might feel silly doing the simple dot-to-dot coloring page in its original version. Following the random order of the numbers on the page provides more interest and more challenge than if the student had just written out a skip-counting series, and the student can easily self-check his work by judging whether or not the picture has been completed correctly.

BONUS TIP: After you’ve gone to all the trouble of changing the numbers, wouldn’t it be nice to have this last longer than once-through-and-done by your little smarty-pants student? Cut the pages out of the book, slip a page into a plastic page protector, and let your child use a dry-erase marker on the plastic. Wet-erase markers (also called “transparency markers”) will work great, too, and they don’t rub off instantly whenever a stray sleeve crosses the page. A quick wipe with a wet tissue will clean up wet-erase markers and prepare the page for the next use. You could even use enough plastic page sleeves to hold all the pages from the entire coloring book and put them all into a 3-ring binder. Give your child the binder, some markers in assorted colors, and a couple of tissues, and you won’t hear from him for a very long time!

Workshop Wednesday: Placemat + Magnets = Educational FUN!

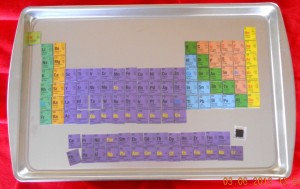
Find a placemat with educational information you’d like your students to learn: states & capitals, U.S. Presidents, whatever you can find. I’ve used both the laminated plastic placemats and the thicker, foam placemats. The former placemat in this photo was a laminated periodic table of elements, proving that educational manipulatives DO work for kids older than five. Notice the element in the lower right corner that is flipped over to show the magnet on its back. The placemat cost me about $3, which is an amazing price for educational gadgetry of this quality!

Periodic Table of Elements

Cut the placemat apart into its various components; scissors will usually work, but you may want to use a razor-knife or X-Acto blade for accurate cuts on thicker materials. Don’t worry about leftover pieces—you can throw them away. The thicker, foam placemat pieces are good for more projects that we’ll cover in a later post (think of them as craft foam that is not subject to static electricity), so you might choose to hang onto those for a while.

Now is a good time to rid your refrigerator door of all those freebie magnets you’ve collected from the pizza guy, hairdresser, auto mechanic, insurance agent, and every politician who marched in last summer’s parades. I always accept freebie magnets when offered (regardless of political affiliations)—they are my favorite homeschool supply! Using your scissors again, cut the magnets into pieces about ½” square or whatever size will fit easily onto the back of the placemat pieces you cut in the last step.

The next step may require a trip to the scrapbooking department of whatever store is near you, unless you are already an avid scrapbooker…er, bookscrapper…uh, person who documents life events in keepsake albums with pretty papers, ribbons, and all variety of cutesy add-ons. I’m not one of them, but I do recognize the homeschooling value of all those fabulous supplies! What you need right now is a box of the adhesive squares that are used for mounting photos or other items onto scrapbook pages. Stick one of those double-stick-tape squares onto the printed side of the little magnets you just cut up, then stick the other side of the tape to the back of your placemat piece. Don’t go all perfectionist in trying to line things up, just smack it on there and move on to the next one—you’ve got a lot of these to make. When each placemat piece has a magnet on its back, stick them all to a steel cookie sheet, pizza pan, or other flat metal item that will hold magnets and is more portable than the refrigerator door.

BONUS TIP: Let your kids help you with any of these steps and they won’t be able to wait until it’s all done to play with it. Now turn them loose and pretend you really don’t care if they learn what’s printed on this new magnetic educational gadget. Your kids will think they are just playing, but you’ll know they will learn from it, even if they think they are building houses or roads or flowers with the magnetic pieces. [wink]

Workshop Wednesday: What Is the Missing Element?

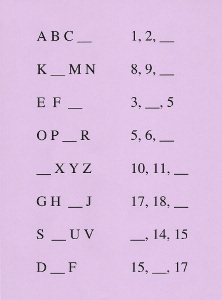
Use this worksheet as an example to make simple Missing Element worksheets for your children. No one should have to stop and sing the Alphabet Song from beginning to end, just to figure out what letter comes after P. The same concept applies to numbers and counting, just without the song. My young kids viewed little worksheets like this as a fun challenge. After a little practice, they could do these orally, asking “What letter comes after V?” any time we had a few seconds to fill: while standing in line at the store, waiting for a red light, any waiting, anywhere. It kept them mentally active, which made the waiting much more bearable for them. I used the same process for numbers, asking “What number comes after 19?” and similar questions. The worksheet itself is a visual method; the oral question and answer exercise is an auditory method.

These are good mental exercises for those students who already know letters and numbers, but who don’t automatically recognize a short segment of the longer series. This is also a good skill to build into those youngsters who are just mastering the ABC’s and counting—notice that I said mastering, not initially learning.

For those students who need a more tactile application, let them match alphabet blocks or letter tiles to the challenges on the worksheet, filling in the gap with the appropriate letter on a block or tile. Number tiles can be used to create the number challenges, using multiple tiles to produce multiple-digit numbers. Borrow letter or number tiles from games, or make your own by cutting 1-inch squares from cereal box cardboard and marking with a Sharpie on the plain side.

Be sure to allow your students plenty of free-play time with the Missing Element exercise, as they will be sure to want to challenge each other (or you) with more examples. When a child continually quizzes you for the answer, give the correct answer each time, knowing that he is learning from your consistent responses. When you are confident that he really does know the correct answer, you can give the wrong answer with a questioning tone of voice or say “Is it K?” to see if he will correct you!

For a young kinesthetic learner, spread out the letter or number series on the floor using Post-It notes or flashcards and let the child hop on each one as he reads them off and shouts out the missing element as he hops into the gap. Another method for energetic children is to have flashcards for the series in one room and extra flashcards for the missing element in another room. Challenge your little Tigger to run, hop, or somersault into the other room to search for the correct card(s) to bring back and fill in the gap in the series.

Combining all of these learning style methods will give your students practice at using more than just their preferred style of learning, which helps them gain a better understanding while also broadening their experiences. As your students get older and expand their knowledge base, you can adapt this Missing Element concept for other academic pursuits as well.

Workshop Wednesday: Dominoes Make Great Tactile “Flashcards”

Wouldn’t it be wonderful to have a single set of simple math learning aids that could help your students learn everything from basic number values to fractions, decimals, and percentages? It already exists, and you may even own a set: dominoes. Ordinary flashcards appeal to the student who learns best through visual means: seeing and reading. Saying the flashcard facts aloud will work best with the student who learns well through auditory means: hearing and saying. For the student whose fingers must connect with the lesson in a tangible way for him to truly lock the facts away in the deep recesses of his mind, dominoes make ideal flashcards!

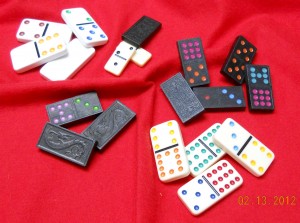
Dominoes make great tactile “flashcards”!

Dominoes are wonderfully tactile, whether they are the smooth, heavy plastic ones that look like imitation ivory or the pressed wood versions with a decorative design embossed on the back side. The dots are usually carved out, and the depressions are filled with bright colors of paint. There is also usually some physical attribute serving as a divider between the two halves of the domino, either a carved or embossed line. All of these features work together to provide textural interest to the fingers that get to hold them – much more interesting than flat, boring, cardstock flashcards. Flipping through a stack of thin cards is one thing; stacking up dominoes, as one masters the facts they represent, is quite another thing. Dominoes appeal to many senses and learning styles with their bright colors, heavy thickness, and the wonderful sound they make as they clink together.

Let’s look at the wide variety of math exercises, from beginner level to more advanced skills, that can be performed with a set of dominoes.

Number Value

Count the spots. Say the number, or write the number. Repeat as needed for practice until the student knows how many seven is and can identify a group of dots with the appropriate number. Substitute a matching number of candies, blocks, or toy cars for the dots and repeat the counting exercise until the student understands that numbers can apply to more than just small colored dots in orderly patterns. Once the student has mastered the number relating to each distinct pattern of dots, arrange the same number of objects in different patterns to show that each number can occur in various types of groupings (e.g. four objects in a straight line is still four, even though they do not form a square, as on the domino).

Smaller v. Larger

When the student understands the principle of assigning values to digits, that same student can begin to differentiate smaller groups from larger groups. Since each domino conveniently displays two number groupings, use them to practice smaller v. larger numbers: help the student decide which group of dots represents the smaller number and turn that side to be on the left, leaving the larger number group on the right side. Repeat as needed for practice until the student can tell at a glance which number is smaller and which number is larger. Practice saying the numbers and deciding which is smaller and which is larger, and then count the dots, if necessary, for confirmation.

Two-Digit Numbers

Once again, each domino represents two digits. Help the student learn to read and write the two-digit numbers shown on each domino’s face. For example, if a domino shows a two and a six, that domino may be read as 26 or as 62. Dominoes that have no dots on one side can be read as a one-digit number and a two-digit number (e.g. 3 and 30). The smaller v. larger exercise can then be repeated with these two-digit numbers.

Addition

Students can begin simple addition problems by adding the two numbers represented on a domino and then counting the total of all dots for confirmation.

Subtraction

By holding a domino vertically with the larger number on top and the smaller number on the bottom, the student can begin learning to write and perform subtraction problems. More advanced students, who have learned the concepts of positive and negative numbers, can reverse the domino, placing the smaller number on top, and proceed with the subtraction exercise.

Multiplication

Dominoes can be used as multiplication flashcards by attempting to multiply the two numbers represented. If the student is unsure of an answer, it is advisable to consult a reference chart for the correct answer, rather than merely guess. Seeing the correct answer time after time will help the student memorize it by sight, and the student will eventually trust his memory instead of taking the time to look at the chart for the answer. (A calculator may also be used to check answers, but pressing a wrong button can deceive the student into believing a wrong answer.)

Division

Holding the dominoes horizontally can represent the numbers in a division problem. The student can write those numbers down on paper to practice dividing. The beginning student should only divide small numbers into larger numbers, until his knowledge of decimals allows him to practice dividing larger numbers into smaller numbers.

Manipulatives

Turn the dominoes face-down, so the dots are not visible. Practice counting, adding, and subtracting. Subtraction is merely undoing the addition process, and this can be easily illustrated by grouping and re-grouping the dominoes. Arrange groups of dominoes into rows to illustrate multiplication facts, and discuss how dividing is just undoing multiplication, but sometimes with leftovers called “the remainder.”

Fractions: Proper & Improper, Simplifying

Holding a domino vertically, the two numbers can represent the numerator (top) and denominator (bottom) of a fraction. Proper fractions always have the larger number in the denominator, while improper fractions always have the larger number in the numerator and can be simplified into a mixed number fraction. When reading the domino as a fraction, the student can decide if the fraction can be simplified and what that new fraction should be. Advanced students may select two dominoes and attempt to add them together as fractions, converting them to common denominators as needed. Subtraction, multiplying, and dividing fractions may also be practiced by selecting random dominoes to use as the fractions in each problem. Students should always be encouraged to write math problems in a notebook — when needed for reference, the student can easily look back at his previous work to see how he solved similar problems.

Fraction, Decimal, & Percentage Equivalents

Students with a working knowledge of fractions may move on to the decimal equivalents of fractions. Percentages are another form of fractions. Fraction, decimal, percentage, and ratio can all be thought of as “nicknames” for equivalent amounts. Arranging face-down dominoes to illustrate the problem, writing out the problems, and drawing diagrams will all help the students understand how the amounts are equivalent. Then the student may wish to use face-up dominoes as flashcards again, using the two numbers shown as a fraction and determining the decimal and percentage equivalents.

Perimeter, Area, & Volume

Using the dominoes face-up, a student can build “fences” to illustrate perimeter, or the distance around the outside of a specific shape. Count only the edges of each domino, and count each half of the long sides as a separate unit: a domino at a corner would count as 3 units: one for the short end on one side of the corner, and two along the long side of the domino on the other side of the corner. Filling in that shape solidly with “floor tiles” relates to the concept of area. Again, count each half of a domino (each separate section of dots) as one “floor tile.” Stacking multiple layers of dominoes can illustrate the 3-dimensional concept of volume. For example, an area represented by two rows of three dominoes each will contain six dominoes. Stack up several identical layers to show that each layer contains six dominoes. Multiply the area of six times the number of layers to determine the total number of dominoes used.

Play Domino Games

What better way to show that math is valuable in everyday life than to play a game of dominoes? Advanced players might enjoy the competitive element of keeping score, but those playing just for the fun of the game can proceed more quickly by simply playing their dominoes on the matching numbers and moving on to the next turn. There are a variety of domino games, so expand your knowledge base and learn several.

Line Dominoes Up on Edge for Physical Science Domino Effect

No one should go through life without lining up dominoes in curvy lines or intricate patterns and then gently pushing over the first one in line to watch all the others tumble in turn. Setting up the dominoes on end is good for honing the fine motor skills of small hand muscles — great care must be used to ensure that the dominoes don’t fall too early! Repeat as often as possible and search You-Tube for massive domino displays to enjoy!

Verified by MonsterInsights