Do you have a child who needs to see things for himself in order to understand lesson concepts? Have you used math manipulative blocks but he’s still just not quite getting it? Here’s a unique idea for a powerful math tool that you can make yourself from simple graph paper. By making a special measuring tape that exactly corresponds to the size of whatever math manipulatives you use, your students will have a customized tactile and visual learning aid.
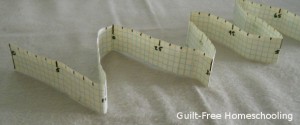
Cut 1 or 2 sheets of graph paper into 1-inch wide strips and tape them together for the length you desire (make sure that no strips end in a partial square). Graph paper marked with five squares per inch (available in office supply stores) is compatible with the centimeter-scale Cuisenaire Rods that we used: 2 graph-squares = 1 centimeter, so marking numbers on every other line produces a centimeter measuring tape. (Yes, centimeter graph paper would have been easier to use, but I couldn’t find any in my area — so I improvised!)
To illustrate skip-counting by 2′s, accordion-fold the tape on every other number, and then say (auditory) the number for each fold-increment. Adapt and repeat for other skip-counting intervals. (The measuring tape in the photo only has numbers at intervals of 5, but feel free to write on as many numbers as your children need.)
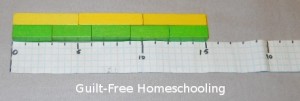
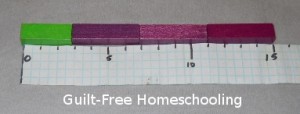
Your students can lay Cuisenaire Rods on the tape to demonstrate addition & subtraction facts. Arranging different length rods to equal the same total (1+5, 2+4, 3+3, etc.) helps them see by yet another method that different numbers can add up to the same total. The measuring tape becomes a learning aid for memorizing facts as your kids line up blocks or rods on it and see the resulting numbers.
Repeat the same process for multiplication & division facts: 3×5, 5×3 — both measure to 15.
This method can also help students understand uneven division problems. For 15 divided by 4, start placing 4-rods at the 15 and filling in backwards toward 0, but fill in the gap with a “remainder” rod, in this case a 3-rod fits as the remainder.
We used this measuring tape by itself to illustrate multiplication and division facts by accordion-folding the paper tape into 6 sections of 8 centimeters to show 6 x 8 = 48 and other facts. My origami-loving son really enjoyed this foldable number line, and he would take a few seconds during a math problem to fold it back and forth, just to be certain of his answers.
The measuring tape can also be used as your kids run around the house, measuring everything in sight (kinesthetic) for practice at measuring and estimating how large certain objects will be, according to the scale used by your math manipulatives. For instance, my sofa may be 86″ long, but measuring it with a centimeter scale makes it 215 centimeters. My kids liked the challenge of guessing how many centimeters first, then measuring an object to confirm the answer. This is also a great way to compare inches and centimeters, and they can use a ruler, yardstick, or measuring tape in inches to confirm their answers.
If you use another form of math manipulatives other than Cuisenaire Rods, you can adapt the size of the measuring intervals on this homemade tape to coordinate with your own manipulatives. Graph paper with 4 squares per inch (1/4″ squares) can be marked for 1/2″, 3/4″, or 1-inch manipulatives. Remember the sofa we talked about above? It would be almost 115 connecting cubes long, when measured according to a scale for these 3/4″ cubes.
P.S. — We stored our measuring tape neatly by folding it up and using a large paper clip to hold it in place. ;-)


 Guilt-Free Homeschooling is the creation of Carolyn Morrison and her daughter, Jennifer Leonhard. After serious disappointments with public school, Carolyn spent the next 11 years homeschooling her two children, from elementary to high school graduation and college admission. Refusing to force new homeschooling families to re-invent the wheel, Carolyn and Jennifer now share their encouragement, support, tips, and tricks, filling their blog with "all the answers we were looking for as a new-to-homeschooling family" and making this website a valuable resource for parents, not just a daily journal. Guilt-Free Homeschooling -- Equipping Parents for Homeschooling Success!

Speak Your Mind