Do grammar lessons rank among the favorite subjects at your house? Would you like to make sure they do? Would you also like to incorporate other learning style methods into a subject that typically requires only the visual skill of reading?
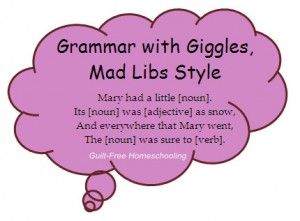
Mad Libs are part party game and part puzzle book. They remove key words from nursery rhymes, letters, and simple stories, and replace those words with blanks marked with the appropriate part of speech that is needed to fill in the gap. The fun comes from asking your audience for the random words first, and then reading them the completed story, using their suggested words in place of the expected ones: (adj.) Phony Miss Muffet sat on a (noun) frog, eating her (noun) henhouse and (noun) giraffe. Most kids will be begging for more at this point! Reading the sentences aloud and hearing the crazy wording are both auditory components, and the sillier these sentences come out, the more likely your students are to remember them! “Phony Miss Muffet” may even become a permanent addition to your family’s vocabulary.
I was introduced to Mad Libs back in my elementary school years, along about the time my classmates and I were learning the difference between adjectives and adverbs. Someone in my family brought home a Mad Libs book, and the next thing I remember is that we were all holding our sides, laughing until we couldn’t breathe, and the tears were running down our cheeks. We had to take turns reading the completed Mad Libs stories, because the last person to read one could no longer speak from prolonged laughter. Anything capable of producing that much hilarity is guaranteed to stick in my mind, and I very quickly learned that adjectives tell what kind and adverbs tell how or when. Years later, I used the Mad Libs process to help my own kids learn parts of speech, and they had just as much fun with it as I did.
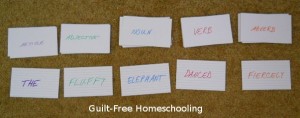
Go grab some index cards and some colored markers, and let’s get ready to add some giggles to those grammar lessons. Take turns around the family circle choosing the words, and write one word per card, nice and large. If you already use a color code for parts of speech (great visual method), continue it in this activity, writing nouns in color #1, verbs in color #2, adjectives in color #3, adverbs in color #4, and so on. Write NOUN on the back of all the noun cards, ADVERB on the back of all the adverb cards — you get the idea. Make as many of each kind as you’d like, but keep each kind in its own stack (you’ll see why in a minute). Be sure to include articles, conjunctions, proper nouns, pronouns, and prepositions, but keep the cards and markers handy so your students can add more words whenever they want to. As your students’ grammar knowledge increases, they can add more complex parts of speech: for example, linking verbs and participles. But I’m getting ahead of myself…
To play, I mean learn, shuffle each individual stack of cards and place them upside-down, so the parts of speech (on the back) are plainly visible, and select an appropriately ordered group of cards (without peeking at the words on the face of each one) and lay them out in the order of a sentence, such as article, adjective, noun, verb, adverb. Now turn them over one at a time to watch your silly sentence take shape: The fluffy elephant danced fiercely. It will probably only take one or two rounds of this for your kids to begin thinking up more words to add! Let them make new cards to change the existing sentence, or shuffle those cards back into the stacks and start over with a new sentence combination. All the shuffling and dealing of cards are good tactile methods to keep the hands and fingers involved in the lesson. As a bonus lesson, have your students copy each silly sentence into their notebooks, underlining the words with colored pencils, if desired, to reinforce the color code for the parts of speech.
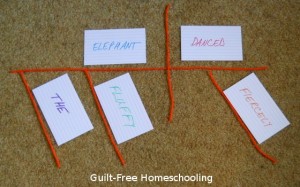
Diagramming sentences is also a valuable skill for learning grammar, and the cards can be rearranged into the proper diagram, using yarn, string, or ribbon to form the diagram lines. Spreading all the cards out into long sentences or large diagrams on the floor or table brings a kinesthetic component to normally visual-only grammar lessons. Be sure your students copy each diagram into their notebooks, too — those notes become valuable reference material for future lessons, uniting the visual skill of reading with all the other learning skills used in the same lesson.
As their grammar knowledge grows, your students can add multiple modifiers, use conjunctions to create compound subjects and verbs, expand into direct and indirect objects, plop down some prepositional phrases, and giggle their way through learning to diagram introductory adverb clauses!
BONUS TIP:
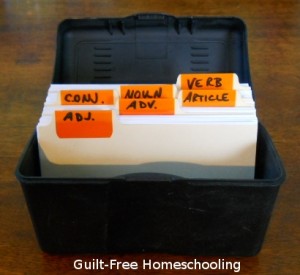
Once you have made a few dozen word cards, a handy way to store them is in an index card file box. Add a set of divider cards marked for the parts of speech, and choose a student to become the Official Keeper of the Parts of Speech for the day, so he can sort them into the right categories to put them away again for next time. He’ll get the bonus activity of learning to recognize the parts of speech, and he’ll never realize that this fun activity is a great lesson in itself! (You’ll want to keep these word cards, because we’ll use them in more great grammar ideas coming soon!)
You can use the links below to find Mad Libs products or to play Mad Libs online. (No, I’m not getting a commission from this, I just love the product!)
It’s a Mad Libs World
Mad Libs
WordLibs Mad Libs Online game
See also:
Teaching Spelling (and Grammar) Through Reading and Listening
How Did You Learn to Write?

 Guilt-Free Homeschooling is the creation of Carolyn Morrison and her daughter, Jennifer Leonhard. After serious disappointments with public school, Carolyn spent the next 11 years homeschooling her two children, from elementary to high school graduation and college admission. Refusing to force new homeschooling families to re-invent the wheel, Carolyn and Jennifer now share their encouragement, support, tips, and tricks, filling their blog with "all the answers we were looking for as a new-to-homeschooling family" and making this website a valuable resource for parents, not just a daily journal. Guilt-Free Homeschooling -- Equipping Parents for Homeschooling Success!

Yes! We use Mad Libs all the time in our quest for knowledge. They are so much fun and, I’ll be honest, they were how I learned the parts of speech when I was a child. Why is homeschool awesome? Well, you don’t get to spend entire grammar lessons playing Mad Libs at traditional school, now do you? Thanks for the great article!
I love this idea! Mad Libs is my favorite way to practice grammar with my girls (they’re in 2nd grade) so we’ll DEFINITELY have to try this! Thanks. :-)