Do you need a new idea for keeping the kiddies occupied indoors when it’s too hot to play outside? Are you looking for a “down time” activity? Have you had it with the constant noise of TV and kids and more TV? Here is something that will occupy their minds as well as their hands, stir their imaginations, and give your ears a few moments of blissful solace: a box of felt pieces.
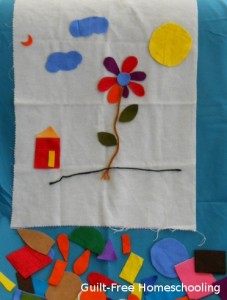
This was a favorite activity for my tactile child. It makes a great “lap toy” for quiet time. I started with some leftover pieces of craft felt, cutting them into geometric shapes and random shapes. A piece of flannel fabric (approx. 18″ x 24″) served as a background and could be spread over a sofa cushion, the carpeted floor, or a bed pillow, then folded up easily to fit into the storage box when playtime was done. [Hint: cut up an old flannel shirt, nightgown, or pillow case.] I used felt in bright colors, pastels, neutral colors, and black and white for squares, rectangles, triangles, circles, and ovals in a wide range of sizes. [Note: thin sheets of craft foam can be used, but the foam pieces tend to jump or cling from static electricity, and they lack the softer flexibility of the felt cloth.] The child makes “pictures” and patterns with the felt shapes on the flannel, stacking or layering pieces as desired. Smoothing the pieces in place provides an important tactile connection for a touch-feely child.
It works best to keep the smallest pieces larger than a coin — anything smaller will be difficult to cut. The largest pieces do not need to be bigger than your hand, since larger pieces will be more difficult to store flat. (An older child may enjoy cutting the pieces for younger siblings to play with, but remember the size limitations.) If you are feeling especially creative, add some half-circles, crescents, teardrop/petal shapes, stylized leaf shapes, and a few 4″-10″ strands of yarn (useful for flower stems, kite strings, and other necessary lines). Pinking shears can add variety to some pieces, but will be difficult to use on smaller pieces; the shears must also be quite sharp to produce a good zigzag edge. (Optional: applying iron-on interfacing will stiffen the felt, making cutting easier and the pieces more durable.)
Remember that this project will be a plaything, so your shapes do not have to be exactly measured or accurately cut. Keep it simple: free-hand cutting is adequate. Circles do not have to be perfectly round, and squares, rectangles, and triangles do not need perfectly straight sides or precise corners. Your child’s imagination will be broadened through playing with the felt shapes, and imagination is a great substitute for precision.
Quick trick for cutting triangles: cut squares or rectangles in two diagonally.
Quick trick for cutting petal shapes: cut a rectangle in two diagonally, making two long triangles, and round off the short end opposite the long pointy tip, producing the stylized silhouette of a single-scoop ice cream cone.
Quick trick for cutting leaves: round opposite corners of a square or rectangle, leaving the uncut corners as the pointy ends of the leaf.
Don’t feel that you need to make shapes that look like real objects. Your child’s imagination will take over, transforming those simple rectangles, circles, and triangles into wonderful things. A child who has always relied on printed coloring pages for “art class” may need some time and a little help to activate his imagination, stop depending on literal representations, and begin developing creative thinking skills.
Store the pieces as flat as possible in a box large enough to make clean-up easy for the child, and a container with a tight-fitting or locking lid will prevent accidental spillage. Any pieces that are wrinkled or folded when put away will be wrinkled and folded at the next playtime, so try to smooth each piece out as flat as possible. (The tactile child will actually enjoy this step.) Badly wrinkled pieces can easily be ironed flat again.
A solid felt board or “flannel-graph” can be made by covering heavy cardboard or a bulletin board with a large piece of felt or flannel fabric. The board requires more storage space than just a loose piece of cloth, but the board can be useful for illustrating lesson concepts to more than one child at a time by propping it up where all can see it at once. A small strip of felt on the back of paper pictures will make them cling to the fuzzy board — the entire back surface of the picture does not need to be covered. Sandpaper can also be used as a backing by cutting thin strips of fine sandpaper (1/2″ wide by 1″ or 2″ long) and gluing the strips to the backs of cardstock pictures or word/number cards. Large cards may need wider or larger pieces of rougher sandpaper to help support their weight. All sorts of visual aids for lessons can be used with flannel boards. Christian bookstores usually carry Sunday School lesson materials for felt boards, including great pictures of Bible heroes or generic pictures of children and families.
Ideas for Lessons:
Sorting — Can you sort pieces by color? By shape? By size?
Counting — How many of each color/shape/size?
Matching — Can you find a piece that is the same color/shape/size as this one?
Patterns — Circle, circle, square… can you make a pattern that matches this one?
Sequencing — Red, red, blue, red, red… what comes next?
Explaining Processes (using flannel-graph letters or cards)– To make the word kitty work for two kitties, we change this y to an i and add es.
Phonics & Spelling — C-a-t, b-a-t, r-a-t… can you make more words that end with -at?
Reading — Put these word cards together to make a sentence.
Fractions — Is this rectangle divided into halves or fourths? (Use several squares in the same size to form rectangles.)
Arithmetic — How many ways can you group these pieces? (Use matching sizes & shapes to teach addition, subtraction, multiplication, division, perimeter, and area. Ratios and percentages can be illustrated with a mix of colors, sizes, or shapes: 3 red squares and 1 blue square = 3/4 red and 1/4 blue, or 75% red and 25% blue.)
Felt shapes and felt-backed pictures can be used for just about anything you can think of. Let your creativity take over as you adapt the felt pieces and pictures to whatever lesson you are working on, and watch more applications come to mind the longer you use them. Whether you use this as an educational tool or a quiet-time toy, the learning possibilities will be unlimited!


 Guilt-Free Homeschooling is the creation of Carolyn Morrison and her daughter, Jennifer Leonhard. After serious disappointments with public school, Carolyn spent the next 11 years homeschooling her two children, from elementary to high school graduation and college admission. Refusing to force new homeschooling families to re-invent the wheel, Carolyn and Jennifer now share their encouragement, support, tips, and tricks, filling their blog with "all the answers we were looking for as a new-to-homeschooling family" and making this website a valuable resource for parents, not just a daily journal. Guilt-Free Homeschooling -- Equipping Parents for Homeschooling Success!

this is a really good idea – and cheap! My son will love this. I have started homeschooling him kindergarten this year, and I am enjoying reading through your posts.