Workshop Wednesday: Dot-to-Dot Skip-Counting

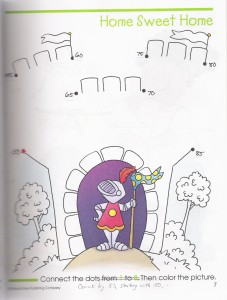
I bought a dot-to-dot coloring book, which was much harder to find than I had anticipated (this one is from School Zone Publishing). Their pictures only used numbers from 1-25, so I dug out some small white stickers, grabbed my scissors and a black fine-point Sharpie, and went to work. I cut the stickers into pieces small enough to cover the numbers on the picture and re-numbered the drawing using skip-counting. Sometimes the pictures are complicated enough that it’s important to only do one number at a time (cover previous number with a sticker, write new number on the sticker, then move on to next number), just so you don’t lose your place and mess up the whole thing. With more complex drawings, my stickers sometimes overlapped the lines of the picture, so I just re-connected those lines, drawing right across the sticker.

Click on photo for larger image.

I changed the directions at the bottom of the page to correspond to the new, improved numbering system: Count by 2’s; Count by 3’s; Count by 10’s; Count by 12’s; and so on. I made the skip-counting harder as the difficulty of the pictures progressed. To make things even more challenging, I changed some of the directions to say “Start at 3. Guess the rule?” so that the pictures didn’t always begin at 1 and the student would have to analyze the numbers to determine which one came next. I made some pictures start at 2, 3, 4, 5, 50, 55, 101, etc. and vary in increments. Some pages counted by 2’s on even numbers; some counted by 2’s on odd numbers. Some counted by 5’s, 10’s, or 100’s—a wide variety of skip-counting experiences.

Skip-counting is good practice for multiplication, and following the numbers of a dot-to-dot puzzle helps your students learn what interval comes next by connecting them in numerical order. The complexity of the numbering system quickly overtakes the simplicity of the picture, providing a worthy challenge to math students who might feel silly doing the simple dot-to-dot coloring page in its original version. Following the random order of the numbers on the page provides more interest and more challenge than if the student had just written out a skip-counting series, and the student can easily self-check his work by judging whether or not the picture has been completed correctly.

BONUS TIP: After you’ve gone to all the trouble of changing the numbers, wouldn’t it be nice to have this last longer than once-through-and-done by your little smarty-pants student? Cut the pages out of the book, slip a page into a plastic page protector, and let your child use a dry-erase marker on the plastic. Wet-erase markers (also called “transparency markers”) will work great, too, and they don’t rub off instantly whenever a stray sleeve crosses the page. A quick wipe with a wet tissue will clean up wet-erase markers and prepare the page for the next use. You could even use enough plastic page sleeves to hold all the pages from the entire coloring book and put them all into a 3-ring binder. Give your child the binder, some markers in assorted colors, and a couple of tissues, and you won’t hear from him for a very long time!
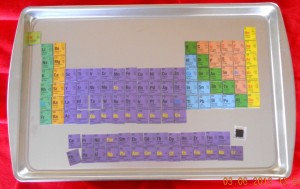
Workshop Wednesday: Placemat + Magnets = Educational FUN!

Find a placemat with educational information you’d like your students to learn: states & capitals, U.S. Presidents, whatever you can find. I’ve used both the laminated plastic placemats and the thicker, foam placemats. The former placemat in this photo was a laminated periodic table of elements, proving that educational manipulatives DO work for kids older than five. Notice the element in the lower right corner that is flipped over to show the magnet on its back. The placemat cost me about $3, which is an amazing price for educational gadgetry of this quality!

Periodic Table of Elements

Cut the placemat apart into its various components; scissors will usually work, but you may want to use a razor-knife or X-Acto blade for accurate cuts on thicker materials. Don’t worry about leftover pieces—you can throw them away. The thicker, foam placemat pieces are good for more projects that we’ll cover in a later post (think of them as craft foam that is not subject to static electricity), so you might choose to hang onto those for a while.

Now is a good time to rid your refrigerator door of all those freebie magnets you’ve collected from the pizza guy, hairdresser, auto mechanic, insurance agent, and every politician who marched in last summer’s parades. I always accept freebie magnets when offered (regardless of political affiliations)—they are my favorite homeschool supply! Using your scissors again, cut the magnets into pieces about ½” square or whatever size will fit easily onto the back of the placemat pieces you cut in the last step.

The next step may require a trip to the scrapbooking department of whatever store is near you, unless you are already an avid scrapbooker…er, bookscrapper…uh, person who documents life events in keepsake albums with pretty papers, ribbons, and all variety of cutesy add-ons. I’m not one of them, but I do recognize the homeschooling value of all those fabulous supplies! What you need right now is a box of the adhesive squares that are used for mounting photos or other items onto scrapbook pages. Stick one of those double-stick-tape squares onto the printed side of the little magnets you just cut up, then stick the other side of the tape to the back of your placemat piece. Don’t go all perfectionist in trying to line things up, just smack it on there and move on to the next one—you’ve got a lot of these to make. When each placemat piece has a magnet on its back, stick them all to a steel cookie sheet, pizza pan, or other flat metal item that will hold magnets and is more portable than the refrigerator door.

BONUS TIP: Let your kids help you with any of these steps and they won’t be able to wait until it’s all done to play with it. Now turn them loose and pretend you really don’t care if they learn what’s printed on this new magnetic educational gadget. Your kids will think they are just playing, but you’ll know they will learn from it, even if they think they are building houses or roads or flowers with the magnetic pieces. [wink]

Workshop Wednesday: What Is the Missing Element?

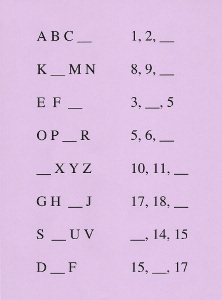
Use this worksheet as an example to make simple Missing Element worksheets for your children. No one should have to stop and sing the Alphabet Song from beginning to end, just to figure out what letter comes after P. The same concept applies to numbers and counting, just without the song. My young kids viewed little worksheets like this as a fun challenge. After a little practice, they could do these orally, asking “What letter comes after V?” any time we had a few seconds to fill: while standing in line at the store, waiting for a red light, any waiting, anywhere. It kept them mentally active, which made the waiting much more bearable for them. I used the same process for numbers, asking “What number comes after 19?” and similar questions. The worksheet itself is a visual method; the oral question and answer exercise is an auditory method.

These are good mental exercises for those students who already know letters and numbers, but who don’t automatically recognize a short segment of the longer series. This is also a good skill to build into those youngsters who are just mastering the ABC’s and counting—notice that I said mastering, not initially learning.

For those students who need a more tactile application, let them match alphabet blocks or letter tiles to the challenges on the worksheet, filling in the gap with the appropriate letter on a block or tile. Number tiles can be used to create the number challenges, using multiple tiles to produce multiple-digit numbers. Borrow letter or number tiles from games, or make your own by cutting 1-inch squares from cereal box cardboard and marking with a Sharpie on the plain side.

Be sure to allow your students plenty of free-play time with the Missing Element exercise, as they will be sure to want to challenge each other (or you) with more examples. When a child continually quizzes you for the answer, give the correct answer each time, knowing that he is learning from your consistent responses. When you are confident that he really does know the correct answer, you can give the wrong answer with a questioning tone of voice or say “Is it K?” to see if he will correct you!

For a young kinesthetic learner, spread out the letter or number series on the floor using Post-It notes or flashcards and let the child hop on each one as he reads them off and shouts out the missing element as he hops into the gap. Another method for energetic children is to have flashcards for the series in one room and extra flashcards for the missing element in another room. Challenge your little Tigger to run, hop, or somersault into the other room to search for the correct card(s) to bring back and fill in the gap in the series.

Combining all of these learning style methods will give your students practice at using more than just their preferred style of learning, which helps them gain a better understanding while also broadening their experiences. As your students get older and expand their knowledge base, you can adapt this Missing Element concept for other academic pursuits as well.

Workshop Wednesday: Dominoes Make Great Tactile “Flashcards”

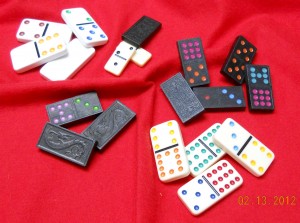
Wouldn’t it be wonderful to have a single set of simple math learning aids that could help your students learn everything from basic number values to fractions, decimals, and percentages? It already exists, and you may even own a set: dominoes. Ordinary flashcards appeal to the student who learns best through visual means: seeing and reading. Saying the flashcard facts aloud will work best with the student who learns well through auditory means: hearing and saying. For the student whose fingers must connect with the lesson in a tangible way for him to truly lock the facts away in the deep recesses of his mind, dominoes make ideal flashcards!

Dominoes make great tactile “flashcards”!

Dominoes are wonderfully tactile, whether they are the smooth, heavy plastic ones that look like imitation ivory or the pressed wood versions with a decorative design embossed on the back side. The dots are usually carved out, and the depressions are filled with bright colors of paint. There is also usually some physical attribute serving as a divider between the two halves of the domino, either a carved or embossed line. All of these features work together to provide textural interest to the fingers that get to hold them – much more interesting than flat, boring, cardstock flashcards. Flipping through a stack of thin cards is one thing; stacking up dominoes, as one masters the facts they represent, is quite another thing. Dominoes appeal to many senses and learning styles with their bright colors, heavy thickness, and the wonderful sound they make as they clink together.

Let’s look at the wide variety of math exercises, from beginner level to more advanced skills, that can be performed with a set of dominoes.

Number Value

Count the spots. Say the number, or write the number. Repeat as needed for practice until the student knows how many seven is and can identify a group of dots with the appropriate number. Substitute a matching number of candies, blocks, or toy cars for the dots and repeat the counting exercise until the student understands that numbers can apply to more than just small colored dots in orderly patterns. Once the student has mastered the number relating to each distinct pattern of dots, arrange the same number of objects in different patterns to show that each number can occur in various types of groupings (e.g. four objects in a straight line is still four, even though they do not form a square, as on the domino).

Smaller v. Larger

When the student understands the principle of assigning values to digits, that same student can begin to differentiate smaller groups from larger groups. Since each domino conveniently displays two number groupings, use them to practice smaller v. larger numbers: help the student decide which group of dots represents the smaller number and turn that side to be on the left, leaving the larger number group on the right side. Repeat as needed for practice until the student can tell at a glance which number is smaller and which number is larger. Practice saying the numbers and deciding which is smaller and which is larger, and then count the dots, if necessary, for confirmation.

Two-Digit Numbers

Once again, each domino represents two digits. Help the student learn to read and write the two-digit numbers shown on each domino’s face. For example, if a domino shows a two and a six, that domino may be read as 26 or as 62. Dominoes that have no dots on one side can be read as a one-digit number and a two-digit number (e.g. 3 and 30). The smaller v. larger exercise can then be repeated with these two-digit numbers.

Addition

Students can begin simple addition problems by adding the two numbers represented on a domino and then counting the total of all dots for confirmation.

Subtraction

By holding a domino vertically with the larger number on top and the smaller number on the bottom, the student can begin learning to write and perform subtraction problems. More advanced students, who have learned the concepts of positive and negative numbers, can reverse the domino, placing the smaller number on top, and proceed with the subtraction exercise.

Multiplication

Dominoes can be used as multiplication flashcards by attempting to multiply the two numbers represented. If the student is unsure of an answer, it is advisable to consult a reference chart for the correct answer, rather than merely guess. Seeing the correct answer time after time will help the student memorize it by sight, and the student will eventually trust his memory instead of taking the time to look at the chart for the answer. (A calculator may also be used to check answers, but pressing a wrong button can deceive the student into believing a wrong answer.)

Division

Holding the dominoes horizontally can represent the numbers in a division problem. The student can write those numbers down on paper to practice dividing. The beginning student should only divide small numbers into larger numbers, until his knowledge of decimals allows him to practice dividing larger numbers into smaller numbers.

Manipulatives

Turn the dominoes face-down, so the dots are not visible. Practice counting, adding, and subtracting. Subtraction is merely undoing the addition process, and this can be easily illustrated by grouping and re-grouping the dominoes. Arrange groups of dominoes into rows to illustrate multiplication facts, and discuss how dividing is just undoing multiplication, but sometimes with leftovers called “the remainder.”

Fractions: Proper & Improper, Simplifying

Holding a domino vertically, the two numbers can represent the numerator (top) and denominator (bottom) of a fraction. Proper fractions always have the larger number in the denominator, while improper fractions always have the larger number in the numerator and can be simplified into a mixed number fraction. When reading the domino as a fraction, the student can decide if the fraction can be simplified and what that new fraction should be. Advanced students may select two dominoes and attempt to add them together as fractions, converting them to common denominators as needed. Subtraction, multiplying, and dividing fractions may also be practiced by selecting random dominoes to use as the fractions in each problem. Students should always be encouraged to write math problems in a notebook — when needed for reference, the student can easily look back at his previous work to see how he solved similar problems.

Fraction, Decimal, & Percentage Equivalents

Students with a working knowledge of fractions may move on to the decimal equivalents of fractions. Percentages are another form of fractions. Fraction, decimal, percentage, and ratio can all be thought of as “nicknames” for equivalent amounts. Arranging face-down dominoes to illustrate the problem, writing out the problems, and drawing diagrams will all help the students understand how the amounts are equivalent. Then the student may wish to use face-up dominoes as flashcards again, using the two numbers shown as a fraction and determining the decimal and percentage equivalents.

Perimeter, Area, & Volume

Using the dominoes face-up, a student can build “fences” to illustrate perimeter, or the distance around the outside of a specific shape. Count only the edges of each domino, and count each half of the long sides as a separate unit: a domino at a corner would count as 3 units: one for the short end on one side of the corner, and two along the long side of the domino on the other side of the corner. Filling in that shape solidly with “floor tiles” relates to the concept of area. Again, count each half of a domino (each separate section of dots) as one “floor tile.” Stacking multiple layers of dominoes can illustrate the 3-dimensional concept of volume. For example, an area represented by two rows of three dominoes each will contain six dominoes. Stack up several identical layers to show that each layer contains six dominoes. Multiply the area of six times the number of layers to determine the total number of dominoes used.

Play Domino Games

What better way to show that math is valuable in everyday life than to play a game of dominoes? Advanced players might enjoy the competitive element of keeping score, but those playing just for the fun of the game can proceed more quickly by simply playing their dominoes on the matching numbers and moving on to the next turn. There are a variety of domino games, so expand your knowledge base and learn several.

Line Dominoes Up on Edge for Physical Science Domino Effect

No one should go through life without lining up dominoes in curvy lines or intricate patterns and then gently pushing over the first one in line to watch all the others tumble in turn. Setting up the dominoes on end is good for honing the fine motor skills of small hand muscles — great care must be used to ensure that the dominoes don’t fall too early! Repeat as often as possible and search You-Tube for massive domino displays to enjoy!

Bringing GFHS Tips to a Screen Near You!

Carolyn & Jen are working on some new ways to bring their popular workshop tips right to your own internet-surfing device! Have you discovered Pinterest yet? Well, we have! Visit Carolyn’s Pinterest page or Jennifer’s Pinterest page for fabulous tips and ideas you can use in your homeschool. Be sure to click FOLLOW to keep up with all our latest pins.

Have you discovered Etsy? Well, we’re there, too! Our Etsy shop is one you’ll want to visit often as we offer items from our Conference Vendor Booth.  “ScarletTreasures” is our shop’s rather cryptic name (long story), but you can mark it as a FAVORITE to always be able to find it easily.

Carolyn frequently posts teaching tips on her Facebook page, Guilt-Free Homeschooling, so submit your friend request to keep up on those, too! Carolyn also Tweets from guiltfreehsing, and she’ll be attempting to tie all these social media links together without getting tangled up.

We will soon be starting some “Workshop Wednesdays,” blogging the teaching tips and learning methods that have kept our conference attendees coming back for more, workshop after workshop, year after year. We are constantly coming up with new ideas and new ways to apply old ideas to make your job easier, help you teach your children more efficiently, and help your children understand more fully. Stop by all of our sites, browse through our offerings, and say Hi! We always enjoy making new friends and visiting with familiar faces!!

Top 10 Things I Wish I’d Known When I Began Homeschooling

Whether you are beginning homeschooling after removing your children from an institutional school or are starting by simply not sending your little ones to preschool or Kindergarten, I can offer you some valuable been-there-done-that advice. File this under “If we’d only known…”

10.       The “classroom model” is counter-productive to learning.
Seating students in tidy rows of individual desks is only beneficial if the teacher needs to maintain control over a crowd of students by herself. Ditto for periodic testing. Double ditto for asking permission to speak or to use the bathroom. Let them do science in the backyard; let them draw while lying on the floor; let them read in the treehouse; let them compare prices and quantities as math while grocery shopping. Demanding attention, waiting for silence in the room, waiting for all eyes forward, waiting in line—all are dehumanizing tactics meant for crowd control or to break the spirit of the individuals. These methods are used with new recruits in the military—and in prison. Exploration is the birthplace of genius, but when was the last time anyone turned loose a classroom full of students to randomly discover their hidden genius?

9.         Schedules are made for faculties, not families.
Who in their right mind would put constraints on learning? What parent would tell their child “No, I’m sorry, Sweetie, but I can’t let you learn any more today”? Schools insist that learning must take place between the hours of 8:30 a.m. and 3:30 p.m. on Monday through Friday, September through May—and then they are disappointed that the students’ skills diminish over summer break. Homeschooling parents can sneak in “stealth” lessons on trees or flowers or bugs during a family picnic. Homeschoolers can browse an antique store during a weekend outing and turn it into an impromptu history lesson. Homeschooling students can help Dad change the oil or re-grout the bathtub or trim an elderly neighbor’s bushes… and get credit for learning valuable lessons at the same time. Learning opportunities abound every moment and every day. Never stop learning, and never stop looking for the “teachable moments.”

8.         Reading and lecturing alone are insufficient teaching methods.
Textbook directions and diagrams only went so far in helping my kids learn. I soon found myself drawing different diagrams (if only bigger or more colorful), explaining concepts in multiple ways, or using borrowed game pieces as manipulatives to illustrate concepts. We did lessons outdoors; we did lessons on the floor; we used board games as lessons; we used videos as lessons. We acted things out; we made up rhymes; we used sign language to help us remember things. We added bright colors; we built models; we made flashcards; we invented games to help in practicing new skills. I had my kids teach difficult concepts back to me to be sure they understood them correctly. We used every possible method we could think of for illustrating and demonstrating lessons—and it worked. It worked very well.

7.         Every homeschool is different. Don’t let anyone convince you otherwise.
Each family will need to use the methods and materials that fit their own children’s needs. It’s supposed to work that way; it has to work that way; that is why we are homeschooling in the first place. It is beneficial to share with others what has or has not worked and why, but each family needs to run that input through their own filter. Trying to mimic what others have done is a trap destined for failure. Borrow their idea, if you really like it, but adapt it to your own family’s tastes. If it works well, continue to adapt it and keep changing it as your needs change. If it doesn’t work well, either make enough changes that it will work or toss it back and try something else. You have your own preferences, you have your own values—build your homeschool around those, and ignore the Homeschooling Joneses. Two (or more) families can use identical materials, but still use enough variations in supplemental activities that their lessons will look nothing alike.

6.         Students need academic success to build their self-confidence.
I didn’t realize that my (former public school) kids would need to see that they were capable of learning on their own… without the collective input of two dozen other kids backing them up. They needed to learn that they could move on to the next concept as soon as they had mastered this one. They also needed to learn that I would not push them to move on until they had mastered each concept, whereas classrooms move on with as little as one correct answer and, at most, one-third of the room understanding. Most of our first year of homeschooling was spent in learning how to learn and learning that they could learn. Once they had acquired confidence in their own abilities, things progressed much more quickly and much more smoothly.

5.         The price of the materials has nothing to do with the amount of knowledge your students will gain.
We found used materials at book swaps and garage sales. We used hand-me-down materials from relatives and found great learning games and toys at thrift stores and flea markets. We made our own cheap versions of fancy educational gadgets from cereal boxes and tape and glue. I even made up my own lessons when I couldn’t find suitable materials to purchase. Purchases of popular, highly recommended, expensive materials often turned out not to be a good fit for us. We often learned more from the inexpensive items than we did from the pricey ones. Shiny boxes and high price tags do not automatically equal success.

4.         Fit the materials to your students’ preferences and expectations.
My daughter’s former school did not have enough books, and they treated workbooks like textbooks, requiring every student to copy lessons into personal notebooks. One thing my daughter reallyreallyreally wanted from homeschooling was to have her very own personal workbooks that she could write in and decorate with gold star stickers. Done: I ordered a workbook. One thing my daughter reallyreallyreally didn’t ever want to see again was a red pencil mark on her papers. Done: I used bright orange and lime green and sky blue colored pencils to correct her work. Problems solved. Focus on the learning.

Find out what your kids expect homeschooling to be like. Find out what they do want and what they don’t want. Ditto for yourself and your spouse. Homeschooling should not be about one parent’s dream to play school with desks in a row and maps on the walls (although desks and maps are wonderful learning tools, they should not be the primary focus); homeschooling should be a learning adventure for the whole family. It’s okay to keep some parts of the school model, if what your family really wants and needs is that consistency. It’s okay to scrap all preconceived ideas and start over from scratch, if what your family really wants and needs is an Opposite Day educational experience. It’s also okay to use this method for this student and that method for that student, if that is what they really want and need.

3.         Finding gaps in foundational skills is proof of academic success. (just fix ’em before moving on)
I was under the mistaken assumption that I could just begin teaching where the school had left off. I was also naive enough to think that the public school teachers had made sure my kids had understood everything… correctly. I was wrong on both counts. We had been homeschooling for only a few weeks when we hit our first educational pothole. The math book expected my child to work with fractions, and my child was horribly confused about fractions and what to do with them. I ordered some workbooks that focused solely on fraction math and put the regular math lessons on hold until my child was confident in handling fraction problems. These workbooks made fractions very simple to understand, but my child became incredibly angry and frustrated—but not at learning fractions—she understood those concepts very quickly, once they were explained adequately. Her anger and frustration came from seeing how simple fractions were to understand and remembering how difficult and complicated her teachers had told her fractions were.

We found materials to fill in each gap of missing knowledge, and then we moved on. Regular lessons in any given subject were suspended until that particular pothole was filled (the time varied from minutes to days to weeks), but once we could resume the lessons, the progress always came faster. We found numerous potholes during that first year, but by the end of that year, my children were learning with confidence and gaining ground rapidly. Every pothole proved to us that we were learning—if we hadn’t been making progress, we would never have discovered the potholes.

2.         Play is learning, and learning should be fun.
Children work diligently at playing, whether they are building sand castles, playing dress-up, or roller-blading on the driveway. Kids wear themselves out having fun, and they learn important lessons from their playtime. They learn that moist sand packs best; they learn that long skirts and high heels don’t combine well with stairs; they learn that balance is very important in skating as well as in life.

Do you remember being eager to get your driver’s license? Do you ever hate waiting for a new movie to come out after you’ve seen the trailer for it? Have you ever called a friend to tell them all about your latest accomplishment? That is the excitement of learning!

What you do in your leisure time is your version of fun, whether that means reading a book or watching TV or painting your toenails or fishing for The Big One. If it wasn’t fun, you would do something else with your leisure time. Now look at what your children do during their leisure time—and find a way to incorporate those methods into their lessons for some really motivated learners.

1.         Mom = Teacher = Mom (or Dad)
The first time Mom answers her student’s question, a miraculous transformation takes place: the student realizes that Mom knows stuff. Each answered question builds that reputation, and answering “I don’t know, but let’s try to find out together” increases the thirst for knowledge.

Parents have a unique advantage over traditional classroom teachers, in that parents can admit they don’t know all the answers. Homeschooling parents can use a bunny-trail question as the next teachable moment without disrupting an entire room full of students or getting hopelessly off a pre-set schedule.

Parents have a dynamic relationship with their children that allows snuggling during particularly difficult lessons. Learning to read is a magical milestone that should be celebrated with hugs and kisses and shouting and dancing, not relegated to the far corner of the room and conducted in hushed voices. Parents know instinctively when their child can be encouraged to try one more time and when that same child will benefit most from taking a break. Parents see their children day and night, weekday and weekend, season after season, year after year, on good days and bad days, in sickness and in health. Parents know what their children want and what their children need—and they will move heaven and earth to provide for them

Teachers are motivated by a paycheck and a sense of duty; parents are motivated by love. When a random child acts out in a classroom, the teacher seeks to make the disruption stop, even to the point of removing that child; when a parent’s own child acts out at home, the parent seeks to determine the cause of the problem and remove the problem, not remove the child. No one can know any given child to a greater degree than that child’s parent, no one will love a child more than that child’s parent, and no one can be a better teacher for a child than that child’s parent.


As homeschoolers, the most important thing to focus on is learning. If something is getting in the way of the learning, it becomes a stumbling block and is probably not all that important. Do things in a different order, try another method, or set that material aside for a time and see what happens. Homeschooling should be about learning, not about following in someone else’s precisely spaced footsteps. We made the most significant progress when we focused on what we were learning and stopped worrying about how we were learning it. Focus on the learning, and watch it happen!

GFHS at Chicago Homeschool Expo, Aug 5-6

Carolyn & Jen will be speaking at the Chicago Homeschool Expo, August 5-6! If you’ve been to a Guilt-Free Homeschooling workshop before, we know you’ll love these new topics. If you haven’t attended one of our workshops before, you are in for a treat!

Our workshops at the 2011 Expo:
*Teaching the Unteachables: Tactile & Kinesthetic Learners
*Who Wrote This “Rule Book,” and Why Do I Think I Need to Follow It?
*Simplified Planning & Record-Keeping for Hopelessly Disorganized Homeschoolers
*Using Learning Styles to Develop Excellent Study Skills
*Preschool Is Not Brain Surgery
*Conquering the Tricky Transition from Public School to Homeschool
*Overcoming Your Biggest Fears in Teaching: Math, Science, & Spelling

These workshops are jam-packed with solid, practical information you can put to use immediately. Come prepared to take notes, because you’ll want to remember everything!

Look for the Guilt-Free Homeschooling booth in the Vendor Hall. Our books will be available, including a brand new book, The GFHS Solar System Learning Lab. We will also have a w-i-d-e variety of teaching & learning aids, manipulatives for all ages, and fabulous one-of-a-kind products that can’t be found anywhere else. We specialize in matching manipulatives to learning styles, and we have our new line of Learning Labs to help you teach a variety of subjects (we have restocked after nearly selling out in Chicago this Spring!). If you have wiggly-can’t-sit-still students or can’t-keep-their-hands-still students, you need to see our Learning Labs! The GFHS staff love to meet our fans — tell us if you’ve read our blog!

Verified by MonsterInsights